Business Application Designer : Getting Started
Contents Hide
The necessity for business data to be available regardless of location over the past few years have led organisations to look towards mobile applications to provide this convenient access to back-end system data. However not every organisation is readily prepared to design, develop and deploy their desired mobile applications without having some programming experience.
BrightBuilder's Business Application Designer provides a simple, streamlined approach to creating and deploying mobile applications, putting the user workflow and application logic ahead of the need for any programming experience. Using this development tool, user screens may easily edited and laid out, with the context used to navigate between forms easily specified. In addition to this, synchronisation logic to send records to BrightServer is all handled within the same project, allowing quicker development and simpler rollouts of the application to end users.
These definitions may then be uploaded to BrightServer instances, which may be downloaded by devices running BrightForms when they connect to these server instances. The Business Application Designer essentially provides a new, high level view of mobile application development, utilising the already powerful BrightXpress platform and development suite.
This section contains an introduction to using the Business Application Designer and modes in BrightBuilder. It describes the designer's BXP projects, underlying concepts, specific functions, and interfaces.
Project Overview
Application logic created by the Business Application Designer are stored in BrightBuilder's BXP project files. This project type contains both application logic and server-side configuration logic for BrightServer to run when the device synchronises to the server.
New BXP projects may be created by tapping the 'New Project' button in either BrightBuilder's toolbar or the Projects panel. A wizard will appear, which may be followed to create a new BXP project. When completed, the project will appear in the projects panel.
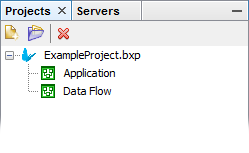
Expanding the project will reveal two nodes - the Application node and the Data Flow node.
The Application element is used to define the application that will be executed on mobile devices. This element may be used to lay out a set of building blocks called Form Dialogs, defining the forms of the application. The navigation and flow of the application between these dialogs may then be established via Form Links, which specify the direction and how the change in form dialogs occurs via the form link's action.
The Data Flow element details the flow of data between client devices and backend server systems. Client Tables which are used or imported into the application will appear in the editor. Data Accessors may then be placed in the editor and specified as data sources or destinations for synchronisation.
Double clicking either of these nodes will open them for editing. These editors will be further detailed in this topic, which also contains links to their respective sections in the Business Application Designer documentation.
Project Properties and Actions
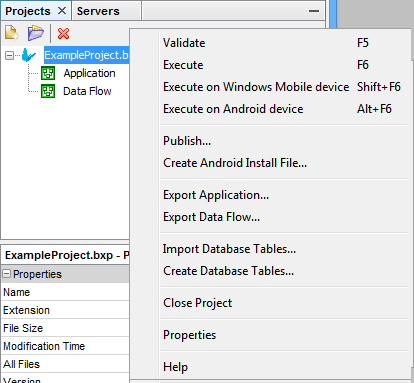
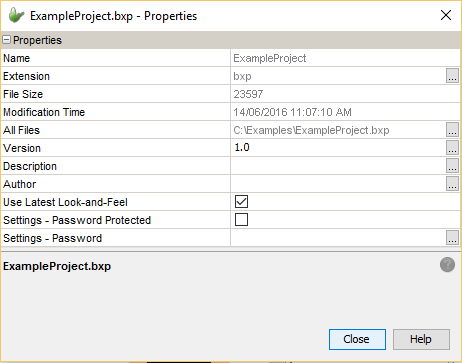
In addition to these nodes, the project node itself has a set of properties which may be accessed either by right clicking on the node and selecting the 'Properties' option, or selecting the project with the Properties panel open. The properties listed are a subset of a BSP's (BrightForms Project's) properties. The project node also contains a range of context menu actions, also common with BSP projects. For more information, please refer to the Projects chapter of BrightBuilder.
BXP project specific options are as follows :
'Publish ...' : This option is used to upload a complete application to BrightServer. For more information, please refer to the Publishing Projects to BrightServer section of this topic.
'Create Android Install File ...' : This option is used to create white labelled (branded) Android application packages (APKs) by packaging . For more information, please refer to the Creating White Labelled Android Install Packages chapter.
'Export Application ...' : This option allows the user to create a BSP project from the BXP project. After having created the base BSP project, advanced programming techniques and methods can be employed to implement features and functionality that may not be available through BXP projects. This is a one way process. That is, the changed BSP project cannot be imported back into the BXP project.
'Export Data Flow ...' : This option is similar to exporting the application logic to a BSP project by using the above option. This option allows the creation of a BEP project from the BXP project. The purpose is again to allow the advanced configuration, programming techniques and methods to implement features and functionality that may not be available through BXP projects. Note that the changed BEP projects cannot be imported back into the BXP project.
Application Panel
BXP projects will contain two elements, one of which being the Application element that contains the definition of the mobile application. This element is the Application Panel which can be opened by double clicking the element under the project tree. The Application Panel is used to define the application (form dialogs) and the data flow within the application (form links) in a visual representation that is easy to understand and maintain.

Through the Application Panel, the mobile application can be visually laid out as it provides a new graphical representation of mobile applications that allow for better understanding of how the application will operate when run.
The top toolbar within the panel displays the form dialog types available to be used within the application. Form dialogs are the building blocks of the application that define a high level form. Form dialogs nodes can be added to the application by clicking on and dragging the form dialog icons into the application canvas where each node represents a unique instance of the form dialog.
These dialogs can be connected through form links. These form links specify the flow of the application by showing the dialogs that can be opened from specific dialogs within the application. Form links may be created in the application panel by holding the 'Ctrl' button, then left-clicking and dragging the mouse between the parent and child dialogs. This will establish the form link between the dialogs, represented by a directional arrow showing the child dialog (node with arrowhead pointing towards it) that is to be opened by its parent dialog. The actions to be performed to open another dialog is also shown on the directional arrow. By double clicking on the middle rectangle box that appears on the arrow, the action in the parent dialog that will open the child dialog can be set.
For more information about the application panel, please refer to the Application Panel chapter.
Data Flow
Along with the Application element, BXP projects also contain a Data Flow element. This element may be edited through the Data Flow panel, which defines the data flow between different sync points (i.e. the data flow between data sources and destinations) for the project. Sync points can be back-end information systems such as databases and client tables found on devices in the field. These points can be defined and laid out graphically to provide a new representation of data flow. By providing this kind of interface and representation of data flow, it can easily be understood and created without the need of any server side programming. The data flow element essentially simplifies server configuration by supplying mechanisms to add client table nodes that represent tables on the devices out on the field and data accessor nodes that represent our data sources and destinations of data for use when synchronisation is carried out. The data flow element is integral in the use of synchronisation as they dictate the source and destinations of data between client and server when synchronisation is executed on the device. Essentially data flows shows where data will be sent or received when synchronisation is performed in the application. When the application requires synchronisation of data between clients and servers, a data flow should be laid out in the data flow element.
Data flow is represented by directional links between client tables nodes and data accessor nodes. Client Tables nodes are sync points that represent a client database table on the mobile devices. These are the tables that will be synchronised when the synchronisation engine is executed with a sync request defined in sync dialogs. While Data Accessors are the sync points that can be accessed from the server. They represent data source and destinations to and from the data will be sent and/or received. A data accessor can be either a database or a file which defines a single file for reading or writing server data. Links are to be made between these nodes to show the direction data is sent. If the application requires data from a server side source, then a data flow should be created between the client table node and the data accessor node where the direction of the link is from data accessor node to client table node. Data flow links are created by simply holding the 'Ctrl' button and dragging the mouse from one sync point (the source) to another (the destination) in the Data Flow panel.
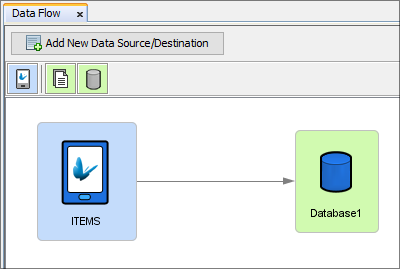
From the above data flow, records created in the client table 'ITEMS' on mobile devices will be sent to the 'Database1' database defined by the data accessor node. The records on the device will be sent when the device synchronises to the server via sync requests in the Sync Dialog.
More information about the data flow element can be found under the Data Flow chapter.
Form Dialogs
Through the application panel, the application can be built through Form Dialogs. Each form dialog provides simple and common functionality that is commonly required in mobile applications such as displaying a list of data or editing a record in a table. A BXP application can be made from the following dialogs:
 Login Dialog
: Provides a form where users
need to login with a valid user name and password before proceeding.
The values used to authenticate the user name and password may
be specified through this dialog.
Login Dialog
: Provides a form where users
need to login with a valid user name and password before proceeding.
The values used to authenticate the user name and password may
be specified through this dialog. Menu Dialog
: A form with buttons as menu
items to represent a menu of options to users. These menu items
will be links to other form dialogs.
Menu Dialog
: A form with buttons as menu
items to represent a menu of options to users. These menu items
will be links to other form dialogs. List Dialog
: Displays items (records)
from a specified data table within the project. This dialog also
provides the ability to search for specific items to display a
subset of records.
List Dialog
: Displays items (records)
from a specified data table within the project. This dialog also
provides the ability to search for specific items to display a
subset of records. Edit Dialog
: Facilitates manipulation
of items (records) in tables in the client database. These dialogs
can be used to add a new item, modify existing items and/or view
records in the data table.
Edit Dialog
: Facilitates manipulation
of items (records) in tables in the client database. These dialogs
can be used to add a new item, modify existing items and/or view
records in the data table. Settings
Dialog : A form dialog with
the purpose of holding the settings of the application. Here,
users can edit and change these settings which will persist in
BrightForms.
Settings
Dialog : A form dialog with
the purpose of holding the settings of the application. Here,
users can edit and change these settings which will persist in
BrightForms. Sync Dialog
: Sync dialogs can be used
to facilitate the synchronisation of data between devices and
servers. The user can choose the sync requests to enable and execute
those requests through this dialog.
Sync Dialog
: Sync dialogs can be used
to facilitate the synchronisation of data between devices and
servers. The user can choose the sync requests to enable and execute
those requests through this dialog. Dropbox Dialog : Dropbox dialogs can be used to facilitate
the data exchange of data between devices and Dropbox files. The
user can choose the Dropbox transfers to enable and execute those
requests through this dialog.
Dropbox Dialog : Dropbox dialogs can be used to facilitate
the data exchange of data between devices and Dropbox files. The
user can choose the Dropbox transfers to enable and execute those
requests through this dialog.
Form Dialogs can be added to the application by dragging and dropping them in the Application Panel. By double clicking the form dialog with the application panel, the specific form dialog editor will open allowing for functionality and properties of the form dialog to be edited.
For more information on Form Dialogs refer to the Form Dialogs chapter.
Form Links
The flow of the application and how navigation within the application will occur is specified through Form Links. Form Links are used to direct the application from one form dialog to another. They specify what form dialogs will open other dialogs defined with the application and by what action. In order to create a form link, an action is needed, to indicate what needs to be performed in the parent dialog for the child dialog to open.
Form Links can be created by first holding the 'Ctrl'
button and left-clicking the
parent dialog component. Dragging the mouse to the child form will
then connect the two dialogs through the displayed arrow. The action
which the form link will take is displayed on the link's label, and
is initially empty when the link is initially created. By double clicking
 , the action
editor window will appear allowing you to set the action for
the form link.
, the action
editor window will appear allowing you to set the action for
the form link.
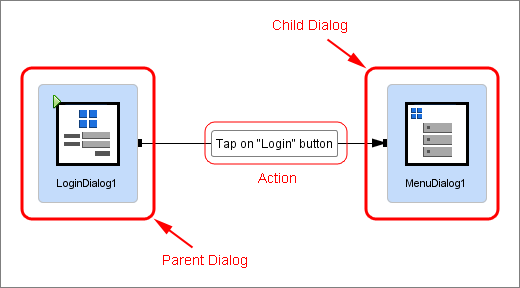
From the form link shown above, we see the parent dialog component (LoginDialog1) will open its child dialog component (MenuDialog1) when the 'Add' button with the parent dialog component is pressed. Multiple form links can be specified between two form dialogs.
For more information on Form Links refer to the Form Links chapter.
Publishing Projects to BrightServer
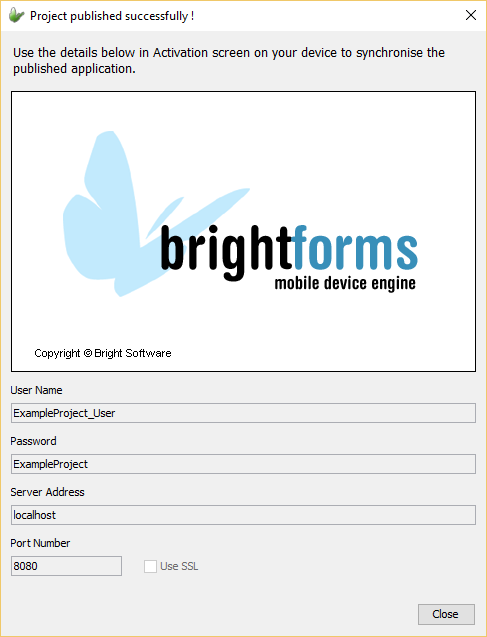
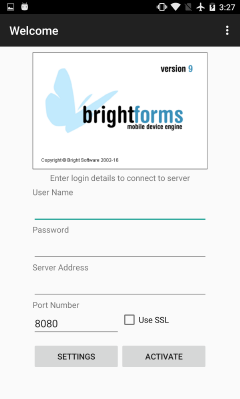
Projects developed using the Business Application Designer can be easily published onto BrightServer instances. By connecting to these BrightServer instances with BrightForms, published applications can be downloaded and executed on mobile devices. BrightServer is a lightweight server side solution that can be used for publishing and distribution of the latest published mobile applications and business data on mobile devices. Deployment of application has become even simplified without the need to register users on the server side. Through the BXP Designer and BrightServer, user accounts and deployment of applications is bundled together through one simple button click.
Uploading solutions created by the Business Application Designer is performed via the 'Publish ...' option in the BXP project's context menu. This action is used in place of the traditional deployment options for other BrightBuilder projects, and will deploy the Application and Data Flow to a BrightServer instance. In addition to this, a User account will be created (or updated) on the server, whose details may be used in BrightForms to activate the application.
 Only
projects which are completely valid may be published to BrightServer.
For more information on validation in the Business Application
Designer, please refer to the Project
Validation chapter.
Only
projects which are completely valid may be published to BrightServer.
For more information on validation in the Business Application
Designer, please refer to the Project
Validation chapter.
For more information, please refer to the Publishing Applications chapter of the Business Application Designer documentation. The application may be released to additional users, by Connecting to the BrightServer instance and configuring users via the Users panel.