| 4. Executing applications through BrightBuilder | 6. Setting up a BSP project to display records in a table |
In this series of tutorials, you will learn how to create a BSP project that allows users to enter and save data into a local database stored on the client.
We will now create a table which will contain names (‘NAME’) indexed by the primary key (‘ID’). The table will be used to store data locally on a device.
Create a blank BSP project. (Tutorial 2.1 – Create a BSP Project)
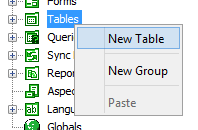
In the project tree, right click on the Tables subtree. And press ‘New Table’ in the popup menu. This will create and open a table.
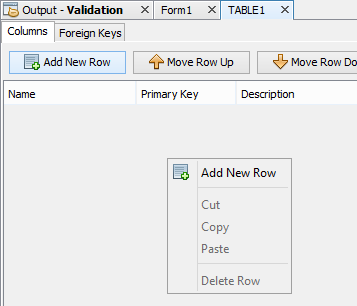
Now add 2 columns. To add columns, we can either:
Use ‘Add New Row’ button in the Columns tab
Or right-click the table editor window in the Columns tab and select ‘Add New Row’ from the popup menu
Change the names of these columns to ‘ID’ and ‘NAME’ and set the ‘ID’ column as the primary key of the table by ticking the ‘Primary Key’ column (Untick Allow nulls for the ID row).
Now click on your table definition under the Tables subtree. Right-click the table definition and press ‘Properties’.
Depending on what functionality you desire, untick ‘Auto Delete Records’. This property will delete the records on the client after they have successfully synced and been sent to the server. In this tutorial series we do not want this functionality.
You have created a table definition which will be used to store data locally on a device. In the next tutorial we will use auto forms to create a form and query.
In this tutorial, we will see how a table can be used to create a form with a label and edit control for each column. This new form will be used to input a new row into the table we defined in tutorial 5.1. Using auto form will also create a query that will be used to define a subset of data. This query will have multiple uses such as setting the records we see in a listview and specifying the data to be sent to a server. More on this in later tutorials.
Right-click the table we want to base the form from and click ‘Auto Form…’
The Auto Form Wizard will open.
Enter the name of the form
into the 3rd field and press
‘Next >’.
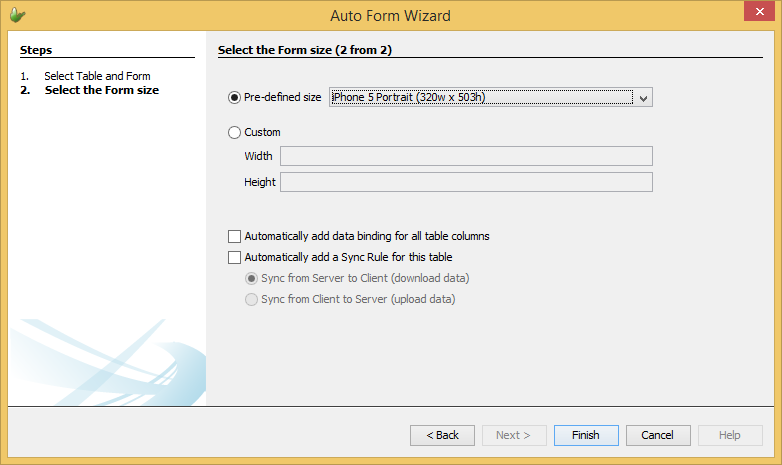
We’ll set the size of the form either using Pre-defined sizes or entering our own custom size. This dialog also optionally allows users to add data binding for each table columns and/or automatically add a sync rule for the table. Sync Rules will be explained further later in this tutorial. For now, leave both these options unchecked. Set the size to ‘iPhone 5 Portrait’ and press ‘Finish’.
This will create a new form, with a label and edit control for each column. We will use these edit control fields to allow users to input data to be entered into the table.
It will also automatically create a query that queries the table the auto form was based on (E.g. named qTABLE1_FORM1).This query will query all items in the table by default. You can change what data is queried and returned. For this tutorial, leave the query as is.
As of now the form does not have any functionality, we will set this form functionality in the next step.
Using the form we made in the previous step, we will save the data entered into the table we created in tutorial 5.1.
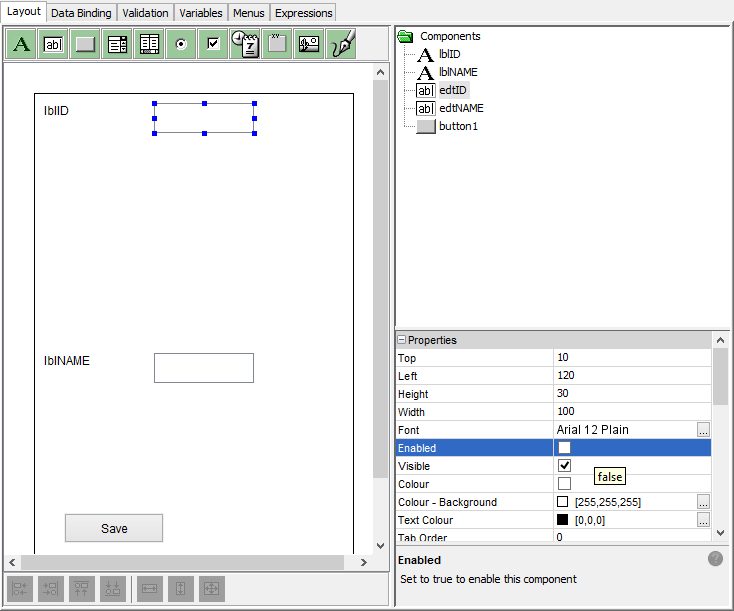
Open the form, then drag and drop a button onto the form, changing the caption property to ‘Save’.
Click the edit control for the ID column in the table. Untick the Enabled property. We are doing this to stop users from entering values into this control as we will use a random number generator to specify the primary key.
In this form we will be accepting data entered from users. To ensure data accuracy we will use validation rules to enforce data is entered correctly. Switch to the Validation tab and press ‘Add New Validation Rule’.
If the name field is empty
we want to display an error
message. Press  and
drag and drop the operands and methods into the rule.
and
drag and drop the operands and methods into the rule.
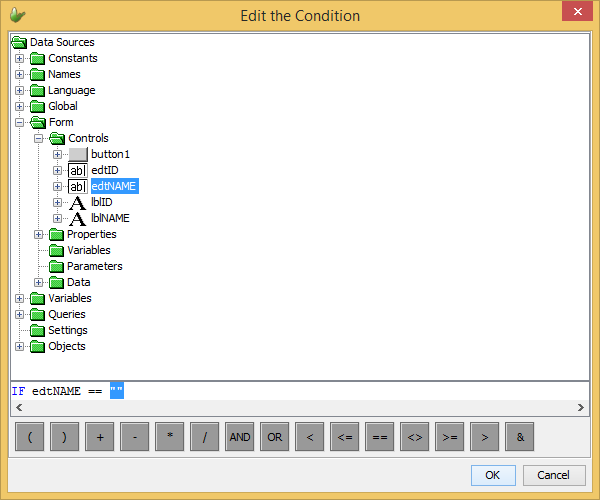
When setting the right hand side of the ‘==’ operator, initially it will be ‘???’. Double click this and simply leave the ‘Enter Value’ empty. This will compare the edit control with an empty string.
When the end user tries to save a row into the table and the name field is empty, saving will not commence and will display an ‘Invalid Input’ dialog, with the message included in this table.

Now how do we save data? Switch to the Expressions tab. Create a new expression by clicking the tab (if not already open), then typing a new expression name (E.g. save_click) and clicking ‘Create’.
We need to generate a primary key; this can be done by using the NumberGenerator.UniqueNumber() method, and storing it in a local variable to use. To create this local variable, expand the ‘Variables’ subtree and double click the item in the tree, to name a new variable. Drag and drop this variable into the expression.
Using the local variable and methods found in ‘Objects>Database’ and ‘Objects>NumberGenerator’ in the data source tree, drag and drop methods and operands to replicate the code below.
local.primary_key = NumberGenerator.GetUniqueNumber();
Database.Reset();
Database.AddColumn("ID", local.primary_key);
Database.AddColumn("NAME", edtNAME);
Database.AddRecord("TABLE1");
Once we have saved the new record into the table, we want to close the form. Do this, by adding the method Form.Close() to the expression checking if the name field was not empty. Simply drag and drop the necessary operands (IF and <>), form controls and methods into the expression to form the below IF statement. You can also operate in text mode and simply type the text below.
IF(edtNAME <> "")
{
Form.Close();
}
Finally we need to set the button to call this expression when pressed. Do this by setting the ‘Action – Click’ property for the ‘Save’ button
This form will now save new data into the table when the button ‘Save’ is pressed. The next tutorial will show you how to open a new form.
In this tutorial we will teach you how to open a new form from a form. When opening forms from a form, they establish a parent-child relationship. The parent is the form that opened the form and the child is the form that was open. It is not possible to access the parent form while the child form is open. For more information about forms, please refer to the BrightBuilder > Forms section of this document.
Create a new form with the same size as the form we created through auto form (iPhone 5 Portrait). Tutorial 2.2 – Create a form.
Add a button to the form and change its caption to ‘New’. This button will be used to open the new form when pressed.
Double-click the ‘New’ button to assign the button an action. This button will open the form we made with auto-form from tutorial 5.2. So go ahead and press ‘Open a Form’. This will open a new dialog.

In this dialog, using the combo box under ‘Open Form’ select the form we created from the table definition in tutorial 5.2 and press ‘OK’. When clicked the button will open the form.
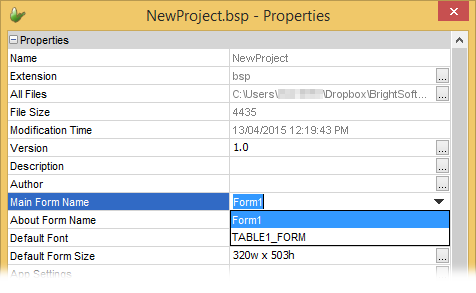
We now want to set this new form as the main form for this application. First we need the Project – Properties window. We can:
Click ‘Window>Properties’ in the main menu to make it appear
Or right-click the chosen project and click ‘Properties’
In the Project Properties window, navigate to the ‘Main Form Name’ property. Change its value to the new form we created and press ‘Close’. The application will now call the new form first when the application is run.
In the next tutorial we will use listviews to show the contents of the table.
| 4. Executing applications through BrightBuilder | 6. Setting up a BSP project to display records in a table |