Queries
Contents Hide
Queries are the primary mechanism for retrieving information from a database and consist of questions presented to the database in a predefined format. Many database management systems use the Structured Query Language (SQL) standard query format.
Queries are useful to view, change, and analyse data in different ways. They can also be used as the source of records for forms. Optionally, mathematical functions can be applied to the field values, a count or a filter applied to retrieve distinct records.
There are two kinds of queries, parameterised and non-parameterised. Parameterised queries use a variable parameter value in its condition, allowing it to change at runtime, whereas non-parameterised queries is a simple static query that returns the same records each time it is accessed.
BrightBuilder has four ways to define queries, namely:
Standard query
Advanced SQL query
Scripted Query
Online query
Stored Procedure / RPC query
Within projects, standard or advanced SQL queries may be written and utilised, providing data retrieval on local table definitions and data. This foundation allows powerful, yet simple stand-alone applications to be created, which may function independently without external data sources referenced.
On large data sets, the Online Query options allow users to view snapshots of the remote database and save them to a local file with significantly less overhead. This works in conjunction with a synchronisation from server to client. Online queries uses a different synchronisation engine to allow for a fast and ideal view of a snapshot of large server tables.
Stored procedures from the server can also be accessed by BrightBuilder to create more complex queries and operations, allowing users to retrieve large amounts of data like online queries, yet not requiring table definition or mapping within the project. All this is achieved by interfacing such server procedures as a simple query in BrightBuilder.
Query Management
Creating a New Query
To create a new query,
In the Projects Window, expand the project in which the query is to be added. The different project elements will be displayed.
Right click on the Queries subtree and select New Query from the popup menu as shown in the figure below.

The newly created query will be automatically opened in the Editor window. Another way to verify the addition of a new query is to expand the Queries subtree, a new query element will appear under the Queries subtree with default name, Query1 or Query# depending on how many queries there are in the project. Refer to the Figure below.

A new query is created as a standard query by default. As such, a blank standard query editor tab will open on creation.

Opening an existing query
Any closed queries can be opened for modification or inspection of the query properties. When a query is opened, it will open the Query Editor window.
To open a query, expand the Projects\Queries subtree and do any of the following:
Double-click on the query name, OR
Right-click on the query name and select Open from the popup menu, refer to the image below

Renaming queries
To rename a query, right click on the query that is to be renamed and select Rename from the popup menu.
A Rename input dialog box will appear, type the new query name and click OK.
It is recommended to use a naming convention that will make it easy to understand this element is a query and not a form, to do this, a Q or Query prefix to all your query names may be added.
 A valid query name begins with a letter and may be followed
by letters, digits, and the underscore sign ( _ ), and must
not contain more than 64 characters. Using spaces or special
characters like asterisk (*) is not allowed and will be rejected
during the renaming process.
A valid query name begins with a letter and may be followed
by letters, digits, and the underscore sign ( _ ), and must
not contain more than 64 characters. Using spaces or special
characters like asterisk (*) is not allowed and will be rejected
during the renaming process.
Query Properties
Queries have additional properties that defines the query for the data model. These properties include:
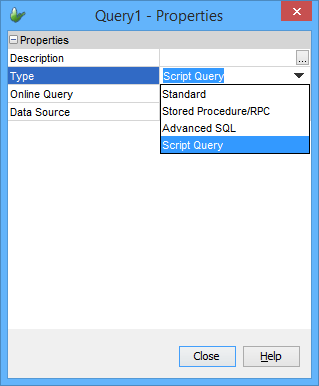
Type specify the type of query to be defined in the editor window. The various types of queries available will be detailed within in this chapter
Online Query set to true if the query is to access server records without saving the result to the local database.
Data Source manually define a data source to access for online queries if more than one is available. The list is populated with data sources discovered. If left blank, it will look up the default data source in a BrightServer instance.
An online query is represented by this icon ![]() in the Projects window. When an online query is executed in the
application, an XML file will be created in the query folder
of the BrightForms installation directory
in the Projects window. When an online query is executed in the
application, an XML file will be created in the query folder
of the BrightForms installation directory

To view or change these settings, either right click on the corresponding query object to bring up the pop-up menu and select the Properties option, or click on the corresponding query object in the project tree.
Deleting a query
When deleting any project elements, remember that the project in itself must be expanded to view all the project elements in it.
Expand the Queries subtree in the Projects window.
Right-click on the the query that is to be deleted.
Select Delete from the pop-up menu.
Click Yes to confirm deletion of the query.
Exporting query definition to a file
Using the Export As Text option from the query popup menu, the query definition can be saved to a file and used to create your BrightIntegrator configuration files. The exported query definition will be saved as an xml file to your local export directory.
Standard Queries
A select query retrieves data from one or more tables and returns the result set. The query can group records, calculate sums, averages, minimum and maximum. The query can also return a count and/or distinct records.
When a new query is created, it is set as a standard query by default. Queries may also be set to standard queries via the drop down menu in the Type attribute in a Query's properties.
Selecting Parent and Child Tables
A Parent Table is the primary table used by a query. The query can access all fields of the parent table, and can also can be used to save data to these fields via query reference.
A query can combine the data contained in two relational database tables based upon a common attribute to signify a table join. To do this, select the parent table and the child tables in the table join. Child tables are the secondary tables where other related information come from. Queries can access the child table columns in the Relationships and Output Fields tab, but data cannot be written to such tables via query reference. Thus child tables are more for display purposes that can be included in a report form or in the listview.
For example, in a manufacturing company, the business may want to get a report on the SUPPLIERS who supply certain PARTS that are being used in a PROJECT. A query to find the parts supplied by a certain supplier can be created. To do this, first select the parent and child tables. The parent table can be the SUPPLIERS table, since there will need to be a condition to pick a certain supplier. The PARTS table can be the child table since only information from this table will need to be displayed as query columns.
Select the parent table
Simply choose from the tables in the Select Parent Table drop down list. In the following figure, the CUSTOMERS table was selected as the parent table and the Has Child Tables checkbox has been checked thus all the other tables are on display.

Add child tables to the query
Tick the Has Child Tables checkbox to view all other tables in the project
Select the table from the All Tables window and click on >> button to add the table in the Child Tables window
Repeat step 2 until all child tables required in the query has been added to the Child Tables window.
Remove a Child Table
Select the table from the Child Tables window and click on the << button to remove the table. A confirmation dialog box will appear as shown below.
Click YES to continue with removing the child table.

To remove all the child tables simply untick the Has Child Tables checkbox..
Removing a child table will also remove any relationships and relationship keys associated with that table. Though the Output and Order Fields will have to be manually removed.
Change Parent Tables
When changing the Parent table of the query; this will reset all the data in the query, from the Tables to the Order Fields tab of the query.
Simply select the new table from the Select Parent Table drop down list and click Yes to the confirmation dialog box that will appear as shown below,

Creating Relationships
A relationship is an association created between common fields in two tables. This is done to combine information from multiple tables. A relationship can be one to one, one to many, or many to many. A relationship exists between two tables when one or more key fields from one table are matched to one or more key fields in another table. The fields in both tables usually have the same name, data type and length. In BrightBuilder, the fields used in a relationship are called Relationship-Keys . Relationships use table joins to access data from child tables.
While relationships are useful for retrieving records,
queries with joins are not advised to be used with reading
and writing to tables, such as by modifying and deleting
records. The queries involved with these operations should
contain a single parent and no children; failure to adhere
to this convention may result in unexpected application
behaviour.
Table relationships in BrightBuilder has an (n-1) rule, where n is the number of tables in the query and (n-1) is the number of relationships required in the query.
The following image is the query Relationship tab,

Establishing a Relationship
To establish a relationship, follow these simple steps,
Define the tables that are to have a relation in the Tables tab of the query i.e. parent and child tables .
Go to the Relationship tabs, select the source table from the Source Table combo box and the destination table from the Destination Table combo box. Note that once selected, the fields in the tables will appear in the Source and Destination Columns window respectively.
Select the common fields from the Source and Destination Columns window and click the >> button to add the Relationship Keys chosen. Repeat this step until all the common fields have been added as a Relationship Key.
The relationship between the two fields will be displayed in the Relationship Keys window, while the resulting relationship between the tables will be shown in the Relationships window.
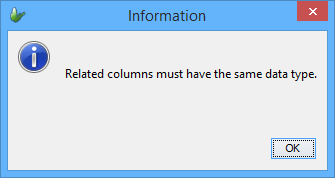
The data contained in the relationship keys column will be the link between the tables and must therefore be of the same data type. When two columns are selected as a relationship key but are not of the same type, BrightBuilder will issue a warning shown below and will disallow the inclusion of this relationship key.
Removing Relationships
When removing a relationship from the Relationships window, all the Relationship Keys will also be deleted.
To do this, select the Relationship and click the << button in the Relationships section, notice that the Relationship and Relationship Keys have been deleted.
The Relationship Keys can also be deleted one at a time by selecting the Relationship Key fields and clicking the << button in the Relationship Keys section. Repeat this step until all unnecessary Rels-keys have been deleted.
 Take note that when the last Rels-key has been deleted,
the relationship between the tables will also be deleted.
Take note that when the last Rels-key has been deleted,
the relationship between the tables will also be deleted.
Modelling Table Relationships for Synchronisation
When synchronising tables from the server to the client. It is best to make sure that the table joins have correct table relationships.
Table joins in Bright Software Mobility Suite are treated as a binary tree. The parent table is the root and the child tables are the leaves. The relationship traversal is from the parent to the child table. Only one-to-one and one-to-many relationships are supported. Many-to-many relationship must be decomposed in one-to-many relationships using a supplementary joint table.

In the illustration above, the parent table has a one-to-one relationship with the right-hand child table. The child table acts as a lookup table for the parent table. Each record in the parent table has a corresponding record in the child table and that these records are linked through a common column field in the two tables. The column involved in the relationship from the parent table does not need to be the tables primary key. In order for the one-to-one relationship to be enforced, the column involved in the relationship from the child table must be the tables primary key or a column with the unique constraint.

The most common type of relationship is the one-to-many relationship. In a one-to-many relationship, a record in the parent table can have many records in the child table, but a record in the child table has only one matching record in the parent table as shown from the illustration above. The tables are usually linked through the primary key from the parent table and the foreign key from the child table.
Specifying Query Conditions
Conditions are restrictions placed on a query to identify the specific records that are to be extracted by the query. For example, instead of displaying all the suppliers that your company uses, you can view just the suppliers from Australia. To do this, specify a condition that limits the results to records whose Country field is Australia in the SUPPLIERS table.
Complex conditions can be created with fields from the parent and child table. Each line in the condition refers to a field from the parent or child table, a comparison operator, and either a value or a parameter.
The image below displays the query Condition tab with no condition specified so far.

Inserting an Expression
To specify a condition for a field, first select the table from the Table drop down list. In the earlier example, select the CUSTOMERS table.
Select the table field from the Column drop down list and enter the expression in the Value cell for that field.
Then click on the Insert Expression button to include the expression in the Condition window, note that the structure of the condition is TableName.ColumnField = Value or TableName.ColumnField = ? if its a parameterised query.
The following image has a condition ITEMS.ITEM_ID = 1, note the change of text in the Insert Expression button.

Additional conditions can be entered for the same field or different fields. To be able to insert more expressions in the Condition window, the operator BrightBuilder will use to combine the conditions when the query is run must first be added. BrightBuilder combines expressions using either the AND or the OR operator.
Click on the Insert AND button to add an AND operator in the condition window, this will return records that meets all the criteria specified in the Condition window.
Click on the Insert OR button to add an OR operator in the query condition, this will return records that meets any of the criteria specified in the Condition window.
Expressions you inserted can also be blocked by selecting the expression line from the Condition window and clicking on the Block Expression button. Blocking expressions in BrightBuilder means grouping the expressions; this will place parentheses between the expressions and will also create expression precedence when the query is run.
A single expression or a group of expressions can be blocked. When blocking a group of expressions, it must have the correct condition format, meaning it has expressions and matching operators in between the expressions.
Follow the steps in inserting an expression in the Condition window to add more expressions to the query conditions.
To unblock an expression , select the expression inside the parentheses and click on the Unblock Expression button. The Unblock Expression button will only be enabled if an expression or a nested expression inside the parentheses was selected, and no operators are present.
Parameters can also be used in conditions ; this will in turn create a Parameterised Query. A parameterised query is one in which the expression terms are variable and can therefore be specified at run time. The power of a parameterised query is that it allows the retrieval of different result sets depending on the value of the parameter passed to it.
To add a parameter, simply select the Table and Column Name the expression will be based upon and tick the Parameterised checkbox to enable the Name and Description fields. Type an appropriate parameter name and description and click Insert Expression.

Note that the expression line format is Table.Column Name = ?, where ? is the value assigned in to the query parameter. Query parameters can be assigned through user input in the forms or through form expressions. A valid parameter name begins with a letter and may be followed by letters, digits, and the underscore sign ( _ ), and must not contain more than 64 characters.
If an invalid character is typed in the parameter name, the cell border will become red and the Insert Expression button will not be enabled until a valid name is entered.
The Value field will only allow entering of the specified
data type for the column field. When the mouse is
held over the Value field, it will display a tool-tip
of what the expected data type is. When an invalid
value is entered, the cell border will be red and
the Insert Expression button will be disabled.
In entering values for the date time format, it will accept the system date time format of the users location, for example Australian date time format is dd-MM-yy.
Table column fields can also be checked for null values by ticking the NULL checkbox and using the equal or not equal operator to compare the column values with null. The image below is a query condition that checks if the DESCRIPTION field of ITEMS table is equal to null.

Updating an Expression
To change the Column Name or Value or Parameter Name of the expression,
Highlight the expression; notice that the Insert Expression button becomes the Update Expression button.
Make the necessary changes in the Expression group box and click Update Expression.
Deleting an Expression
To delete an expression or a block of expression in the Condition window, simply select the expression and click the Delete button.
To select multiple lines of expression, whether for blocking or deleting, simply highlight the lines by selecting the first line then press SHFT+down_arrow or SHFT+mouse_click until the last line to delete or block.
Selecting Output Fields
Output Fields can be chosen from parent and child tables. In this way, the designer has complete control on what information is to be displayed for editing or viewing purposes. By default the values in the fields are used in the output. Optionally, simple mathematical functions can be applied to the field values. The following image is a screen shot of the Output Fields tab.

As shown from the Output Fields tab, all the columns from the parent and child tables are visible from the Columns window and can be included as an Output Field. Column functions, Count and Distinct records are also specified in this tab.
Column Functions
The following are several column functions that are available in BrightBuilder numeric query output fields. Numeric fields are table columns that have int and double as its data type. The column functions will not be enabled unless the column is a numeric data type.
Average - arithmetic mean of the column values.
Sum - total of all column values.
Min - the minimum value within the column values.
Max - the maximum value within the column values.
To specify a column function,
Simply select the numeric column field and tick the function to be used on that column.
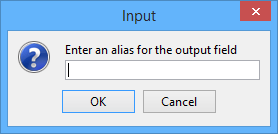
Enter an alias for this column function in the Column Alias field.
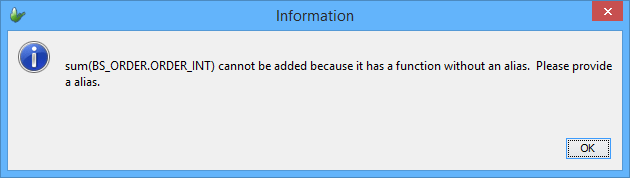
When using the Column Functions it is necessary to always provide an alias to the column name, BrightBuilder will issue the following message if no alias was provided for the column name.
Click OK to return command to BrightBuilder, the column field with the column function but no column alias will not be added to the query output fields.
Column Alias
It is possible to specify a custom name for an output column by using the Column Alias field. Aliases are used to provide more descriptive names or to shorten the column names or to avoid conflict with the same column names already included in the output fields. It does not change the name of the column, it only specifies another name that can be used to refer to the column.
To create an alias for the output column field,
Highlight the column name in the Query Table Columns window
Enter the alias in the Column Alias field.
Alias names are also subject to the object-naming rules for BrightBuilder. If an invalid alias name was entered, BrightBuilder will issue the following warning message and will discontinue addition of that column to the query output fields.

Reserved words are acceptable as aliases, though it is not recommended as reserved words may create conflicts in the SQL statements used for database creation and access. The following message will be displayed when a reserved word is used as an alias.

Simply click OK or close the dialog box to return command to BrightBuilder.
Adding the column to the Output Fields window
Once it has been determined which columns to use as
output to a query, after specifying the column functions
and the column alias, if there is any, the user can now
click on  to add the highlighted column name to the query Output
Fields window. Use
to add the highlighted column name to the query Output
Fields window. Use  to remove a column field. Use
  to add
ALL column fields of the query table to the Output Fields
window or use
to add
ALL column fields of the query table to the Output Fields
window or use  to remove ALL columns from the Output Fields window.
Including Count
Another feature of the query Output Fields tab is the ability to include a count of the query record set.
1. Tick the Include Count checkbox to invoke the following dialog box,
2. Enter the alias name for the count and click OK. Output Fields window will include an entry, COUNT(*)(<alias name>)
Returning Distinct Records
Queries can also return distinct records. Checking the Distinct Records Only checkbox does this. To understand the concept of distinct records, given the following table example below,
MOVIE_SESSION
| ID | CINEMA | MOVIE | TIME |
| 1 | Joes Cinema Complex | Casablanca | 1300-1500 |
| 2 | Joes Cinema Complex | Casablanca | 1000-1200 |
| 3 | Joes Cinema Complex | Casablanca | 1130-1330 |
| 4 | Joes Cinema Complex | West Side Story | 1030-1230 |
The MOVIE_SESSION table shown is a list of movies showing on Friday at Joes Cinema Complex.
A query to return all the movie names showing for that day, would return the following result set.
| MOVIE |
| Casablanca |
| Casablanca |
| Casablanca |
| West Side Story |
But if the Distinct Records Only feature of the query was used, the result set will be,
| MOVIE |
| Casablanca |
| West Side Story |
Moving Output columns
The order of the output columns can be changed to set the order in which the columns will be retrieved and displayed.
Simply select the Output Column fields and click Move Up to move the column up or Move Down to move it down until the output fields are in the order desired.
State Order for Output Fields
The column outputs selected from the Output Fields tab will be displayed in the Order Fields tab. The Order Fields tab is where to specify the sort mode of the records to be displayed. Records can be sorted in ascending or descending order depending on the column specified in the Order By Fields window. Columns are ordered from top to bottom.
BrightBuilder allows complex sorts, meaning it is possible to sort records in ascending order by some fields and in descending order by others.
The order in which the columns are sorted determines how the data will be organized. After the output fields have been inserted in the order fields with its corresponding sort mode, the fields can be moved to reconfigure the sort order. Simply highlight the order field and click the Move Up or Move Down to position the order fields.
To remove the order field, simply select it from
the Order By Fields window and click on the button. This
will return the column name to the Output Fields window.
To add output columns to the Order by Fields window,
Highlight the column from the Output Fields window in the Order Fields tab, shown below,

Select the sort mode from the Sort radio boxes; default value is Ascending.
Click
to add the output column to the Order By Fields window.Repeat the above steps until all the output columns required in the sort have been added.
Using the Order Fields tab of the query will not alter the physical structure of the table, it only specifies the way the records will be retrieved and displayed on a form.
Advanced SQL Queries
BrightBuilder offers a more flexible SELECT query structure to users through Advanced SQL queries. These queries may be used in a similar fashion to standard queries in BrightBuilder, accepting parameters and having records accessible through output fields. Provided the underlying database engine supports the queries, they are able to produce a more diverse range of results through more complex SQL SELECT statements and more flexibility for server data consumption, yet still able to be integrated seamlessly into the BrightBuilder querying structure.

To set a query as an Advanced SQL query, simply set it using the drop down menu located in the query’s properties panel, or properties dialog. Once set, the working space will change to display the Advanced SQL editor, which may then be used to define the query.


The SQL Editor
Developers may define the Advanced SQL query using the text editor provided in the working space. Here, the tables, relationships, conditions, outputs and ordering of the query are all specified via standard text SQL syntax, including comments via the “--” prefix on lines.
The editor also provides line and column numbers to help isolate and locate errors in the code. This is located at the bottom of the editor in the status bar.
Below is a diagram detailing these components of the Advanced SQL editor, as well as other components; the parsing button, parameter table, the outputs table and result set definition. These will be explained in the subsequent chapters.

The sections labelled are as follows:
Parse button - Used to parse the SQL statement and automatically populate the tables, parameters and output fields of the query.
Don't parse setting - Disables ability to parse, automatic population and checking of SQL on project validation - advanced users only.
SQL comment - Unparsed comment in SQL text editor field.
SQL statement - Query to be run. Non-standard SQL statements may not parse successfully, and 'do not parse' (2) may need to be used.
ResultSet name - Table which records are stored into for server-to-client transactions.
Column/Line number - Cursor position in SQL text editor field
Query tables - Table which records are retrieved when the query is called and also for client-to-server transactions.
Query parameters - Parameterised fields in the SQL statement, numbered in order of appearance.
Query output fields - Output fields of the SQL statement.
Shortcuts such as select, cut, copy, paste, undo and redo are also readily available in the editor. The commands are as follows:
| Function | Command |
| Cut | Ctrl + X |
| Copy | Ctrl + C |
| Paste | Ctrl + V |
| Undo | Ctrl + Z |
| Redo | Ctrl + Y |
Syntax Parsing
Once the statement has been defined, the parse button may be tapped to parse it for the SQL SELECT statement syntax. If there are any parameters or outputs specified in the query, they will be populated in their respective tables, provided that the statement contains simple column names, functions, and/or joins.
If a statement contains more complex structure, and cannot be parse, yet is confirmed operating on the target database/data source successfully, parsing may be bypassed via the 'Don't Parse' button.

On an unsuccessful parse, an error dialog lists the first instance of an error, and where it is located. It will also list what tokens were expected at that point to assist in rectifying the error.

A successful parse will populate the parameters and output fields columns, and display a dialog notifying the user of this state. Once an advanced SQL SELECT statement has successfully been parsed and thus has correctly identified parameters and outputs, they may be used throughout BrightBuilder, such as via expressions and control assignment.

It is highly recommended that you test and experiment with
the SELECT statements you intend to use within the database
engine beforehand to ensure that they are compatible with
the database engine. This will minimise the SQL syntax related
issues, also make sure that database engine is capable of
processing the statement.
Parameter Passing
A parameter can be specified by inserting the ‘?’ character where a value may be inputted in an SQL statement’s ‘where’ clause. Once successfully assigned on parse, they will register as Param1..n in the parameters column of the advanced SQL working space.

In the following diagram, Param1 is mapped to the first ‘?’ instance, Param2 is mapped to the second '?' instance. In this fashion, ParamN the Nth ‘?’ in all advanced SQL statements.
These parameters may be used in expressions and forms like standard query parameters – accessible in the data source tree. They may also be assigned to controls such as listviews and comboboxes, and set in the same manner general queries’ parameters can be assigned.
Output Fields
Output fields are automatically listed on a successful parse as defined by the SQL syntax. If outputs are incorrectly or insufficiently defined, they will not be listed even if the SQL syntax is correct, so it is advised to check the inputs after the select statement with the set of outputs retrieved.

If no alias is given provided, the output’s name will be <table name>.<column name> by default. Aliases which are correctly assigned to output fields appear next to their corresponding column in parenthesis (). When assigned to listviews and combo boxes etc, the columns of the records will be referenced to by this alias.

Like parameters, these output field names will also be able to be found in the Data Source Tree to be used in expressions and throughout other areas of the project.
Query Tables

This field lists the tables on mobile device's local database of which the output fields will be retrieved from.
The tables' records are used for in application logic such as control and object methods, but are also the tables where records will be synced from in Client-to-Server synchronisation.
Result Set Definition

The 'Result Set Name' field defines how data is consumed on sync rules which link to this query in the server-to-client direction. The string entered in this field is the table name to which the results of the query will be synchronised to. As the content of a SELECT statement could be very complex, this field lets the user to define the table name where the result set defined by this query is to be consumed. In short a SQL SELECT query defines a result set and using this field the user names the resulting query data.
This can also be advantageous in certain scenarios. Using this structure, synchronisation is not restricted to the same tables between server and client, as with Standard Queries. Therefore one may retrieve data from many different tables from the server via the SQL query, yet have them written to a single destination table in the client database, adding another level of flexibility to data consumption.
Do Not Parse
While using the parse button allows the automatic population of the Tables, Parameters and Output fields, SQL statements may also be used within BrightBuilder as is, without automatic parsing or project validation run on the code. The 'Don't Parse' checkbox next to the parse button will signal this state to BrightBuilder. When the setting is checked, the parse button becomes unselectable, and the tables, parameters and output fields must be populated manually in relation to the SQL query if they are to be referenced within the project.
As Advanced SQL statements are executed on the internal database or server as is, the Don't Parse functionality may be used to specify more advanced, engine specific functions and definition compared to the simple parsing method with the Parse button.
 Setting an advanced SQL statement as 'Don't
Parse' allows the inclusion of non-standard or
complex SQL statements that may run on the server and
return a resultset, but are otherwise unparseable by nature.
BrightBuilder will not check the correctness of such statements
on project validation.
Setting an advanced SQL statement as 'Don't
Parse' allows the inclusion of non-standard or
complex SQL statements that may run on the server and
return a resultset, but are otherwise unparseable by nature.
BrightBuilder will not check the correctness of such statements
on project validation.
As such, it is recommended to be used with caution, and by advanced users only.
When clicking the setting, a warning dialog will appear to re-iterate this fact and that the state has changed.


In 'Don't Parse' mode, the read-only tables, parameters and output fields areas in 'Parse' mode become editable. Adding and removing is done by opening the context menu by right clicking, or by double clicking to edit existing values.
Table - Add/Remove options are available via the context menu. Double clicking will allow editing of an exisiting table. Editing or adding a new table will display a dialog to specify table names. This does not necessarily be the project's tables, such as if the statement is to be run in a direct access mode application.


Parameters - Add/Remove options are available via context menu. Add increments, remove decrements the number of parameters specified in the SQL statement. As with the parsed statement, these parameters are in order of appearance within the editor's SQL statement.

Outputs - Add/Remove options become available via the context menu. Double clicking will allow the output field entry to be edited. Adding or editing will bring up a dialog allowing the user to specify a mandatory Table and Column Name, and an optional Alias for the SQL statement.


Script Queries
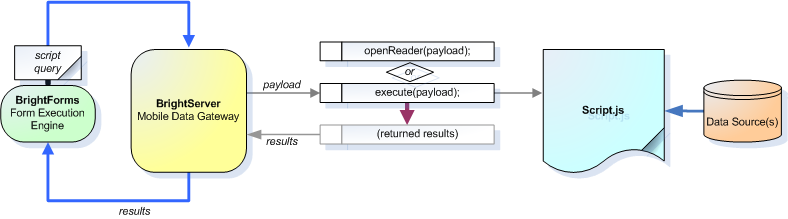
Script queries are used for communicating with the user defined scripts on the server. They carry the query payload between BrightForms and BrightServer scripts. It allows developers to create solutions with greater flexibility, to and from unconventional sources, and with additional/more complex operations supported. Using a purpose built payload format, the designer can create a protocol between the application running on the device and the server scripts. The payload is aimed at describing the data needed from the server. It is a free format text (string) value that the developers have the freedom to decide its content.
In Bright Software Projects, the query interface for the scripts to consume/provide data is handled by the query project element, just like standard queries. Here, the query’s tables it operates on, the parameters passed to it (where applicable) and the output fields are all specified.
Once correctly defined, a scripted query is able to be incorporated into the Bright Software Project's sync engine in exactly the same way a standard query would. The only difference is that non-online queries may not be linked to listviews due to differences in parameterisation. That means you can only use online script queries with listviews, combo boxes etc.
Defining Tables and Outputs
Defining a script query in a Bright Software project has similarities to defining standard queries as the table whose records will be synced and the output fields expected from the query are clearly defined. The difference between the two types of queries is the composition of the query is in the JavaScript language, and defined by the server.
You can specify child tables to read data from, but outputs must be equivalent to those of the parent table.
Create a new query
Select the script query option in the query’s properties

The working space should change to the tabbed view below

Click on each tab and define the values for the table names and output fields, similar to doing so for a standard query. Ensure they match those expected by the script in BrightServer.
Also ensure the 'Payload Parameter Name' is assigned and defined correctly, matching the BrightServer script. For more information on this name, refer to the following section, Using and Defining Payloads.
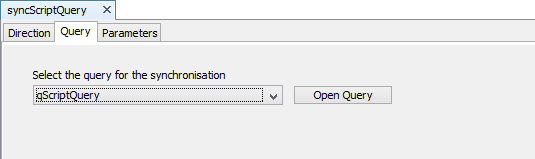
If this script query is used as an online query, then the script name must be specified as defined in the Scripts node of the BrightServer project. This field will tell server which script to execute to provide the data for the online query. If this script query is used for synchronising data from server, then this may provide a special script other than the one defined by the user defined script sync source defined in on the server.

Using and Defining Payloads
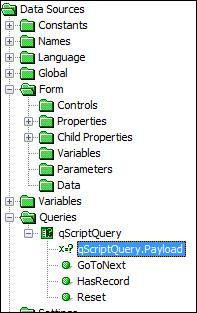
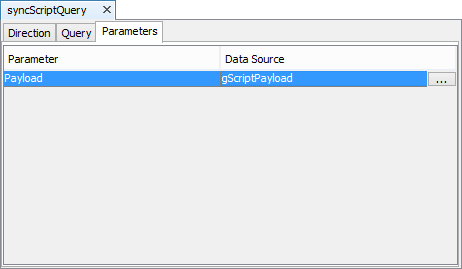
Every script query exposes its payload value as a query parameter so that they can be read set in expressions or when they are used by a sync rule. That mean every script query has always one query parameter by default.
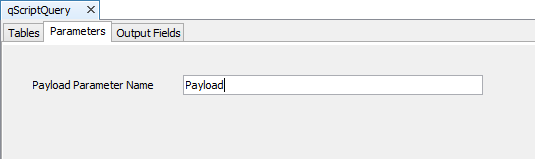
In the script query workspace, there is a tab where you can define the name of this parameter. The default name assigned is "Payload". It can however can be changed using the Payload Parameter Name field for better readability and clarity.
This name is displayed by the Data Source Tree as well as by the sync rule editor.
This payload is a string value. It is a user generated input string, and as such, is designed to be able to pass any values in any way or form to be processed by the server script’s parsing methods.
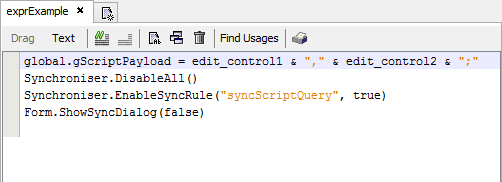
In a script, the payload is expected to be the first parameter inputted into openReader() and/or execute(). From this point, it may be used to produce the results set for the application.
More information on writing script queries, see BrightServer > Scripts.
Using Script Queries as Online Queries
An Online Query allows the user to view a snapshot of the remote database and save this to a local file. With the use of this feature, data transfer is optimised and records do not have to be saved to the local database.
In structure, Online Queries are exactly the same as normal queries; the only difference is that the server database is being queried and the result set is saved to a local file instead of the database. As such, synchronisation of data using an online query is not possible and will cause an error on a project's validation.
To create an Online Query, simply construct a normal query as if querying a local table and set the Online Query property to true. An online query is represented by the
 icon in the Projects window.
In order to return results, an Online Query must refer to a server data source. Therefore, if synchronising to a database, it must be exposed as a data source, or if synchronising to file, must be cached. You may select from a project's currently discovered data sources using the query's Data Source property. If no source is defined, it will automatically use the default source defined by BrightServer.
Scripted online queries are handled by the execute() method, which returns a RecordSet. It's definition is exactly the same, however. If online, the query payload does not necessarily need to be of the same syntax as the script's read() method. If the online query property is checked for a scripted query, a server script name will need to be specified under the 'Parameters' tab.
An online query can be based on either any type of query, but in these cases, online or off, the table definition and identifiers must exist within the project. However, with the online-only Remote procedure calls this may not be necessary. For more information please refer to the next section - Stored Procedures.
You will need to execute a sync-rule to return the
result set of the online queries to the client.
Stored Procedures
A BrightBuilder query can also act as a Stored Procedure query that calls a stored procedure from the server. Stored Procedures can be used to access a sizeable database and return a small result set for reporting or viewing purposes, or even perform server specific calculations that BrightBuilder may not be able to achieve via the standard query operations.
Stored procedure queries work in conjunction with procedures available on the server. As such, the definition of conditions, tables and relationships do not need to be defined within BrightBuilder;specifying the name of the procedure on the server, parameters and outputs is sufficient. Similarly, the implementation of the procedure may change, but if the outputs and parameters remain constant, it will not affect the querying involved in BrightBuilder. This makes the stored procedure feature a very powerful tool for accessing data.
As Stored procedures are a type of online query, online query constraints still apply, ie. they need a data source. They also require a sync-rule to return their result set, which can only be from Server to Client, and no the opposite way around..
Creating Stored Procedures
To create a stored procedure query, set the Query Type property of form to "Stored Procedure". The query editor should change to as below, allowing the editing and modification of such queries. For a Stored Procedure query, ensure the Online Query property is clicked, else there will be an error on project validation.

To correctly map to a stored procedure on a server, the name, parameters and outputs must match to those located on the server. Both Parameters and Outputs are mapped via the order of listing, the type signature(s) specified in the stored procedure. Therefore, it essential to know both the parameters and outputs of the stored procedure to interface. The names given to the fields at this point is for internal project use; they do not need to match the names within the procedure.

Stored procedure query scripts are also organised in a similar fashion, however, the name of the procedure is a variable passed to the script. The names of the parameters are also given as reference, and the output is expected to be correct for the return type. Please note that there is no ability to set in/out parameters with scripted query servers. Any parameter defined as an in/out parameter will function as an 'in' parameter only.

Defining Parameters
Parameters may be set as in, out or in/out as described by the stored procedure to be interfaced. These correspond to read only, write only and read/write parameters in stored procedures respectively, and if not matching, will cause errors on synchronisation.
To add, move or delete the parameters, right-click on the Parameters area and select the command to be performed via the context menu. The Name, Parameter Type, and Data Type of a parameter can also be modified. The user can also specify if its parameterised within the project or specify a constant value for the stored procedure to use.

Defining Outputs
Right-click the area shown below to add or remove Output fields or any record set returned by the stored procedure. These records will be returned in addition to the output and in/out parameters, and will be displayed when the query is referenced in controls such as the listview, or used with the Database object method.
Output fields may also be ordered using the "Move Up" and "Move Down" buttons.

Stored Queries in the Data Source Tree
This is how a stored procedure query appears in the Data Source tree. Typically, parameters generated in the data nodes of the data source tree may not be used; any parameters needed by the stored procedure must be set on synchronisation. The exception to this is in/out parameters, which appear as a data value rather than parameters.
