BrightForms Help Menu Commands
Contents Hide
Upon execution of a project in BrightBuilder, BrightForms will create a database in the export directory you specified in BrightBuilder Directory Settings.
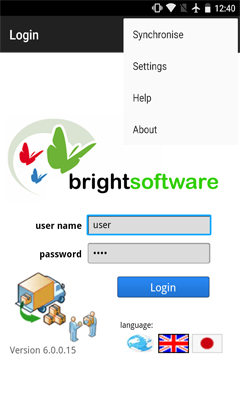
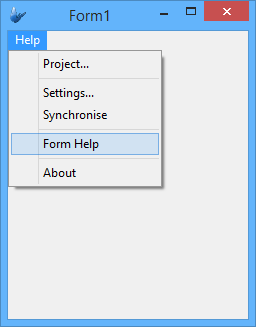
Click or tap on the Help menu to display the drop down menu for BrightForms on Windows, Windows Mobile and iOS devices. For Android, this menu my be accessed by the device's Menu button. Refer to the image below:

Project
The Project submenu opens a .bss file (Bright Software Project Setting file) and will run this executable file on start up. This is a feature exclusive to Windows desktop and Windows Mobile devices. Unless specified, the BrightForms shortcut will run the last project executed.
To make better use of this feature,
First create a BrightForms shortcut on the desktop.
Click on the shortcut to run the BrightForms executor, this will run a blank application or the last application run.
Select Help > Project from the main menu and an open bss file dialog will appear.
Open the export directory used by BrightBuilder to view all the .bss files available. .bss files are identified by the Bright Software logo, refer to the figure below:
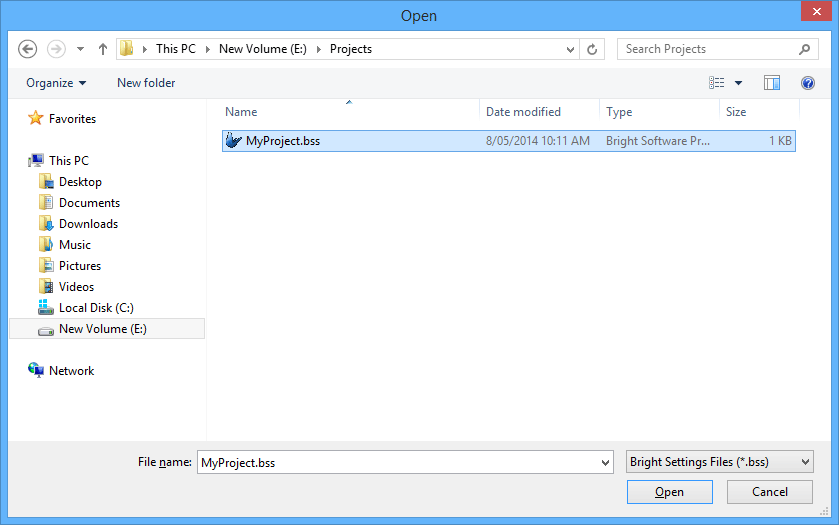
Select the .bss file to be opened for the shortcut and click open.
Close the current BrightForms executable and click on the shortcut to run the project you just opened.
Rename the shortcut to reflect the project it is running.
Another way to change the project you want to open is by editing the Target shortcut property. The target should have the following format,
BrightForms executable path and name Project path and name
For example,
"C:\Program Files\BrightSoftware\BrightForms\BrightForms.exe" "C:\test\export\Repairs.bss"
You can create as many shortcuts as you want for any of your project applications.
Settings
If desired, BrightForms may use password authentication to protect the settings.
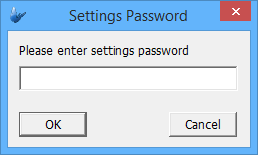
If the Settings - Password Protected project property is true upon execution, the settings cannot be accessed without providing the BrightForms Setting Password. The password that BrightBuilder assigns changes daily, so it is important that the system date is set correctly. With the use of the Settings - Password project property, the developer has the option to specify the settings password and BrightForms will use this password instead of the predefined password from BrightBuilder.
The following dialog will be displayed when the password protected Settings menu is clicked.
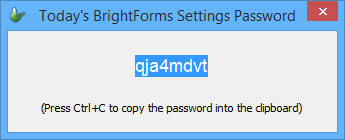
To check out the password for today, return to BrightBuilder and select Tools > Today's BrightForms Setting Password, this will display the password for today like the dialog box shown below.
Settings has six submenus to set before BrightForms processes the project application.
When a BrightForms error is issued, it automatically halts execution of the project application and will display a blank form to signify that you must enter the correct settings.
All current settings will be saved and employed after closing the current form and running BrightForms again.
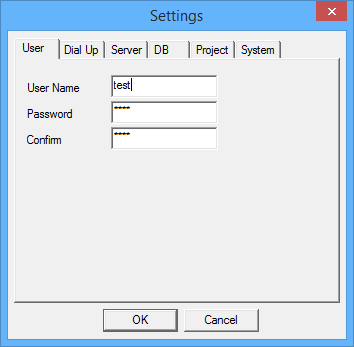
User
The User tab as shown below allows the end user to enter their user name and password. This data will be used to authorize synchronisation with the server. The system administrator will distribute the user names and passwords for the end users. Administration and maintenance of users is done through the BrightServer Mobile Data Gateway user interface.
Dial Up
Dial up settings are specified in the Dial Up tab shown in the following image. It is only available on BrightForms on Windows devices.
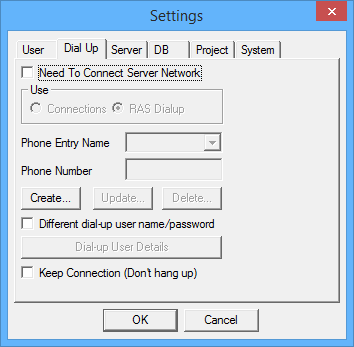
Before synchronisation with the server, BrightForms will check if it needs to dial to the server using the settings in this tab. If the Need To Dial Server checkbox is marked, BrightForms initiates a dial-up connection using the connection settings selected. As of Version 3.5.0., the device's Connection Manager is now used to establish and maintain the connection.
The Connection Manager is the mobile device's way to organise and automate network connections. It automatically requests routes to an internal network (intranet) or a VPN.
In BrightForms case, when the Need to Connect to Server Network has been ticked, the user is given an option to use the connections defined in the Connection Manger or to use a RAS Dialup. RAS entries will be discussed in the next section.
The Keep Dialup Connection (Don't hang up) checkbox can be used to make sure that BrightForms does not disconnect the connection on the device after a synchronisation process. This is best used in GPRS connections.
These settings are usually used in devices such as PDAs and laptop, when one needs to connect to another system. But if you already have a direct network connection with the server, leave Need To Dial Server unchecked.
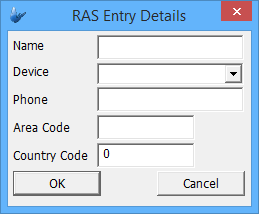
Creating a Dial up connection
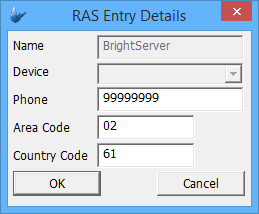
To create a dial up connection, click on the Create button and fill up the RAS Entry Details form shown below and then click OK.
The Dial Up tab will be refreshed and will display the newly created RAS entry, refer to the image below.
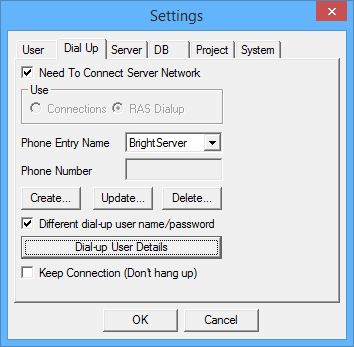
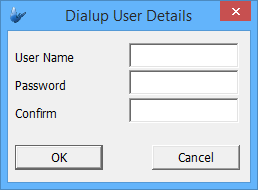
You may also need to setup a dial-up username and password if they are different form the BrightForms username and password. Click the Dial-up User Details button and enter the login details.
Updating existing dial-up connection setting
Once there is an existing RAS, you can update the dial-up settings by clicking on the Update button in the Settings>Dial Up tab. This will bring up the RAS entry form (refer to the image below), note that only the Phone, Area Code and Country Code are modifiable.
Deleting a dial up setting
To delete a Dial Up connection entry, simply select the Phone Entry Name from the drop down list and click the Delete button, the following confirmation dialog will appear:
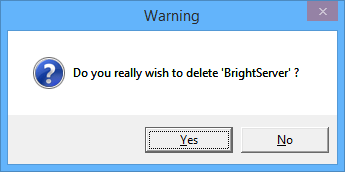
Click Yes to confirm deletion of the entry or No to cancel deletion. The drop down list will automatically be refreshed upon deletion of the RAS entry.
Server
The Server tab is required for the synchronisation engine to work. BrightForms executor checks these settings to find which server to connect. Simply enter the Server IP Address and Port Number and specify Protocol attributes (i.e. SSL and/or Compression).
If the Mobile Data Gateway is accessible through a proxy server, you will need to enter the proxy server details.
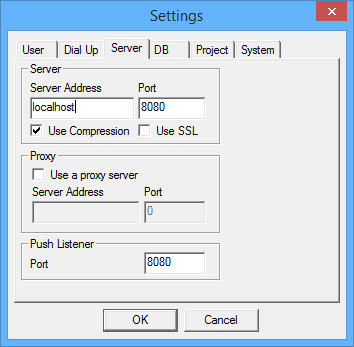

 If using SSL, you will need to enter the SSL port which
is defaulted to 8443.
If using SSL, you will need to enter the SSL port which
is defaulted to 8443.
Changes to the push listener will take effect when BrightForms
next restarts.
DB
The DB tab specifies the database location, name and type to be used by the application project.
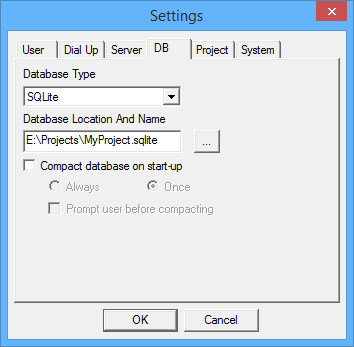
BrightForms can work on a local or a remote database. Depending on the Database Type specified in these settings, BrightForms would access the local database (the default being SQLite) or the server database.
With an MS Access database type, upon initial execution BrightForms automatically creates a database file based on the project name and saves this file to the export directory specified in BrightBuilder Directory Settings.
BrightForms will not create a local database file when Server Direct Access database type is used but will connect with the Mobile Data Gateway to directly access the server tables. When using Server Direct Access, queries should still have the same settings as when using a local database. BrightForms will automatically create the necessary connections and queries do not need to be online queries. Additionally there is no need for synchronisation with Direct Access as the application directly interacts with the server database and there is no local database to synchronise with.
If you want to change path and filename of the database, simply type the complete path and name in the Database Location and Name and select the Database Type from the list.
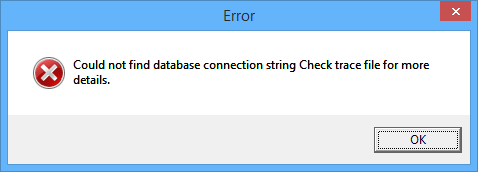
The following execution error will occur if the Database Location and Name was left blank.
Using these settings, BrightForms will open the database file for access and modification by the end-user. If the database file does not exist in the directory, BrightForms will create a new database with the file name and database type supplied in the DB tab.
It is important to note that BrightForms adds five system columns to your existing table definitions for synchronisation purposes. They must not be deleted (dropped) from the application. These are:
BS_APP_DISTR
BS_CLIENT_DELETED_ROWS
BS_CLIENT_ROW_IDS
BS_CLIENT_TX_HISTORY
BS_CONFIGURATION
During use, a database can become fragmented, resulting in inefficient use of disk space. Compacting the database makes a copy of the database and rearranges database file storage on disk. Compacting the database will reduce the disk space used by the database and defragments the data base for more efficient access. BrightForms has a built-in feature that allows the database to be compacted on start-up. Database compaction can be performed each time the project is run or just once and users can be prompted to allow compaction or not.
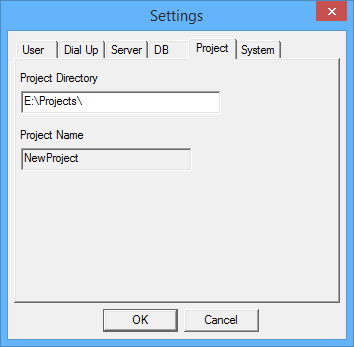
Project
The Project tab sets the Project Files Directory, where the BrightForms project settings application definition and other application specific files are stored.
The Project Name is automatically entered by BrightForms using the project application definition, if BrightForms is started by BrightBuilder.

If you entered a different export directory or did not enter a directory at all, BrightForms will issue the following error.
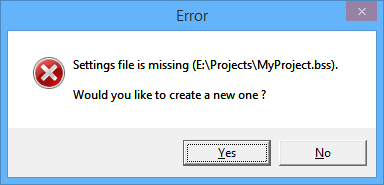
This error will also be displayed if the Project Name is not available in the export directory you specified.
You can change Project Name to switch to another application stored in the Project Files Directory.
System
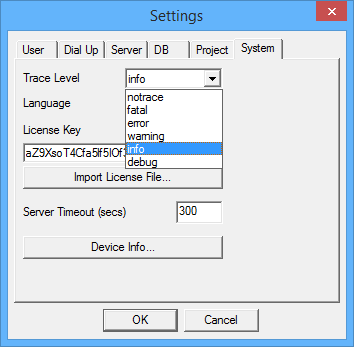
The System setting tab determines the trace module for the project. Initially, there is no trace for the project upon execution. The trace module is a convenient way to identify bugs, issues and errors related to your application. During the application development and testing, it is strongly recommended to set the trace level to Info and go through the trace file as often as possible to check any issues or problems that may occur.
As shown below, there are 6 trace levels available in BrightForms,
| Trace Levels | Description |
| No Trace | No events are logged. |
| Fatal | Errors that stop the application. |
| Error | Application failures (recoverable). |
| Warn | Warnings (e.g. low resources etc.). Application can continue to function. |
| Info | Detailed application operations. |
| Debug | All operations (e.g. exceptions, methods calls, function parameter values, return values, etc.). |
Once a trace level has been selected, upon project execution it will create a trace file with filename BS_dd_mm_yyyy.log (dd-day, mm-month, yyyy-year) in the BrightForms installation's log subdirectory for Windows/Windows Mobile, or the log folder in the project directory for other platforms.
You can open this file using Notepad or any text editor. The following image is a sample trace file with the debug trace level.

The System tab also displays the BrightForms License key and enables the user to import the license file. If the license key is not provided, BrightForms runs in demo mode where the number of forms in the application is limited to two forms only.
To import the license file, simply click on the Import License File button and select the license file in the open file dialog. Please be aware that devices without a license key, or whose key is invalid will run in Demo mode until a valid key is present. Typically, license keys are populated automatically on the device via synchronisation to BrightServer. For more information, please refer to the Mobile License Deployment chapter of the Appendix.
Clicking on the Device Info... button will show the BrightForms About screen.
Synchronise
The Synchronise menu allows BrightForms to synchronise with the server using any or all the sync rules that has been enabled in the project application. It uses the server settings you entered in the Server tab to determine which IP address and port number to use.
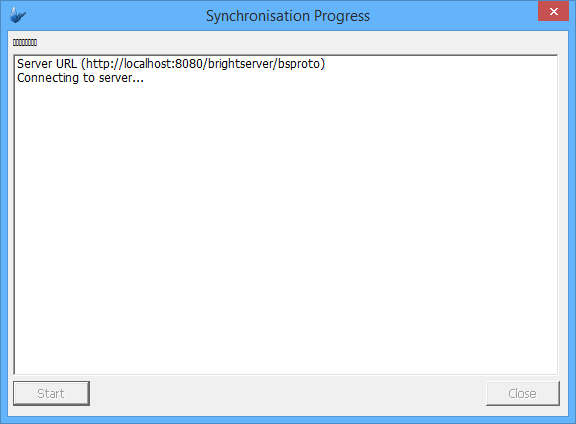
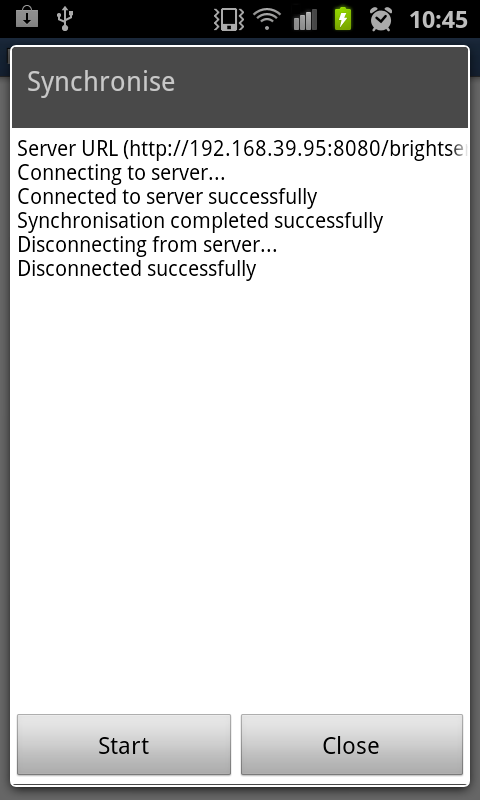
Once selected, the following dialog appears, displaying the synchronisation progress. The activity indicator bar shows the users that the synchronisation is taking place.
You can think of this menu as trying to connect with the server through a Sync Manager object. The Sync Manager handles all the sync rules in your application definition. It contains all the sync rule names and their status (enabled/disabled). You can enable or disable a sync rule using expressions created in BrightBuilder.
Initially, all sync rules are disabled. When you select this menu, it will connect to the server and check whether there is a new application or an update for you as an end-user.
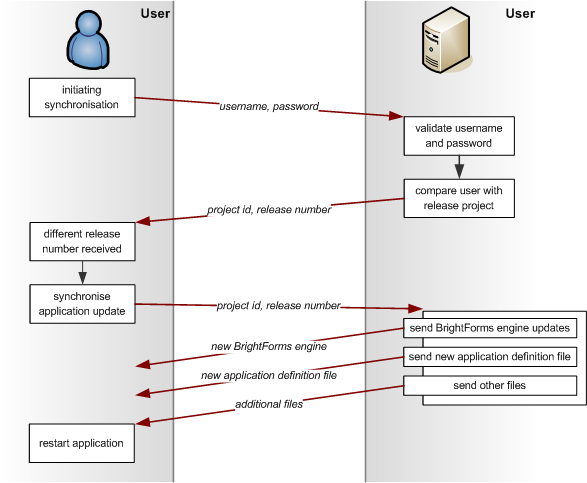
The above figure displays the data transfer protocol used by the Sync Manager. Upon connection with the server, the client sends its user name and password to access the server. The server responds with the Project Id and the Release Number the user is supposed to have on the device. The difference will trigger BrightForms to synchronise new application updates.
Furthermore, any files that are attached to the deployment are received, including any changes to the BrightForms execution engine. After a successful application update, BrightForms prompts the user to restart the application. This will make any changes to the application or the BrightForms engine apparent.
 Important:
The user must restart BrightForms for the application and/or engine
updates to take effect.
Important:
The user must restart BrightForms for the application and/or engine
updates to take effect.
Note:
The server also assigns BrightForms devices their license keys
during synchronisation. For more information, please refer to
the Appendix
> Mobile License Deployment chapter of this document.
Subsequent synchronisation requests will always check the application distribution and the sync rules that are enabled. Sync Rules are enabled in the user interface form through the use of expressions and the Synchronise objects. After the first enabling of a sync rule, it will stay enabled unless another expression is run to disable it. Thus you can use the Synchronise menu to synchronise your tables with that of the server after the first synchronise using the form interface.
In case of any synchronisation errors, the application update on application distribution will be halted by BrightForms while data will be rolled back as if no synchronisation happened.
 Please also note that BrightForms on Android is only compatible
with BrightServer 6 or above, and BrightForms on Windows Phone/Store
with version 8 or above.
Please also note that BrightForms on Android is only compatible
with BrightServer 6 or above, and BrightForms on Windows Phone/Store
with version 8 or above.
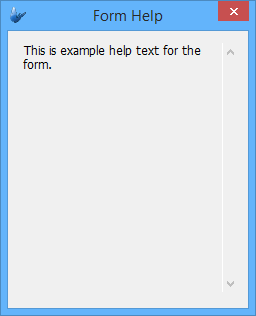
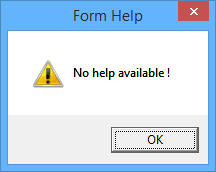
Form Help
This menu will display the help dialog that is attached to the form. This help dialog can be set by the user in the Form Properties.
If there is a help message for the form, it will open in a separate dialog for the user.
When there is no help message specified, the following message will be displayed.
About
The About menu will display the form specified under the project About Form Name property.
If no form has been specified in this property, this action will display the default BrightForms About form, which shows the product name, version number and company name. This is the same form which is displayed via accessing the System > Device Info option in BrightForms' settings.
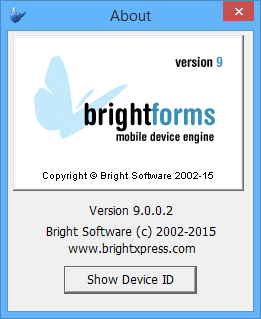
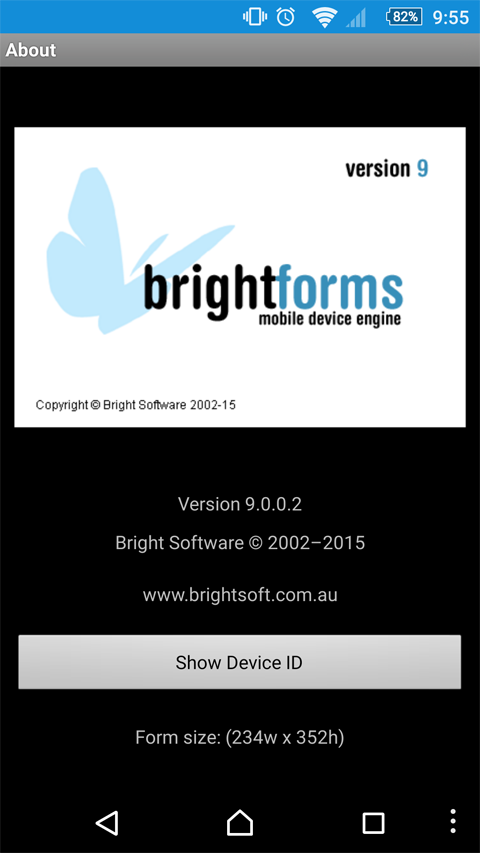
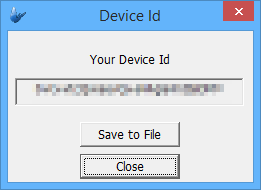
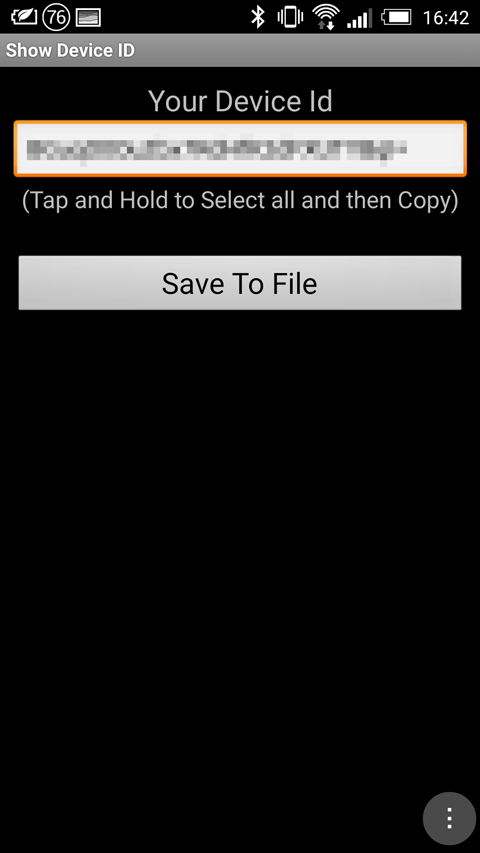
It also has a Show Device ID button, once clicked; it will show the Device Id dialog such as the one below. This is for licensing procedure, since BrightForms is registered or licensed per device.
BrightForms License Management/Device ID: If the device does not
provide the unique device id (serial number), BrightForms generates
a unique id when it is used for the first time or at any time
that the device is hard reset.