
| 6. Setting up a BSP project to display records in a table | 8. Setting up a BEP project for synchronisation |
In this tutorial we will use the application we created in tutorials 5 – 6 to show you how to set up your BSP Project ready to synchronise data to and from a server. The goal of synchronisation is for 2 different data sources (E.g. one in the client and a database on a server) to contain the same data, so that the users can work with the data on the client and serve with equal ease.
Sync rules define the subset of data specified by a query to be synchronised and which direction data is transmitted. The sync rule will use the query specified to define the data to be sent and defines which direction (i.e. client to server or server to client).
Right click on the Sync Rules subtree and select ‘New Sync Rule’.
In the Direction tab in the Sync Rule editor window we need to choose a direction to synchronise data. We’ll set the direction as ‘Client To Server’ meaning data will be sent from the client to the server.
Change to the Query tab where we will set the query which will define the data to be sent to the server. Set it to the query created from tutorial 5.2. This sync rule will send all the data in the local table on the client to the server.
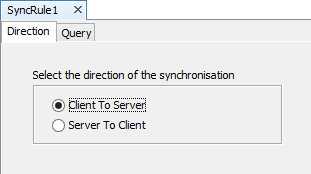
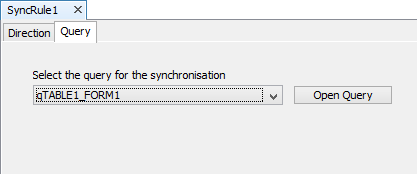
Create another new sync rule to send all data from the server to the client by changing the direction to ‘Server to Client’ and using the same query.
In this tutorial you will learn how to get data from the server to the client. More information on synchronisation can be found here.
In the main form (where the ‘New’ button can be found), add a button and change its caption to ‘Get From Server’.
Double-click the button control, then click ‘Run Expression’.
Using the methods in ‘Objects>Synchroniser’, ‘Objects>Form’ and the listview methods, replicate what has been done below.
Synchroniser.DisableAll();
Synchroniser.EnableSyncRule("SyncRule2", true);
Form.ShowSyncDialog(false);
listview1.Refresh();
The above code will disable all sync rules from running, then enable our sync rule to get data from the server to run. We then invoke the sync dialog and refresh the listview to reflect any changes.
Add a new button and label it ‘Send To Server’.
Double-click the button and press ‘Run Expression’.
For the ‘Send to Server’ button, we do the same thing however enabling the sync rule for sending data to the server.
Synchroniser.DisableAll();
Synchroniser.EnableSyncRule("SyncRule1", true);
Form.ShowSyncDialog(false);
listview1.Refresh();
Now our mobile application is ready to send and receive data between the client and a server. In the following tutorials we will show you have to set up a localhost server and a BEP file in order to use synchronisation.
| 6. Setting up a BSP project to display records in a table | 8. Setting up a BEP project for synchronisation |