On the majority of devices and platforms, the code below may be used to take and save photos on the device. For legacy devices, please refer to Example 4, using the Windows Mobile RunProgramAndWait method.
vIntCaptureResult = Camera.CaptureImage();
IF(vIntCaptureResult == 0)
{
vImageFileName = Camera.GetFileName();
scribble1.LoadBitmapFile(vImageFileName);
}
// Save base64binary to the PHOTO table.
// Delete the image file after saving to the PHOTO table.
Note:
This expression may be linked to the Action-Click property of the Take Photo button.
Camera.CaptureImage() may be used to capture an image, which may then be assigned to images. For video, Camera.CaptureVideo() may be used, but it is advised to reference and view the image through file paths and Form.ViewDocument. Synchronising to the server should be performed using the ExternalBlob data type.
Notice how there is no need to check the device used. This is because the Camera Object is accessing the Camera DLL and not the Camera executable.
Camera.SetFileName("MyPicture.jpg");
Camera.SetPath("\My Documents\BrightProjects");
Camera.SetImageQuality(IMAGE_QUALITY_NORMAL);
Camera.SetResolution(100, 200);
Note:
These methods can be used to set the filename and path , image quality, and resolution.
The SetFileName and SetPath allows you to specify the file name and path of the image such that there is no need to call the Camera.GetFileName method in the Take Photo expression.
The SetImageQuality allows you to specify the image quality whether high, low or normal. Use the System Constants to set the image quality. This method is not available on iOS, Android or Modern Windows platforms.
The SetResolution allows you to specify the image resolution and in essence the image file size. This allows you to make sure that the users will not take a high resolution photo as these photo bitmaps will be saved unto the database. This method is not available on iOS, Android or Modern Windows platforms.
NOTE: This functionality is only available on iOS and Android devices
On modern devices, images or video files may also be retrieved via the camera roll. This will copy the image or video selected to a default or specified path as though the file was created via CaptureImage() or CaptureVideo() methods.
For example:
local.vResult = Camera.ImportImage();
IF(local.vResult == 0)
{
local.vFileName = Camera.GetFileName();
image1 = File.LoadBinary(local.vFileName);
}
Note:
The code above will open up the device's Camera Roll (iOS) or default Gallery app (Android) for the user to select a file. After selection takes place successfully, the file will be written to a local file, which may be retrieved via the Camera.GetFileName() method.
The local file's path and filename may be set by calling the SetFileName() and SetPath() methods prior to ImportImage/Video().
Cancelling the Camera Roll or Gallery applications will have a non-zero return code.
image1 is a control on the form. The image read to file is loaded into this image, using the File.LoadBinary() method.
NOTE: This functionality is only available on iOS and Android devices
Below is an example demonstrating setting up a custom image file name and path to record videos to. After the video has been captured, the code will trivially prompt the user to replay the video, using the Camera.ViewVideo() method.
// Check if custom path exists, else create it
local.vPath = System.GetProjectPath() & "/images/";
IF(File.FileExists(edtPath) <> true)
{
local.vResult = File.CreateDirectory(local.vPath);
IF(local.vResult <> 0)
{
Form.MessageBox("Error", "Directory could not be created", 0);
EXIT;
}
}
// Set path and file name for camera before starting
local.vFileName = "file.jpg";
Camera.SetPath(local.vPath);
Camera.SetFileName(local.vFileName);
// Capture video
local.vResult = Camera.CaptureVideo();
IF(local.vResult == 0)
{
// On success, prompt user and allow them to replay the video
local.vView = Form.MessageBox("Capture", "Video captured successfully - view?", MB_YESNO);
IF(local.vView == IDYES)
{
Camera.ViewVideo(local.vFileName);
}
}
Note:
Custom directory is created to store images/videos in the application.
Camera.ViewVideo() takes a file name and attempts to play the file with that file name in the directory set by Camera.SetPath().
If no directory has been specified previously by Camera.SetPath(), the BrightForms Project Path will be used.
Camera.ViewVideo() may be used to play any video file which is on the local filesystem, provided that the path is set via Camera.SetPath() method, and filename is passed as its argument.
Alternatively, Form.ViewDocument() may be used to play video files, but takes in the full path as an argument.
NOTE: This pattern may only be used if the device is Windows Mobile 4.x or lower
Before version 3.5.0., the RunProgramAndWait method was used to to run the camera application. But this procedure depends on the device used because different devices have different camera executables and have different ways to save the image file.
A HP device would have hpcamapp.exe while an i-Mate and an 02 XDA device would have camera.exe as the camera executable.
The image filename and path will also differ per device, for example: in an i-Mate JAMin device, the image path and filename is \My Documents\<CurrentDateTimestamp>00001\image_00000.jpg whereas in a HP device, photos are saved under \My Documents\My Pictures\image_0000.jpg.
Another issue with using RunProgramAndWait method is that programmatically it is not evident that a photo was taken, thus it is always an assumption that once the camera application is executed, a photo will be taken. Therefore, to get the image filename and path, the expression has to loop through the possible image filenames i.e. image_0000.jpg, image_0001.jpg and so on. Another option to find the image filename is to use the Form.ShowFileOpenDialog, but this will not give a sense of automatic photo capture functionality.
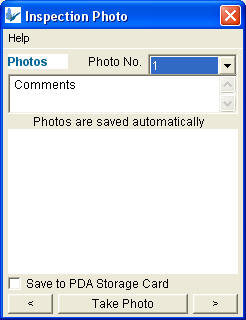
The following image is an example of a Photo Capture form.
IF Settings.SettingDeviceUsed == 1
{
// HP Device
System.RunProgramAndWait("\Windows\hpcamapp.exe", "")
}
ELSE
{
// iMate and XDA
System.RunProgramAndWait("\Windows\Camera.exe", "")
}
// Find the image file created by the camera application.
// Save base64binary to the PHOTO table.
// Delete the image file after saving to the PHOTO table.
Note:
Settings.SettingDeviceUsed – application settings used to check which device is used. This should be setup by the user before taking photos.
This expression should be linked to the Action-Click property of the Take Photo button.
NOTE: This pattern may only be used if the device is Windows Mobile 4.x or lower
Before version 3.5.0., the RunProgramAndWait method was used to to run the camera application. But this procedure depends on the device used because different devices have different camera executables and have different ways to save the image file.
A HP device would have hpcamapp.exe while an i-Mate and an 02 XDA device would have camera.exe as the camera executable.
The image filename and path will also differ per device, for example: in an i-Mate JAMin device, the image path and filename is \My Documents\<CurrentDateTimestamp>00001\image_00000.jpg whereas in a HP device, photos are saved under \My Documents\My Pictures\image_0000.jpg.
Another issue with using RunProgramAndWait method is that programmatically it is not evident that a photo was taken, thus it is always an assumption that once the camera application is executed, a photo will be taken. Therefore, to get the image filename and path, the expression has to loop through the possible image filenames i.e. image_0000.jpg, image_0001.jpg and so on. Another option to find the image filename is to use the Form.ShowFileOpenDialog, but this will not give a sense of automatic photo capture functionality.
The following image is an example of a Photo Capture form.
IF Settings.SettingDeviceUsed == 1
{
// HP Device
System.RunProgramAndWait("\Windows\hpcamapp.exe", "")
}
ELSE
{
// iMate and XDA
System.RunProgramAndWait("\Windows\Camera.exe", "")
}
// Find the image file created by the camera application.
// Save base64binary to the PHOTO table.
// Delete the image file after saving to the PHOTO table.
Note:
Settings.SettingDeviceUsed – application settings used to check which device is used. This should be setup by the user before taking photos.
This expression should be linked to the Action-Click property of the Take Photo button.