Tables
Contents Hide
- Database Fundamentals
- The BrightBuilder Table
- Creating a New Table
- Importing Database Tables
- Opening an Existing Table
- Renaming a table
- Table Properties
- Changing Table Properties
- Deleting a Table
- Adding a New Row
- Column Properties
- Changing Column Properties
- Deleting a Row
- Changing Field Order
- Cutting, Copying and Pasting Rows
- Creating Database Tables from BSP/BEPs
- Auto Form
This chapter discusses in detail the table project element. It is best to have a good understanding of what a table is in terms of the database theory, thus this chapter starts with a section of database fundamentals before proceeding with the concepts of Bright Software's table element.
Database Fundamentals
A database is a large collection of data structured especially for rapid search and retrieval. There are different types of databases such as flat-file, relational and distributed.
Databases are usually organised and stored in data structures known as tables. A table contains information about a specific topic such as products. Using a separate table for each topic allows data to be stored only once which makes the database system more efficient and reduces data-entry errors. Tables are composed of rows (records) and each row is composed of columns (fields). So in a database we have records of data, comprised of fields , stored in tables.
When creating tables, it is common to associate constraints on one or more columns. A constraint is a rule related with a column that the data entered must follow. The following are some table constraints:
The Primary Key constraint defines a unique identification of each record in a table.
The Unique constraint specifies that no two records can have the same value in a particular column.
The Not Null constraint states that a column cannot contain a null value. A null value indicates missing information, for example: unknown date of birth.
The Referential Integrity constraints ensure that data remains consistent across specified tables. By defining unique constraints and foreign keys, relationships between tables can be described and consequently enforce certain business rules.
The foreign key constraint is a key from another table that refers to (or targets) a specific key, usually the primary key, in the table being used. Foreign keys are optional.
Table joins are used to combine data contained in two relational tables based upon a common field or attribute. Table relationships are defined as one-to-one, one-to-many, or many-to-many.
Data types define acceptable values for constants, columns, functions, and variables. Most databases store data in terms of data types. Defining data types allows the database to be more efficient and helps protect it from invalid or bad data input to the tables. Note that there are different data types for different databases, the most common are integers, string, boolean, double, and date time. Base64Binary and externalBlob formats are also offered to transfer binary files.
For easy access to records within the database, an index can be created. An index is a sorted sub-set of the data in the table to which it refers with pointers to the actual data row that allows quick search of the records.
Queries are the primary mechanism for retrieving, updating and analysing information from a database. A query is a simple statement that request data from the database. Many database management systems use the Structured Query Language (SQL) standard query format. There are four basic commands in SQL namely:
INSERT - Insert a record
DELETE - Delete a record
SELECT - Pull data
UPDATE - Modify a record
The BrightBuilder Table
A BrightBuilder table is a relational database table that has a predefined format of rows (or records) and columns (or fields) that define an entity.
In essence, a table is a collection of data about a specific topic, such as employees or projects. To reduce data-entry errors and make the database more efficient, it is advisable to create a table for each topic.
The tables in BrightBuilder adopts any normal database schema and they should each have a primary key. Whether each field allows Nulls or not can also be specified. Data type and length are also determined by the table definitions.
The following image is an example of a BrightBuilder table.

Creating a New Table
Creating tables in BrightBuilder is a simple click of the mouse, just follow these steps:
Expand the project tree to view the different project elements in the Projects window.
Right click on the Tables subtree, a popup menu will appear.
Select New Table as shown in the figure below.
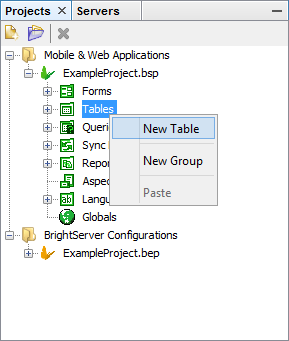
A new table will be displayed in the Editor window with default name TABLE1 or TABLE#, depending on the number of tables already existing in the project.
After creating the table, columns can be added to create the relational database you will use in the application. Table properties can also be configured to pertain to the data exchange system. Renaming and deletion of tables is also possible.
Importing Database Tables
If the tables being created are already existing in a known datasource such as MS SQL Server, MySQL, DB2 or Oracle, then BrightBuilder has a built-in feature that allows the table definitions to be downloaded from the database server and saved to the project.
To import tables from a datasource,
Right-click on the project name and select Import Database Tables... from the popup menu.
Create a New Database connection first. Simply select the database type and enter the required parameters for the connection string as shown below:

From the New Database Connection dialog, click OK. This will open the Import Database Tables dialog.

Tick on the Import checkbox corresponding to the Table that is to be imported.
Click on the Import button. Observe that the table(s) was added to the Tables subtree.
Opening an Existing Table
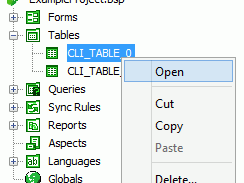
To open an existing table, right click on the table name and select Open from the popup menu. This will open the desired table in the Editor window for editing and viewing.
Renaming a table
To rename a table,
Select the table from the Tables subtree
Right click to invoke popup menu.
From this popup menu, select Rename. The Rename dialog box will appear.
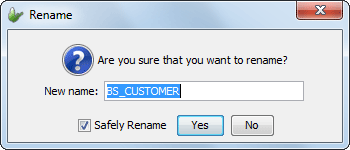
Enter the table name in the New Name field and click OK
 A valid table name begins with a letter and may be followed by
letters, digits, or underscores ( _ ), but must not contain more
than 64 characters.
A valid table name begins with a letter and may be followed by
letters, digits, or underscores ( _ ), but must not contain more
than 64 characters.
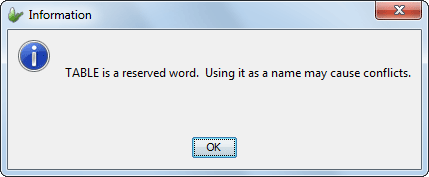
Reserved words are acceptable as table names, though it is not recommended as reserved words may create conflicts in the SQL statements used for database creation and access. The following message will be displayed when a reserved word is entered as a table name.
Notice that the table name will be capitalized on table renaming.
Another way to rename a table or any project elements is by double-clicking on the name field until editable, type the new table name and press ENTER key.
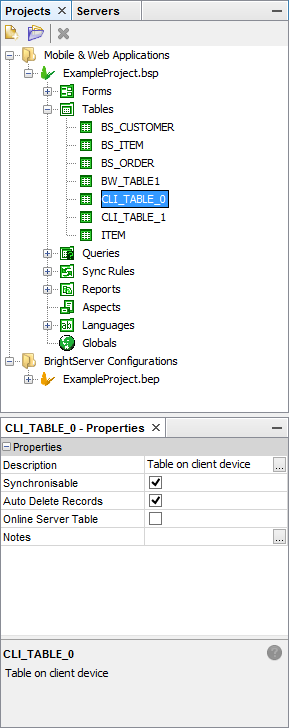
Table Properties
Table definitions have additional properties that pertain to the data exchange system. These are:
Auto Delete Records - if this is true then records will automatically delete themselves after being successfully synchronised.
Description - text describing the table.
Notes - remarks or special comments about the table.
Online Server Table - set to true if table is a server table. Default is false.
Synchronisable - specifies whether the table can be synchronised or not.
An online server table is not created in the client database and is represented with this icon under the Tables subtree. Online server tables does not have to have the same physical attributes as those in the Server database, these are usually used for online queries to view a snapshot of the server tables online.
To view these properties, simply set focus on the table name and the properties will be displayed in the Properties window as shown below.
Changing Table Properties
Table properties require a Boolean value, true or false; or a string value. To set/reset or enter a value for the Table Properties,
Click on the Table Property to invoke the drop down arrow button or edit control.
For a True or False property, tick the checkbox to enable or untick to disable the property . For a string value, simply enter the text and press the ENTER key.
Deleting a Table
To delete a table,
Select the table from the Tables subtree
Right-click to invoke the pop-up menu,
Select Delete from the pop-up menu, the Confirm Object Deletion dialog box will come into view.
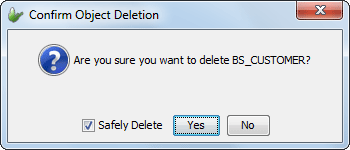
Click Yes to proceed with the table deletion, table will be removed from the Tables subtree and in the Editor window if it is open.
Adding a New Row
Adding a new row in the table is the same as inserting a new field in a relational database.
To add a new row in the table, either use the 'Add New Row' button in the table, or right-click on the Table Editor window and select 'Add New Row' from the popup menu available.
A new row field will appear on the Table Editor window with default name as FIELD1 or FIELD#, depending on how many field already available in the table. Once a row has been added, the column properties for each row field can be changed.
Keep adding rows until you have created the relational table the
application requires.
 Once a project has been executed, BrightForms will create the
local database with the current table definitions for the project.
If in any case there was any table changes, delete the existing
local database from the local export directory before executing
the project to see the table changes on BrightForms. This is not
the case however on application distribution. BrightForms automatically
alters and updates the local database on application distribution
if there are any table changes.
Once a project has been executed, BrightForms will create the
local database with the current table definitions for the project.
If in any case there was any table changes, delete the existing
local database from the local export directory before executing
the project to see the table changes on BrightForms. This is not
the case however on application distribution. BrightForms automatically
alters and updates the local database on application distribution
if there are any table changes.
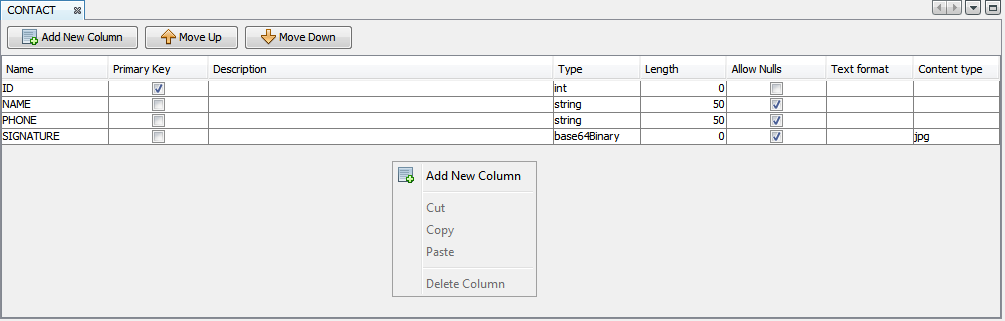
Column Properties
Each row field has the following column properties:
Name - specifies the name of the table field.
Primary Key - identifies this field having a unique value in every row. Default (unticked). Tick the checkbox if the field should be a primary key.
Description - describes the information this field will contain.
Type - the data type of the field. Default (string)
Length - length when Type is string. Values from zero to 4096. Default (10).
Allow Nulls - specifies whether or not the field can contain null values. Default (ticked)
Text Format - specifies text format when the field is read from or written to Comma Separated Values (CSV) files. This field value is required only when using Database object's import, export and Dropbox related methods to import and export data to and from the table.
Content Type - is applicable only to binarybase64 columns and it specifies the file extension to be used when its content is written to a file. This field value is required only when using Database object's import, export and Dropbox related methods to import and export data to and from the table.
A valid column name begins with a letter and may be followed by
letters, digits, or underscore signs ( _ ), and must not contain
more than 64 characters. Reserved words are acceptable as column
names, though it is not recommended as reserved words may create
conflicts in the SQL statements used for database creation and
access.
Note that if a field is a primary key, it cannot also have a Null
value. If Primary Key property is already ticked and the Allow
Nulls property is ticked, the following message will be displayed,
and Allow Nulls will be unticked again.

Note that, for easy of use, when the table has no columns, the
first column that gets added will always be designated as the
primary key of the table, and it will be not null-able !
Changing Column Properties
To change column properties like Name, Description, and Length; simply double click on the field until it is editable and enter the property values.
To change the Primary Key and Allow Nulls properties, just check or uncheck the checkboxes provided for each column.
To change the column Type, simply select from the drop down list of data types available in BrightBuilder.
Deleting a Row
Open the table to make changes on.
In the Table Editor window, select the row field that is to be delete. The row will be highlighted.
Right-click anywhere within the Table Editor and select Delete Row from the popup menu, row is automatically deleted without confirmation.
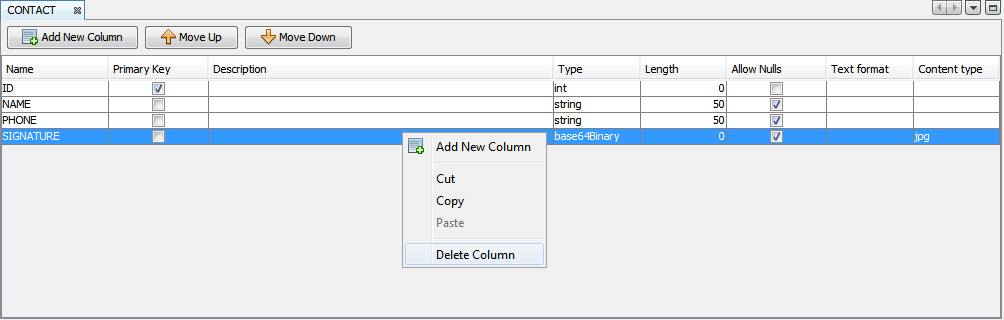
Multiple rows can be deleted by first selecting multiple rows before right-clicking on the selection to display the pop-up menu.
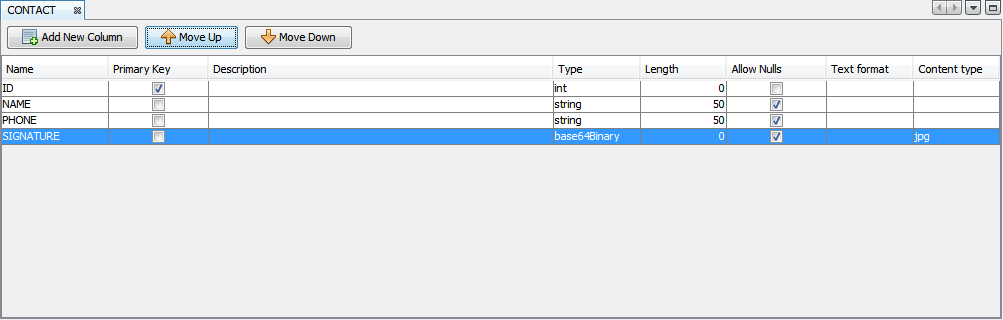
Changing Field Order
In an open table, the order of the fields can be changed by moving them up or down.
To move the columns, select the row to move and click Move Row Up or Move Row Down buttons to change the relative position of the row. Repeat this step until the rows are in the desired order.
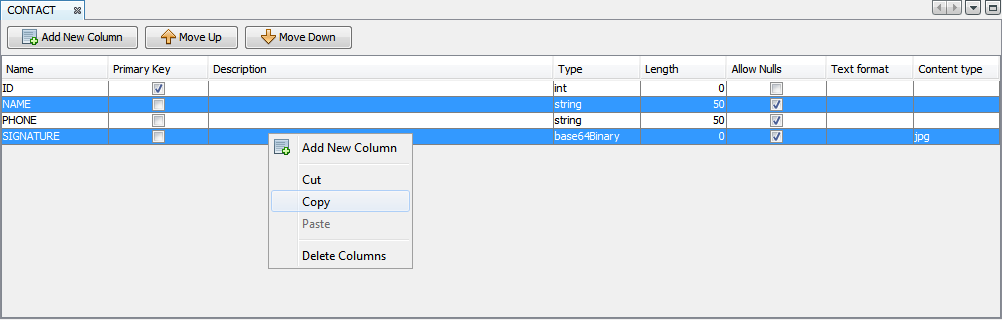
Cutting, Copying and Pasting Rows
One or more fields may be copied and pasted and may be used to duplicate rows definitions within the same table, or use the same definitions in another. To access the copy and paste functions, select any number of rows and right click the selection. The options will be displayed in the context menu.
Pasted rows appear at the bottom of the table once completed.
Creating Database Tables from BSP/BEPs
BrightBuilder may be used to export defined tables to a database directly via connection, or via generating an SQL script to do so. To do this, select the Create Database Tables ... option under the right click context menu of the project. The tables contained in the project will be shown and selectable via check box controls on the left.

Once selecting tables to be exported, select or create a database selection. Then tap 'Create Tables'. This will create tables on the database specified, provided they do not exist. If they do exist, they may be dropped via the 'Drop tables that already exist' option in the dialog before the 'Create Tables' operation.
A script containing the table's CREATE TABLE statement may also be generated using the 'Show Script' button. This will open a new window, displaying a script that may be run to create the selected table(s).

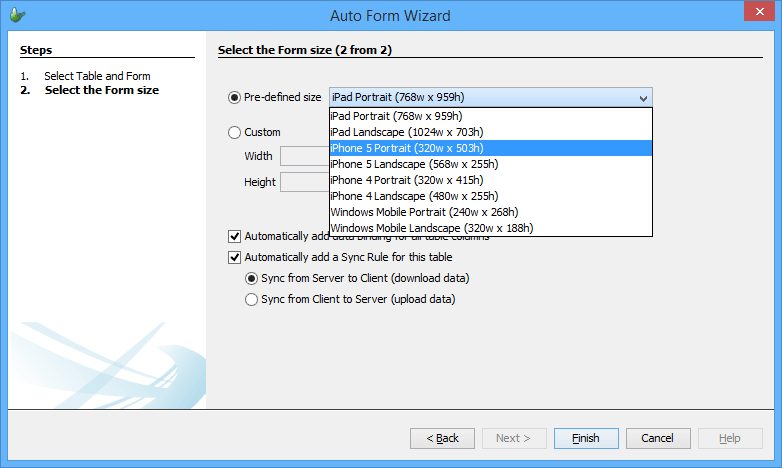
Auto Form
Auto Form functions as a wizard that allows a form and a sync rule to be automatically created based on a given table definition. This function can accessed via the Tools menu or the Table pop-up menu.
When clicked, it will open the Auto Form Wizard as shown below:
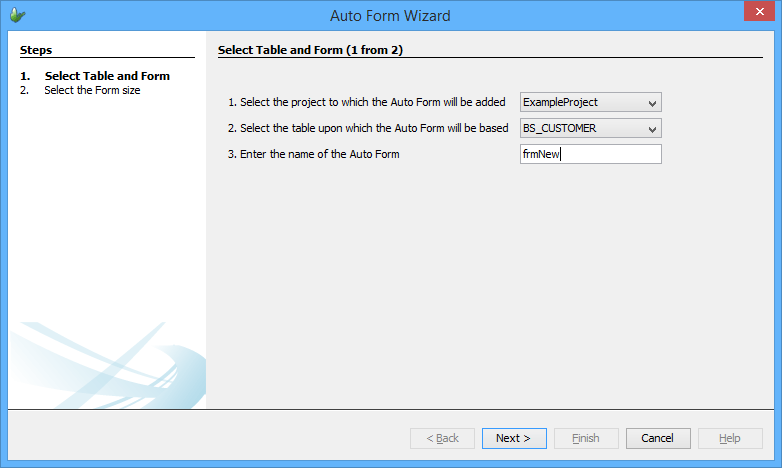
The first screen allows you to select the project and the table that will be used for the form. From the second screen, as shown below, it will allow you to select the size of the form and also the data binding properties for that form. There is also an option in this screen to create a sync-rule for this form.