Sync Dialog
Contents Hide
Sync Dialog 
There are instances where business data needs to be readily available through mobile applications. Synchronisation allows for this sharing of data between the business back-end systems and data captured out in the field. Synchronisation of data ensures that both server and device have the necessary data required and at the same time ensure the integrity of this data is preserved. The synchronisation engine available through Bright products such as BrightServer, is what facilitates the sending and receiving of records form client to server, and vice versa. Through the BXP designer and sync dialogs, synchronisation can be added to applications.
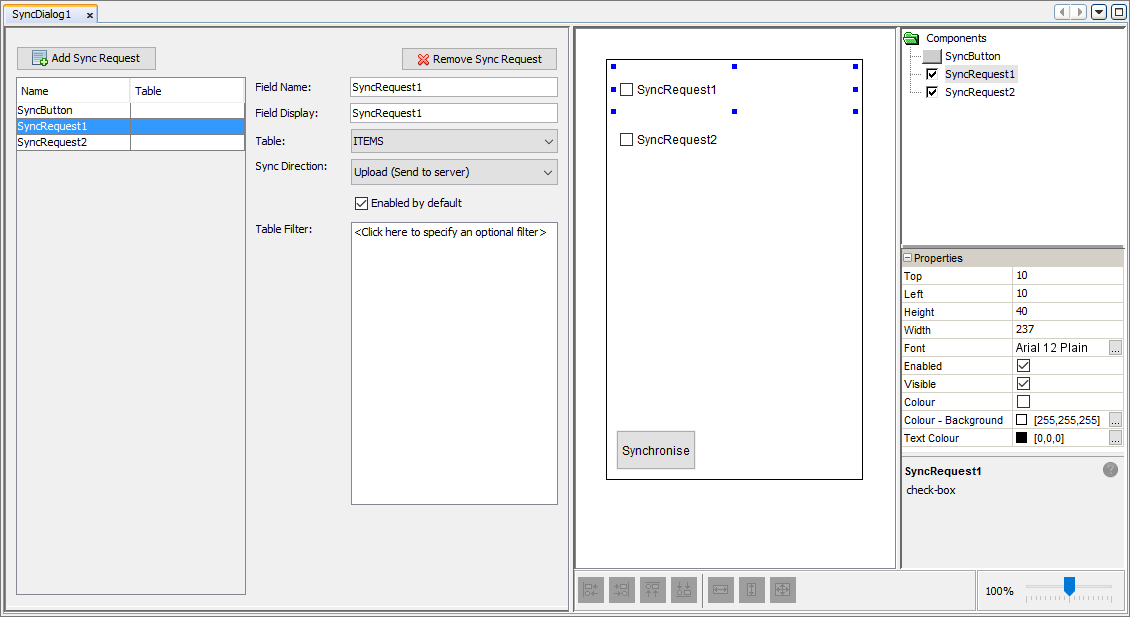
Sync dialogs have the purpose of allowing users of the application to enable and disable synchronisation requests (sync requests) that contains all required information for synchronisation to be completed through the synchronisation engine. Sync requests specify the data to be synchronised and the direction in which this data will be sent (i.e from device to server or vice versa). Sync dialog forms can be used to enable and disable sync requests when synchronisation is needed. The Sync dialog editor allows for multiple sync requests to be added or removed.
Sync Requests
Sync Requests facilitate the synchronisation of data between devices
and servers. They specify what table is to be synchronised with, the
sync direction (send to server or download from server) and the data
set to be sent or downloaded. The Sync dialog editor allows sync requests
to be added through the  button and can be removed by the
  button. By adding
a sync request it will automatically add a check box control to the
form. Clicking on a sync request in the sync request list, allows
for the sync settings to be changed through the options shown. These
options include:
button. By adding
a sync request it will automatically add a check box control to the
form. Clicking on a sync request in the sync request list, allows
for the sync settings to be changed through the options shown. These
options include:
Field Name: The name of the field/sync request and the name of the control on the form.
Field Display: The caption text displayed next to the check box in the identifying label. The label control's name will be in the form '<Field Name>_<Field Display>'.
Table: A list of existing tables that can be used to choose the table to be used in the synchronisation.
Sync Direction: Specifies the direction of the synchronisation. It can either be 'Upload (Send to server)' or 'Download (Fetch from server)'. The sync request can also be enabled by default by ticking the 'Enabled by default' check box.
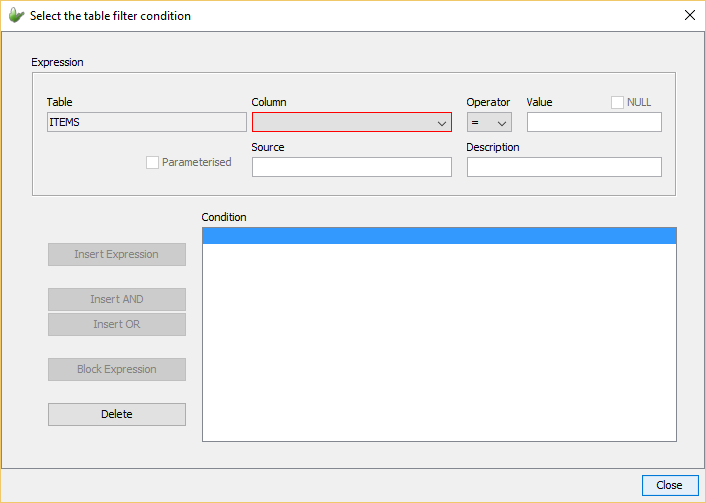
Table Filter: By clicking on the table filter box, the 'Select the table filter condition' window will be shown. Through this window, the table can be filter or "queried" through defining the condition/s for what records will create the data set to be received or sent in the sync request. If the filter is left empty, all the data in the table will be synced meaning every record will be sent/received.
The sync requests specified in the dialog can be executed through the synchronisation engine by tapping the action button with type 'Synchronise'. Only sync requests ticked will be executed when the action button is pressed. An action button with the Synchronise type is automatically added to the sync dialog. By clicking on the action button in the list of Sync Requests will allow the field name and field display (i.e. caption text for button) to be changed. However the button type cannot be changed. If synchronisation is needed for the mobile application, the essential data flow between clients and servers will need to be defined through the Data Flow element.
Form Values
| Form Value Name | Description |
| Checkbox values | Contains the current value of the checkbox. It will be a boolean where TRUE indicates checkbox is ticked and FALSE specifies checkbox has not been ticked. |