List Dialog
Contents Hide
List Dialog 
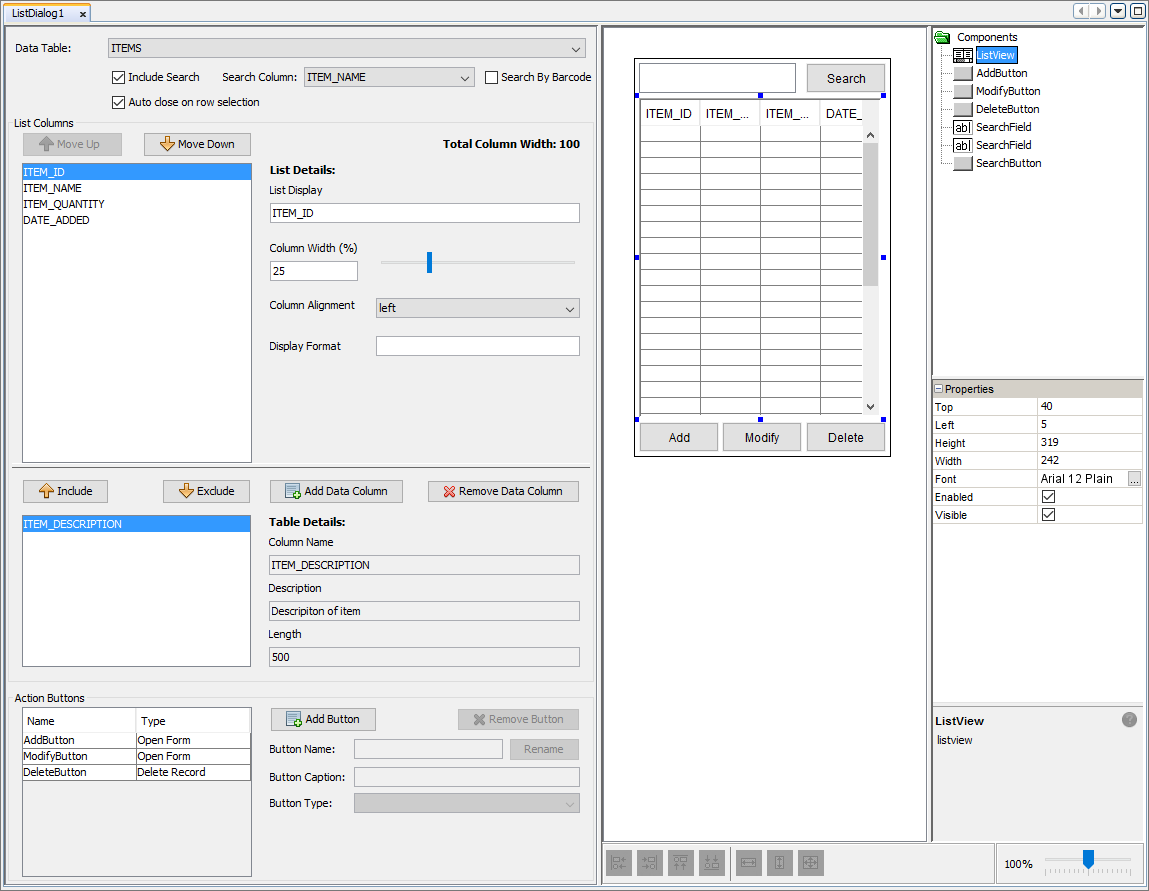
List dialogs provide a form that allows for data within a table to be displayed. A list dialog will contain a list view control that can be used to display the records within a table. When being opened, a list dialog can be opened with context to display all records or a subset of records in the assigned data table. The context for opening the list dialog can be set through form links. The list view control can also be edited to show only a subset of columns within the data table. Through this dialog, multiple buttons can be added with the purpose of changing the flow of the application in order to add or modify records within the data table. List dialogs also provide the ability to search through the records in the data tables and also be able to interact with the listview by assigning form links to single and double taps of records in the listview.
Data Table
Within the list dialog editor window, you can specify the data table where the data displayed will come from. By using the drop down menu provided you can select an existing table or select '<Bind to New Table...>' that will open the 'Create Table' window that allows developers to define the details of a new table. For more information about data tables refer to this section.
The application can also have the ability to allow users to search for specific records within the data table. By including this function, it will add a edit control ('SearchField') and a button ('SearchButton') to the form to carry out the search. When the 'SearchButton' is pressed, it will cause the application to query the data table for records that match the value entered in the 'SearchField'. The search field will be used to search through the values of the specified column within the data table. Records with its specified column values that match the search field, will be displayed in the listview. If the search column is a barcode, then the 'Search By Barcode' check box will need to be ticked and the search button (and hardware scan button if available) will change its functionality in order to activate the device's scanner in order for the barcode to be scanned and searched for in the data table.

Form Behaviour on Close
Through the list dialog editor, the behaviour for when a row selection is made in the listview control can be set. The option of auto closing the dialog when a row has been selected can be applied. This allows for the application to be designed in a seamless manner with as few clicks required. Doing this, the form values of the list dialog can be instantiated with the current selected row's values as form values that are persisted and provided to other form dialog. When closed the list dialog will return to the parent form dialog that opened the list dialog in a form link.

List Columns
Once the data table is set, the editor will populate the listview
with the columns found in the table. In the editor you can specify
the order the columns will appear by using the ![]() and
and ![]() buttons.
Here you can also edit the text to be displayed for each column header
and assign the column width allocated for each. The alignment for
the column text can also be set to either left, centre or right aligned.
A display format can also be provided and used to specify a format
in which the data within the column to be displayed. For example,
number values can be formatted to show to 2 decimal places. For more
information on display formatting refer to the Numbering
Formatting and Date-Time
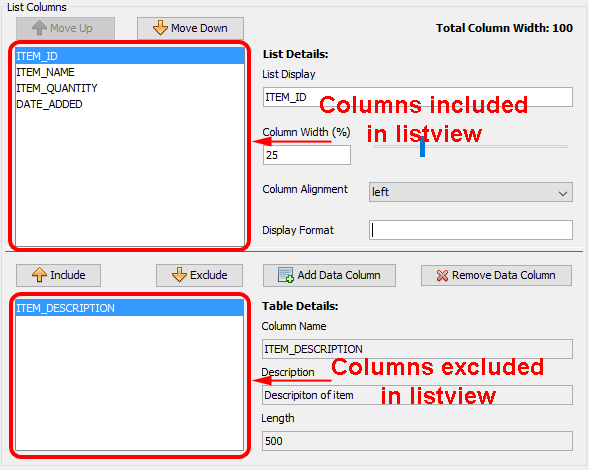
Formatting chapters. Within the editor, columns listed in the
top list are the columns included in the listview, while columns listed
in the bottom list are the columns excluded from the listview. The
columns to be display or excluded can be specified here by utilising
the
buttons.
Here you can also edit the text to be displayed for each column header
and assign the column width allocated for each. The alignment for
the column text can also be set to either left, centre or right aligned.
A display format can also be provided and used to specify a format
in which the data within the column to be displayed. For example,
number values can be formatted to show to 2 decimal places. For more
information on display formatting refer to the Numbering
Formatting and Date-Time
Formatting chapters. Within the editor, columns listed in the
top list are the columns included in the listview, while columns listed
in the bottom list are the columns excluded from the listview. The
columns to be display or excluded can be specified here by utilising
the ![]() and
and ![]() buttons.
buttons.
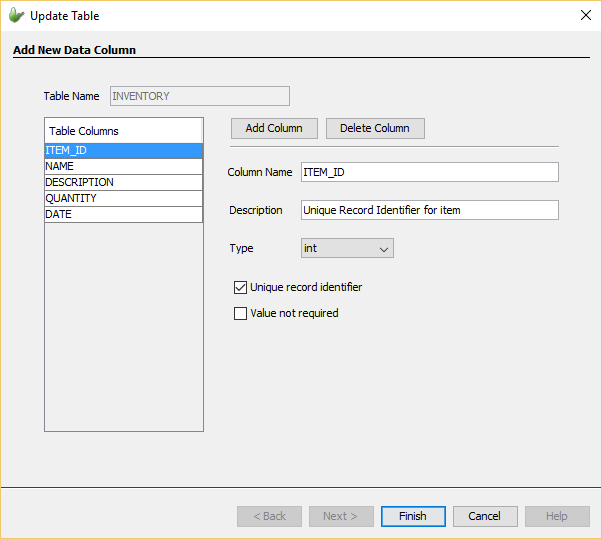
Other data columns can also be added by pressing the  button which will bring
up the 'Update Table' window. When this window opens,
it will display the current table definition alongside with a new
column automatically added. This new column should be edited with
the correct definition. Through this window, the column definitions
for the existing columns can be changed or deleted all together.
button which will bring
up the 'Update Table' window. When this window opens,
it will display the current table definition alongside with a new
column automatically added. This new column should be edited with
the correct definition. Through this window, the column definitions
for the existing columns can be changed or deleted all together.
Any new columns will initially appear in the excluded list of columns.
When records in the excluded list of columns are selected, their details
will populate the fields under 'Table
Details'. Columns in this list can also be removed by pressing
the  button.
Action Buttons
List Dialogs will initially have 3 buttons automatically created.
These initial 3 action buttons can be used to alter the data in the
table. Initially the application will have an action button for adding to the table, one for modifying a record in the table
and another for deleting a
record in the table. However more buttons can be added to the form
through the  button.
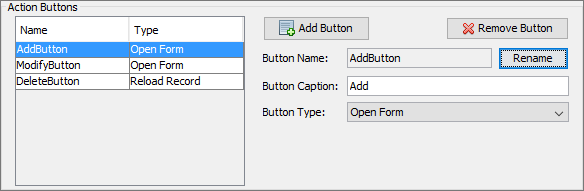
From the list dialog editor, each action buttons, its name and caption text can be changed through the options provided in the editor. Each button will also have a button type which specify the functionality of the button when it is pressed. Each button can have the following type:
Open Form: Buttons of this type indicate the button will open another form within the application. The child form to be opened by the button can be selected through creating a form link from the application panel. The two buttons initially added for adding and modifying data in the data table will be set to this type.
Delete Record: This type specifies the a button that once pressed will delete the currently selected record in the listview. A button with this type will also have other options of displaying a message before deleting to confirm before deleting the records occurs. The text displayed in the message and be set as well. Initially the delete button added to the form will have this type.
Refresh Form: When a form has been opened with the context of modifying a record in the data table and a button of this type is pressed, the form currently opened will be refreshed with the original record values and any modifications will be lost. If this is used in the context of adding a new record into the data table, the form will be refreshed with initial values for each field.
Close Form: Buttons of the 'Close Form' type will be used to close the list dialog form and return to the parent form that opened the form.
Synchronise: Synchronisation can also be performed through this dialog. When pressed, the currently enabled synchronisation requests will be executed. Synchronisation requests can be created through sync dialogs. Thus before buttons of the 'Synchronise' type is pressed, the sync requests desired to be executed should be enabled.
The style of the buttons can be edited through the WYSIWYG window. by simply selecting them in the action buttons panel or through the WYSIWYG window.
Form Values
The following table describes the form values included in every list dialog.
| Form Value Name | Description |
| Column Values
(E.g. ListDialog1.listview.ID, ListDialog1.listview.NAME etc) |
Column values of the currently selected record in the listview. For each column in the data table there will be a corresponding form value. |