Quick Tutorial - Background Synchronisation
Description
A guide outlining the key uses and differences of background synchronisation to other options available, and how to use this feature in Bright Software projects.
Resources
What is Background Synchronisation?
Background synchronisation removes explicit user initiation of the synchronisation process within BrightForms applications. It operates on a separate thread to a mobile application’s logic, yet can signal messages to all forms which are opened and uses exactly the same sync rules as regular synchronisation.
However, it differs from the other two existing methods of synchronisation as unlike the Sync Dialog, it can operate without the user being mindful of the data transfer, and it may be utilised project wide more seamlessly, as all forms can listen and respond to background syncs when opened.
Thus, background synchronisation is a powerful option for developers which can be used to greatly simplify the logic behind BrightForms’ data synchronisation requirements, as well as allowing users to focus on their workflow within an application, without having to worry about synchronisation issues.
Background Synchronisation Sessions
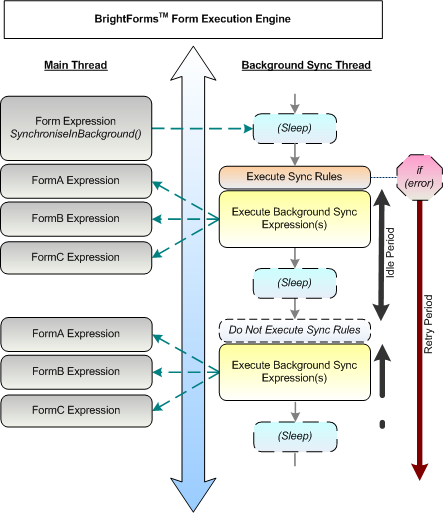
Once Background synchronisation is activated in a project, the new thread of background sync sessions is created and is in operation. The process continues for the lifetime of the application.
Based on set intervals – the idle time of the background sync, the thread will check if there is a signal from the application – ‘SynchroniseInBackground()’ to perform a synchronisation with the server.
If this signal occurs, any enabled sync rules which have also been defined as background sync rules will be executed.
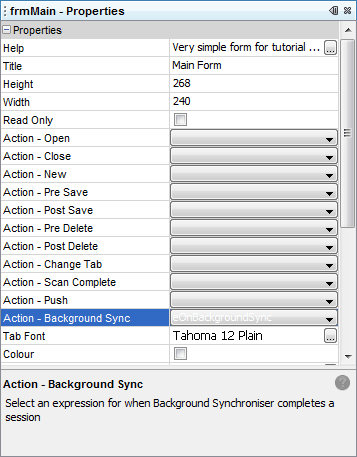
This constitutes a completed background sync session. All forms will then be signalled of its completion. This allows for expressions assigned to their ‘Action – Background Sync’ property to be executed.
When not executing sync rules or notifying forms, the Background Sync thread is considered idle or asleep.
However, if an error at the synchronisation stage occurs, the thread will sleep for the period defined by the background sync’s retry time, rather than the idle time. It will then proceed to wake and retry the synchronisation, with any sync rules that are active.
How to Enable Background Synchronisation in projects
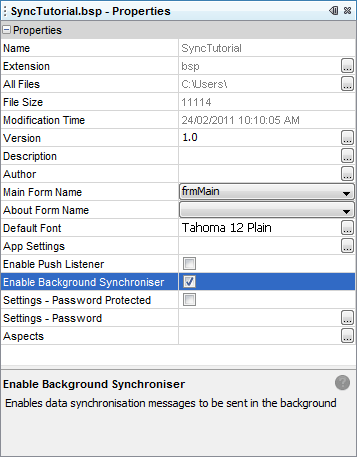
Enabling Background Synchronisation in projects is achieved by setting the ‘Enable Background Synchroniser’ property of the bsp to true. When this is done, the background sync thread in BrightForms will be active, and will run in intervals defined by the Synchroniser.SetBackgroundSyncIdleTime() method, and Synchroniser.SetBackgroundSyncRetryTime() method or sync error.
Logic responding to background sync sessions utilises the form property ‘Action – Background Sync’. As mentioned before, an expression assigned to this value will execute after Background Sync’s session, regardless of if whether server have been touched or data was actually synchronised or not.
Background Sync Methods
Sync rules are enabled for the background sync similar to how they are prepared with the sync dialog – ie, they are also enabled with the Synchroniser.EnableSyncRule() method and are ordered by the Synchroniser.SetExecutionOrder(). As with standard synchronisation methods, it is also recommended to call using the Synchroniser.DisableAll() method prior to activating enabling any sync rules.
The difference between the background sync and the dialog sync method of execution is that enabling the rules themselves is not sufficient for them to be recognised; they must be flagged as a background sync rule specifically using MakeBackgroundSyncRule().
Once these are set, the SynchroniseInBackground() method is used to signal that the enabled rules are to be run when the background sync thread next wakes up. If the synchronisation fails when the thread wakes, the thread will sleep for the ‘retry’ time, with this signal to synchronise still active.
After executing, on success, query based controls such as listviews, combo boxes and any which are on forms with databinding defined will automatically be refreshed on a completed Background Sync event. The last error code and time of synchronisation may be retrieved by the GetLastSyncError() and GetLastSyncTime() methods. Additionally, GetSynchronisedTableName and GetExecutedSyncRuleName may be used to determine what tables/rules were last synchronised.
Also after executing, if successful, the pending sync request count of the Background Sync thread will resolve to 0. If not, this pending sync count, referenced by GetPendingSyncRequestCount() will be incremented. This figure may be used to implement specific application behaviour for when background synchronisation does not occur. It may also be reset manually by the ResetPendingSyncRequestCount() method.
Please be mindful that when calling SynchroniseInBackground(), the device will touch the server when the Background Sync thread wakes next, regardless of whether sync rules are enabled or not. Therefore, it is advised to only enable sync rules when there is information to send, and be consider the server load if the session idle times are short.
Finally, please be aware that any records to be synchronised will be done so when the background sync is called - potentially causing an issue if the database object is used when automatic deletion for the table is activated. As the user is not in control when they want to sync, it is important to make sure that only completed records are being sent when synchronising in this case. One way to achieve this is by monitoring this status, via a STATUS field, and running the query for records to synchronise checking this value.
In general, how the data is created and edited in relation to the user must be considered when implementing background synchronisation processes into the application.
Exercise
BgSyncStart.bsp
The project contains a simple listview which displays the EXAMPLE_ITEM table, and buttons with expressions which allow the creation and modification of records in this table.
The BSP also contains two buttons, ‘sync_dialog_btn’ and ‘sync_exec_btn’ with empty expressions. These have expressions implementing dialog and execution synchronisation respectively.
There is also a button ‘sync_bg_btn’ which brings up the Sync form. This exercise will primarily be focused on implementing this form.
FileSync.bep
The BrightServer Configuration creates new records or modifies existing ones within the EXAMPLE_ITEM table. This EXAMPLE file will be written in C:\Temp\EXAMPLE_ITEM.txt. This path may be changed in the sync points panel.
The data source configured is a file, as the goal of the server is to primarily consume data. Therefore, delete methods are not specified.
Complete the following steps to enable background synchronisation in the project:
Enable Background Synchronisation via Project Properties.
Have the expression – ‘eOnBgSync’ run in the Sync form on background sync. The expression contains statistical information which will display in the edit control on the form.
Create a new button which calls an expression containing SynchroniseInBackground(), signalling the synchronisation.
Enable the same rule as the dialog sync for the synchronisation. Remember to make it a background rule.
Verify the changes by testing to see if the listviews’ values clear (auto delete) when the background sync is performed, and also by observing the complete example, BgSyncFinished.bsp.