IF boolSelect == false
{
lvProducts.Disable()
}
ELSE
{
lvProducts.Enable()
}
Note:
boolSelect – a Form variable, used as a flag in this instance to check whether to display or hide the list view.
lvProducts – a Form control, list view.
A disabled list view will appear shaded out on the form and selections cannot be made in the list.
The GetCurrentRowColumnValue method can be used to obtain information from the result set of the query.
Assume for this example that the List Query returns two columns: PRODUCT_ID, PRODUCT_NAME.
//Select the next record in the list view.
VarIndex = lvProducts.GetSelection() + 1
listview1.SetSelection(VarIndex)
//Check if a record is selected.
IF lvProducts.GetSelection() < 0
{
Form.MessageBox("Error", "Empty list view", MB_OK)
}
ELSE
{
//Get the PRODUCT_ID value of the record.
edOrderID = lvProducts.GetCurrentRowColumnValue("PRODUCT_ID")
//Get the PRODUCT_NAME value of the record
edProductName = lvProducts.GetCurrentRowColumnValue("PRODUCT_NAME")
}
Note:
It is recommended to check whether a record has been selected before retrieving values.
lvProducts – a Form control, list view.
lvProducts.GetSelection() < 0 – Checks that an element has been selected. A return value of –1 means that there is no selection.
edOrderID and edProductName are edit controls and they will display the ORDER_ID and PRODUCT_NAME columns of the current selection.
IF boolShow == false
{
lvProducts.Hide()
}
ELSE
{
lvProducts.Show()
}
Note:
boolShow – Form variable, used as a flag in this instance to check whether to display or hide the label.
lvProducts – a Form control, list view.
A list view will not be visible on the form when it is hidden.
lvProducts.Refresh()
Note:
lvProducts – a Form control, list view.
This expression will refresh the content on the list view by re-running the query.
lvProducts.SetFocus()
Note:
lvProducts – a Form control, list view.
This expression will set the form focus on the list view.
listview2.SetSortOrder("NAME DESC")
listview2.Refresh()
Note:
Listview2 – a Form control, list view.
This expression will set sort order of the listview by the NAME column in DESC – descending order. The listview refresh method has to be called to update the listview after setting the sort order.
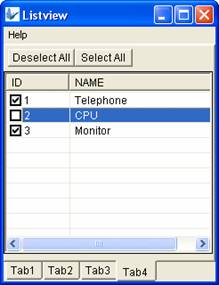
The image above displays a listview with a checkbox on each row to allow users to select multiple records from the list.
To create a listview with checkbox columns, you must have a table column that is either an integer or a boolean data type in your listview query. Then select the table column from the Check-box Column property once the List Query has been defined as shown below:
The expression to link to the “Deselect All” button is as follows:
listview2.DeselectAll()
Note:
This expression will uncheck all the checkbox columns. This will only work if the listview has a checkbox column.
The expression to link to the “Select All” button is as follows:
listview2.SelectAll()
Note:
This expression will check all the checkbox columns. This will only work if the listview has a checkbox column.
This attribute allows multiple selection of the listview rows at runtime. Using GetSelection(), GetSelectionCount() and SetSelection() methods of the listview control, the user's multiple selections can be processed.
// Returns the first of the multiple selections
local.FirstSelection = listview1.GetSelection();
// Returns the number of rows selected
local.SelectRowCount = listview1.GetSelectedCount();
// Find all the selected items
local.Count = 0;
local.Index = local.FirstSelection;
WHILE(local.Count < local.SelectRowCount)
{
IF(listview1.IsRowSelected(local.Index))
{
local.Count = local.Count + 1;
// Make the row as the current selection
listview1.SetSelection(local.Index);
// Do something
// ….
}
local.Index = local.Index + 1;
}
Note:
Listview1 – a Form control, list view.
local.* - Local form variables
The query retrieving the listview records may be changed in BrightBuilder using the SetSql() method. If the query is parameterised, the parameter may also be changed using the SetSqlParam() method after the query has been defined.
listview1.SetSql("select * from TABLE1 where ID > ?");
listview1.SetSqlParam("Param1", local.Variable);
listview1.Refresh();
Note:
Listview1 – a Form control, list view.
The SQL query which is set in the first line is parameterised, with the condition containing a "?".
In the second line, "Param1" refers to the parameter of the query in the first line. local.Variable is the value assigned to this parameter.
After the SQL query is set, the listview must be refreshed for the changes to be visible to the user.
listview1.ShowColumn(local.ColIndex, true);
listview1.ShowColumn(local.ColIndex, false);
Note:
Listview1 – a Form control, list view.
local.ColIndex is index of the column to be shown/hidden. The index is the column's position in the listview, incremented from the left with the first column being at index 0 (ie. the nth column's index is [n-1]).
The second parameter in this method, a boolean, is required. True will show a hidden column, and false will hide a shown column.
This method will insert a column into a listview at a given index, and increment the subsequent indexes by 1.
listview1.InsertColumn(local.ColIndex, "Id", "ID", local.Format, local.Width, ALIGNMENT_LEFT);
Note:
Listview1 – a Form control, list view.
local.ColIndex is index which the column will be inserted into. The index is the column's position in the listview, incremented from the left with the first column being at index 0 (ie. the nth column's index is [n-1]).
"ID" is the column name of the set of records returned by listview1's query. "Id" is the column alias.
local.Format is a variable holding a string specifying the format of the column's cell. It is optional, and may be specified as "" which will use default formatting.
local.Width is variable holding an int value specifying the column width of the inserted column. When inserted, it will be local.Width% of the current listview width.
ALIGNMENT_LEFT is a system constant found in Constants > system > Listview Cell Alignment. It specifies left alignment of the cell.
The first method will delete a column at a given index. The second will delete all columns in the listview.
listview1.DeleteColumn(local.ColIndex);
listview1.DeleteAllColumns();
Note:
Listview1 – a Form control, list view.
local.ColIndex is index of the column to be deleted. The index is the column's position in the listview, incremented from the left with the first column being at index 0 (ie. the nth column's index is [n-1]).