Expressions
Contents Hide
Expressions are used in mobile applications to perform embedded business logic, field calculations, querying databases, basically performing a set of operations to:
compute values
assign values to variables
control the flow of execution
Each form has a set of expressions which access to and can manipulate all data sources accessed by the said form. The names of these expressions are unique within the form. The expressions of a form may be managed and edited by opening the expressions tab.
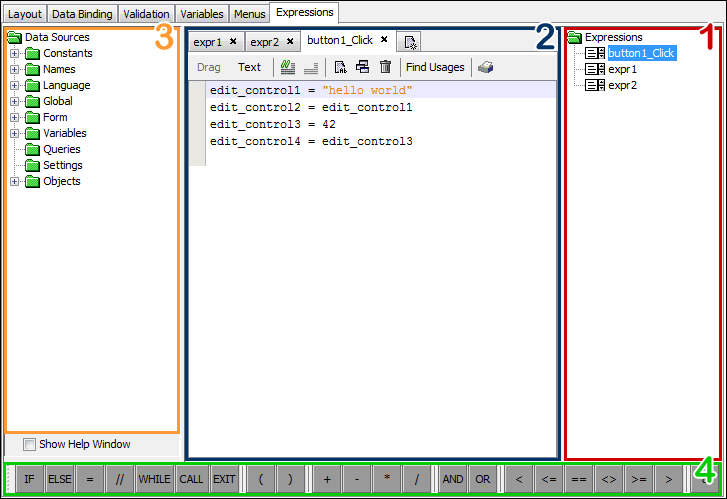
The sections are the:
Expressions Manager - Used to manage all expressions of the form, and open them in the tabbed expression editor.
Expressions Editor - Used to edit a particular expression.
Data Source Tree - is used for reference to what data sources to form has access to. Plays a major role in drag and drop mode editing of expressions
Operator Toolbar - an easy to access list of operators for drag and drop expressions.
Expression Management
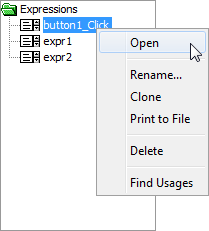
All expressions for a given form are shown under the expressions node located on the right hand side panel. Using this node, expressions may be opened, referenced and managed throughout forms, allowing for efficient and clear expression management though the interface.
Right clicking on an expression under the expression node will bring up a context menu, which is the main tool for expression management.

Alternatively, if an expression is currently opened, the expression toolbar will contain options to rename, clone, delete and print the current expression.

Browsing Through Expressions
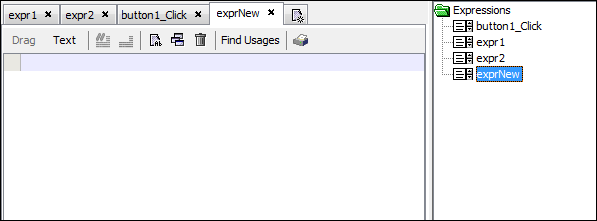
Once opened, an expression is added to the tab of opened expressions. The names of opened expressions are shown as tab headings, and the expression currently being edited is represented the active tab. Expressions may be switched to and from at any time using these tabs. The can also be navigated through using the Ctrl+Page Up and Ctrl+Page Down keys, going to the previous tab and next tabs respectively.

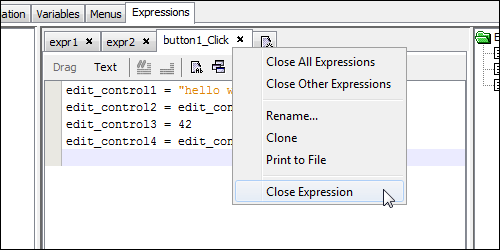
Right clicking on a tab heading also brings up a context menu which allows further management of the set of opened tabs.
Creating a New Expression
The New expression tab is always present no matter how few or many expressions are opened. If clicked, the new expression will appear as the right most tab in a set of opened expressions in the expressions tab.
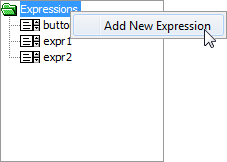
Alternatively the Expression Manager's Expressions node "Add New Expression" pop up menu option can be used to create new expression in the form.
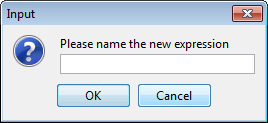
If the tab icon is clicked, an input dialog for the new expression's name will appear.
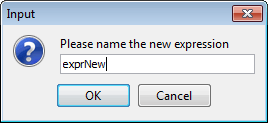
When the new expression is created, will show up in the expressions explorer, and open for editing.
Expressions may also be created via external means, such as double clicking on a button control.
Opening Existing Expressions
Expressions may be opened via their context menu in the Expressions node. Double Clicking the expression will also have this effect.
You may also open it via a context menu, or ‘jumping’ to an expression through a control or another’s CALL operand.
Opening an expression will bring it up for editing and include it in the list of opened tabs. If already opened, this process will ‘jump’ to it in the set of opened tabs.
Closing an Expression
Closing an expression will remove it from the editing space. Opened expressions may be closed via the close button to the top right of its editing tab.

The state it was left in will be the same state it will be opened in at any later stage. Through tabs' context menus, all expressions or all other expressions can be closed through the 'Close All Expressions' and 'Close All Other Expressions' methods respectively.
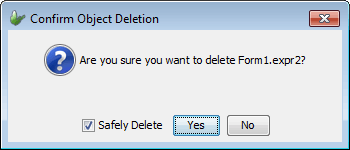
Deleting an Expression
When deleting an expression, BrightBuilder will ask for confirmation. If “Yes” is selected, the expression will get removed from opened tabs and the list of expressions.
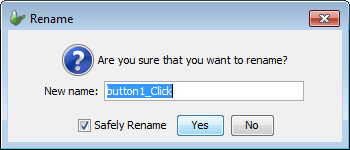
Renaming an Expression
This will rename an existing expression, based on the name entered in the “Rename expression” input dialog.
Cloning an Expression
This copies an expression to one with a new name. When clone is selected, a dialog prompting a name for the cloned expression will be displayed. After entering a name, a new expression will appear in the expressions list, with statements the same as the original expression.
Printing an Expression
This option exports the expression to a txt file in the working directory. The text file will contain the expression in text mode and a header detailing project and form information. This is mainly used for documentation purposes. An example of the output is as follows:
//-----------------------------------------------------------------------------
//
// button1_click
//
// Project : ExpressionTest
// Form : Form1
// Author :
// Version : 1.0
//
//
//-----------------------------------------------------------------------------
edit_control1 = "hello world";
edit_control2 = "42";
edit_control3 = edit_control2;
edit_control4 = edit_control3;
Copying Between Forms
To use this functionality,
Right-click the form where the expression will be copied or cut from.
Select Cut Expression... or Copy Expression... as required. The new dialog will display to show the different expression that can be cut or copied, as shown below:
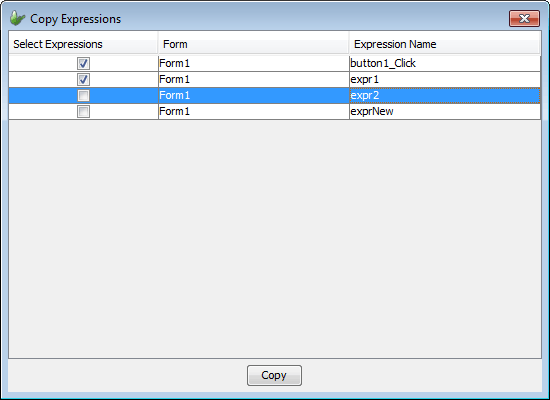
Click Copy button from the dialog and the expression will be saved to the clipboard.
Select a form to copy the expressions selected to.
Expression Construction
An expression constructed via a sequence of statements (lines) which may contain combinations of identifiers, operators, values and methods. The execution order of the expression is determined by the order of these lines and the precedence of control operators. Comments may be used in expressions to omit lines from the execution order.
Identifiers
Data sources such as controls, query result records and parameters, which represent the storing information are referenced via identifiers in expressions. Using these identifiers, the values can be assigned, retrieved, compared or calculated, depending on the operators or methods used in conjunction with them.
Values
Given a line in an expression, a form's variables will have values assigned to them. Values are constant data, and may be of types string, int, boolean or double. They may also be in the form of system or user constants, which are of these types, but are given special identifiers which contain immutable, unchangeable values. All variables must be assigned to an identifier or associated with an operator within expressions.
Type Conversion of Values
Data type checking within form expressions is not strict. This means that it is acceptable to assign a string data source to an integer data source, for example. In this case, the string would be converted to an integer and the resulting value would be used for the assignment. For assignment, the conversion is always right-to-left; the right hand side is converted to the type of the left hand side.
It is also possible to mix data types on the right hand side. In this case, the type of the operator dictates the resulting data type. For example, a multiplication operator separates a string and an integer. Since multiply is a numeric operation, the result must also be numeric, so the string is converted to a number and the result is multiplied with the integer.
Operators
There are several types of operators; BrightBuilder has the following operator categories:
Grouping used to modify operator precedence.
Arithmetic operate upon numbers and produce numbers as their results.
Logical operate upon Boolean values (True or False) and produce other Boolean values.
Relational allows the comparison of two operands, which results in a Boolean value.
String operations that can be performed directly on strings.
Expressions in BrightBuilder can also use the IF/ELSE statements to perform actions depending on criteria. It also has an assignment statement to write values to the data sources.
Note: To add an ELSE statement to an IF statement, drag the ELSE keyword onto the IF keyword in the expression in Drag and Drop mode.
The following table below list and describes all the toolbars that can be used within your form expressions.
Control Operators
| Name | Icon | Description |
| If | IF | Allows conditional execution of a group of statements, when the given condition is true. |
| Else | ELSE | Paired with IF, will execute a group of statements if the given condition is false. |
| Assignment | = | Used to assign values to a data source. |
| Comment | // | A remark by the designer, encoded within the expression. Comments will be shaded in green. |
| While | WHILE | Allows iterative execution of a group of statements while the given condition remains true. |
| Call | CALL | Executes other expressions within the form. |
| Exit | EXIT | Terminates execution of the expression. |
Grouping Operators
| Name | Icon | Description |
| Opening Parenthesis | ( | Used side by side to modify operator precedence. Any sub-expression inside the parentheses will be evaluated first. |
| Closing Parenthesis | ) |
Arithmetic Operators (result is always a number)
| Name | Icon | Description |
| Addition | + | Addition: the values of the left and right operands are added together. |
| Subtraction | - | Subtraction: the value of the right operand is subtracted from the value of the left operand. |
| Multiplication | = | Multiplication: the values of the left and right operands are multiplied by one another. |
| Division | / | Division: the value of the left operand is divided by the value of the right operand. |
Logical Operators (result is always a boolean)
| Name | Icon | Description |
| And | AND | Combines two boolean values and results in TRUE only if both operands are true. |
| Or | OR | Combines two boolean values andd results in TRUE if one operand is true or if both operands are true. |
Relational Operators (result is always a boolean)
| Name | Icon | Description |
| Less than | < | |
| Less than or equal | <= | |
| Equal to | == | [Does not work for strings, use function] |
| Not Equal to | <> | |
| Greater than or Equal to | >= | |
| Greater than | > |
String Operator (result is a string)
| Name | Icon | Description |
| Concatenation | & | Appends the contents of one string to the contents of another string. |
Methods
Methods return a value, calculate values through complex operations, or trigger a change in state in an application. They may also be used to access virtualised processes such as accessing the a device's camera.
Methods are grouped in the Data Source Tree under the node "Objects". Because of the various methods available to developers, there is a section dedicated to them in the help documentation in the form of the Object Methods Reference Manual.
Comments
Comments are used to improve code readability and can also be used to omit lines of code when an expression executes. Typically, developer specified comments are noted with the // prefix in a line, and can be located on the same line as a valid function.
//*** may be used to comment out a whole line which is reversible
in Drag and Drop mode. The [![]() ]
and [
]
and [![]() ]
buttons allow commenting out and removing said comments
respectively. These can also be done over multiple lines, and
is thus particularly good for removing pieces of code temporarily
during the testing phase of an application.
]
buttons allow commenting out and removing said comments
respectively. These can also be done over multiple lines, and
is thus particularly good for removing pieces of code temporarily
during the testing phase of an application.
Editing Expressions
Cut/Copy/Paste/Delete
Both Drag and Drop and Text modes for expressions allow cut, copy, paste and delete functions, which are accessible either by the right click context menu, or via commands. Pasting pastes the copied or cut code at the currently selected location, whether it be lines (in Drag and Drop mode) or where the cursor is located (in Text edit mode).
| Name | Shortcut |
| Cut | Ctrl + X |
| Copy | Ctrl + C |
| Paste | Ctrl + V |
| Delete | Del |
These operations may operate over one or more lines in both modes, however, fragments of lines may only be edited in this fashion in Text mode. The text cut and copied is within their respective modes only, but can be utilised across expressions and across forms.
Drag and Drop Mode
Expressions are mainly edited in BrightBuilder using the Drag and Drop expression editor. Constructing expressions using this method with completed placeholders will always result in an executable expression.
Furthermore, aspects such as syntax highlighting and the easy access to all data sources in scope results in a developers requiring less cognitive load when developing expressions, enabling a greater focus on a form's functionality. It is the default editor expressions are set in when created.
Data Sources and Operators
The data source tree has a more functional role in Drag and Drop mode, where data sources located in the tree may be dragged and dropped into the expression's working area. Operators may also be dragged and dropped in a similar way, from the operators panel at the bottom of the expression editor. These operands may also be dragged and dropped to other positions within the expression editor itself, in which case a copy will be made.
Dragging and dropping either of these constructors in a correct position will result in the area being highlighted in blue. A correct position may include blank portions of code, ??? placeholders, or existing operands. If an operand is dropped on top of an existing operand, the dragged value will replace the existing one.
An example of this is as follows:
The data source is selected, with the mouse button held down.
The data source is dragged and dropped to the desired location.

The mouse button is released, and the destination is updated to the dragged value if correct.
If not, an error message will display at the bottom of the expressions editor, and the expression left in tact.

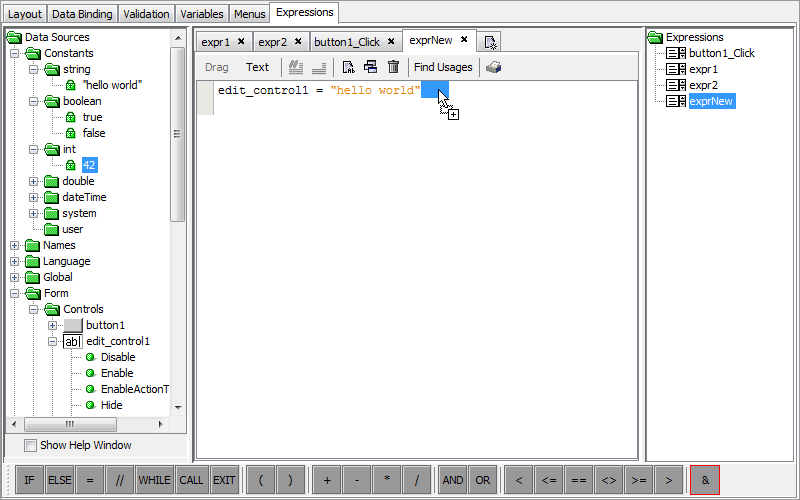
Furthermore, data sources may be dragged and dropped within the expression if they need to be used more than once. An example of this is as follows:
Click and hold the data source within the expression.
Drag the data source to the desired location within the expression. The value placeholder or existing data source to be overwritten will be highlighted.
Once the mouse button is released, the destination is updated to the dragged value if correct, just as if it was dragged from the DST.
Inserting New Lines
New statements are represented by new lines and may be constructed by dragging and dropping an identifier, method or a control operator onto a line in an expression. A new line will be created above the line dragged to in this process. Once this is done, the structure of the operation will be constructed with placeholders.
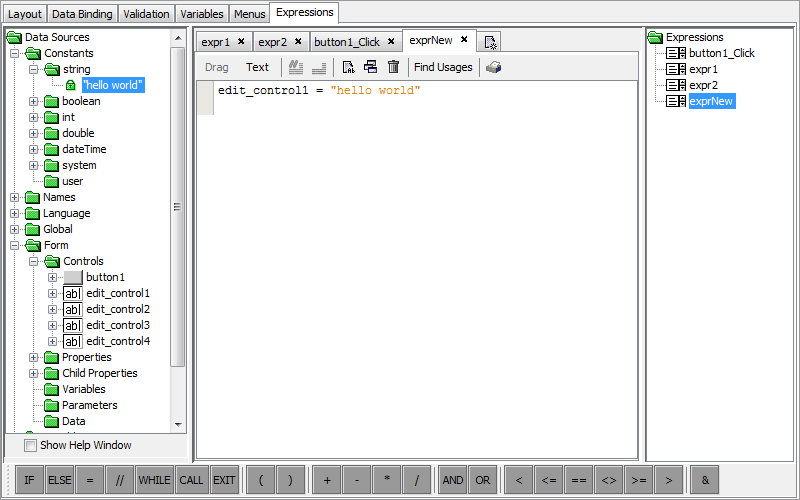
If an identifier is dragged and dropped on a new line, an assignment operation will automatically be constructed.
In the screen below, the data source 'edit_control2' is dragged and dropped to the expression editor. When this is done, a line is highlighted (depending on where the mouse is located. This demonstrates where the operand will be set.
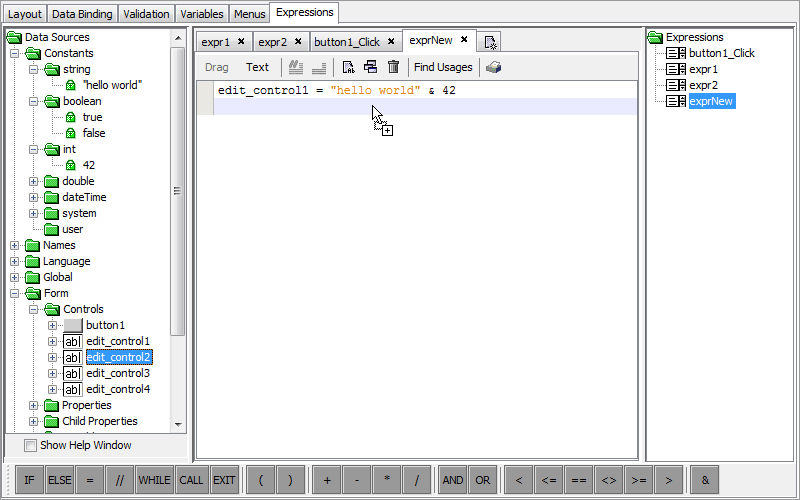
Once the mouse button is released, the assignment operator for the data source will be placed in the highlighted area.

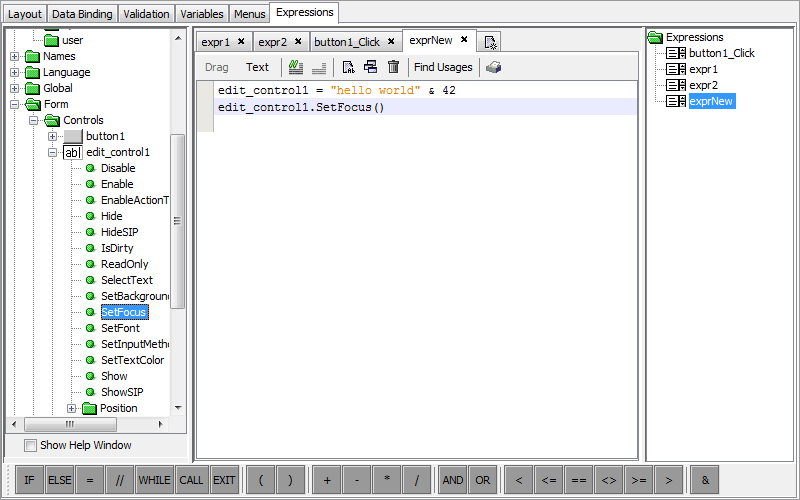
A method can be dragged to and create a new line. Generally those with void return types are to be inserted into expressions in this manner but it may be done regardless of the return type. Those with return types should be used with placeholders.
Below, the method 'edit_control1.SetFocus()' is to be inserted on the purple line.

As it is valid, a new line is created with this method.
If an incorrect operand is dragged and dropped to a new line, an error message will display
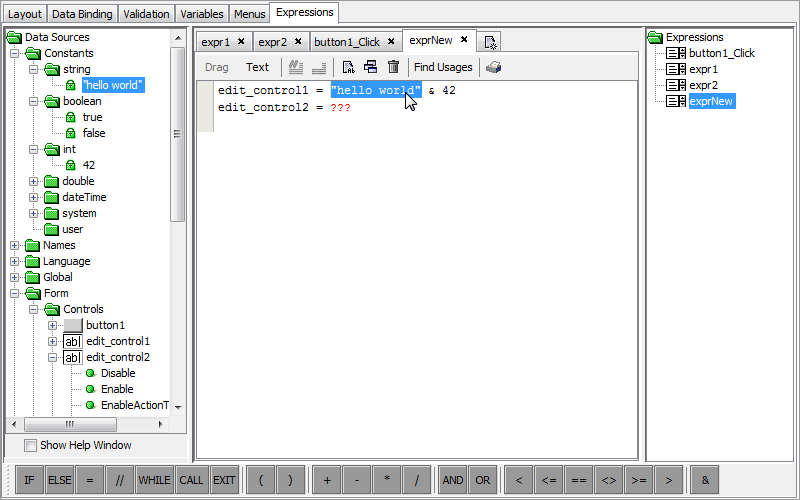
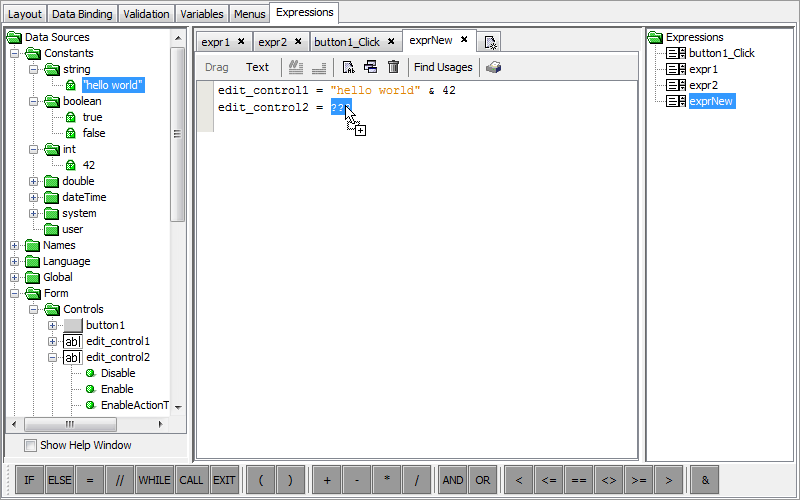
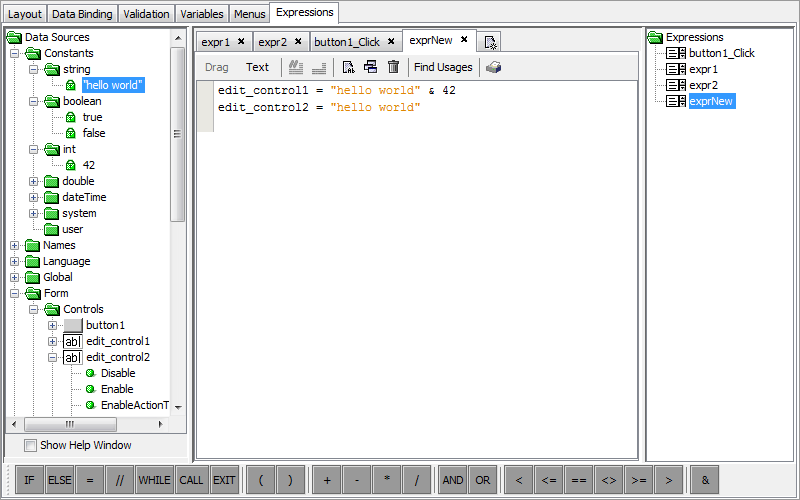
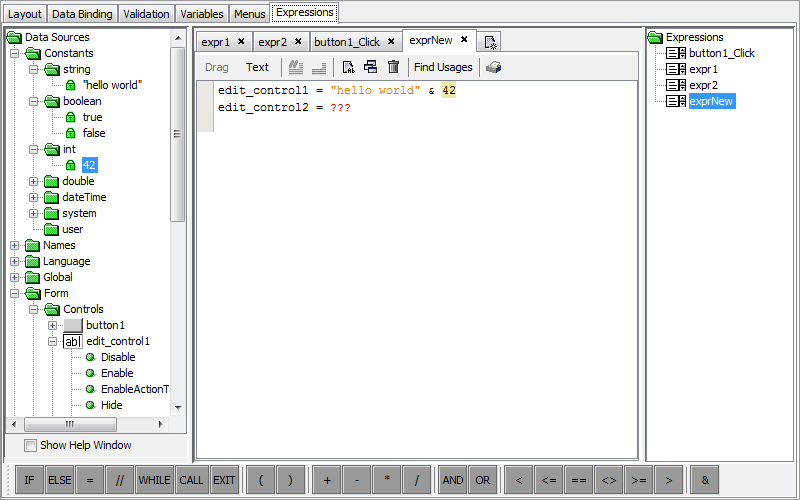
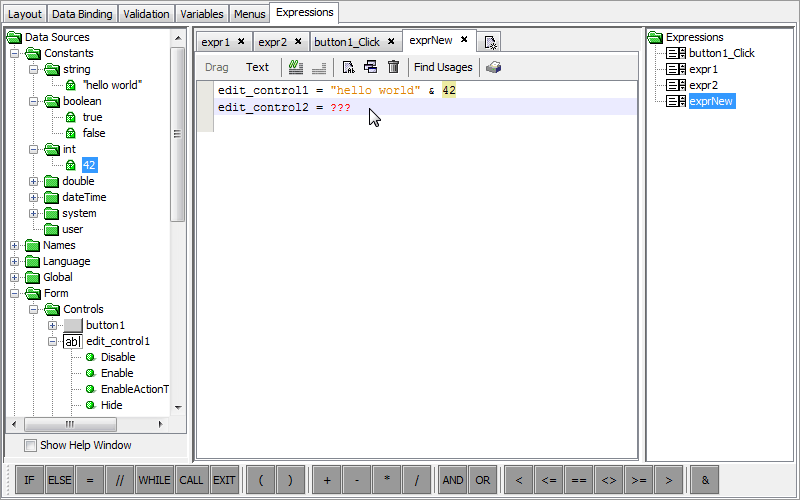
Value Placeholders
When a new line is constructed, values which need to be inputted are signified by the ??? placeholder. These values may have identifiers, values, methods or operators dragged and dropped onto them. Double clicking these placeholders will result in the input dialog being opened. Placeholders are generally type cast by default.
The exception to this behaviour are the '// (comment)' and CALL expression operands, where the values are variable or populated respectively.
The comment operand may be changed via double clicking on the line, and then entering the desired comment in the field.
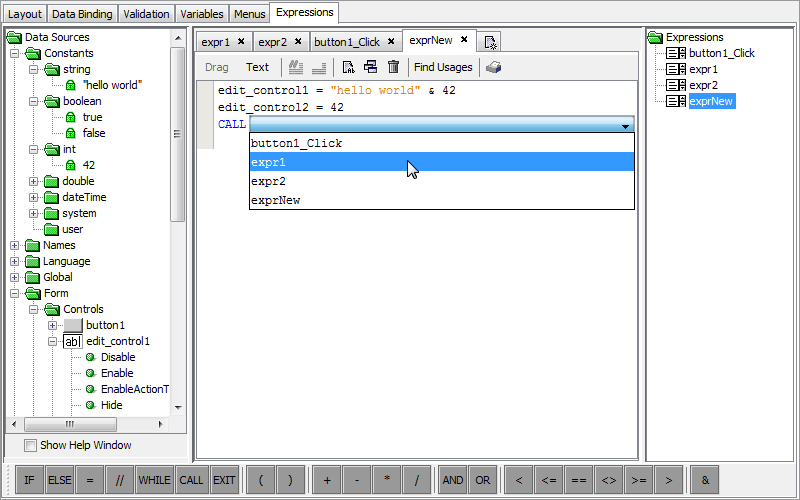
The call operand's line may also be double clicked, which opens up a drop down menu containing the forms expressions which may be called.
Please note that expressions with outstanding ??? placeholders within drag and drop expressions will call the EXIT operand on the ??? placeholder's line on execution.
Selecting Operands
Operands may be selected individually. If the delete key is pressed on a selected operand, it will remove and replace it with a placeholder.
- Here, the constant '42', which is assigned to 'edit_control2' is selected.

- Pressing the delete key will revert it to a placeholder.
Selecting Lines
If a line is selected, it's context menu may be accessed to cut, copy and perform other operations on the selected line.
The screen below shows a line selected (in purple)
Right clicking at this point will bring up a context menu with available operations which may be performed on the line.
The delete button may also be pressed to remove this line from the expression.
Multiple lines may be selected multiply by firstly clicking on the first line you wish to select and holding shift, then clicking on the last line you wish to select. From this point, you may delete or open a context menu, just like on singular lines, and all changes will apply to the lines selected.
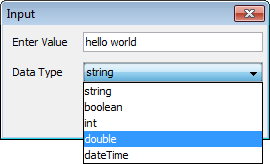
Input Dialog
Double clicking on an editable placeholder, i.e., one that will house a constant - populated or not, will result in the Input Dialog being displayed. This also includes 'placeholders' or fields in the data source tree for constant values. This Input Dialog allows the input of constants to BrightBuilder's set of types. Below is an example of the Input Dialog.
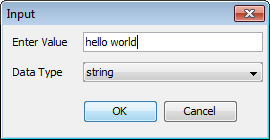
Here, the values and types may be changed, and once all changes are complete, the OK button may used to commit the changes in a given placeholder.
Depending on the type expected, the dialog will change, for example, in methods which requiring a query, the Input Dialog will display the set of query names in the project. The dialog's type will also adapt to any changes in the input for values where the type is not set.
When types are free (any), the type of constant may be changed via the dialog's drop down menu.
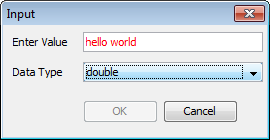
Text will appear in red if the input entered is inconsistent with the type defined, or type expected. As the value is not valid, the input progress may not continue, and thus the OK button is blanked out, prompting change needed.
Operators via Data Source Tree
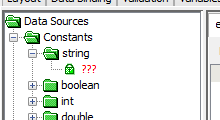
While the input dialog may be used to create constants in expressions, they may also be created under their respective types under the 'Constants' node of the Data Source Tree.
To register a new constant value to be used in expressions, double click the ??? placeholder or an existing value in the tree to enter in editing mode.
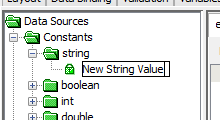
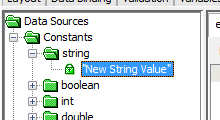
Tapping out of the field, or pressing enter will submit the value. The value may then be dragged and dropped into expressions, as other sources in the DST.
Tapping ESC will cancel any changes made.
Values will be validated as they are entered into the editing field. If a value is invalid, it will appear in red while being edited, and submitting will cancel any changes made via editing.
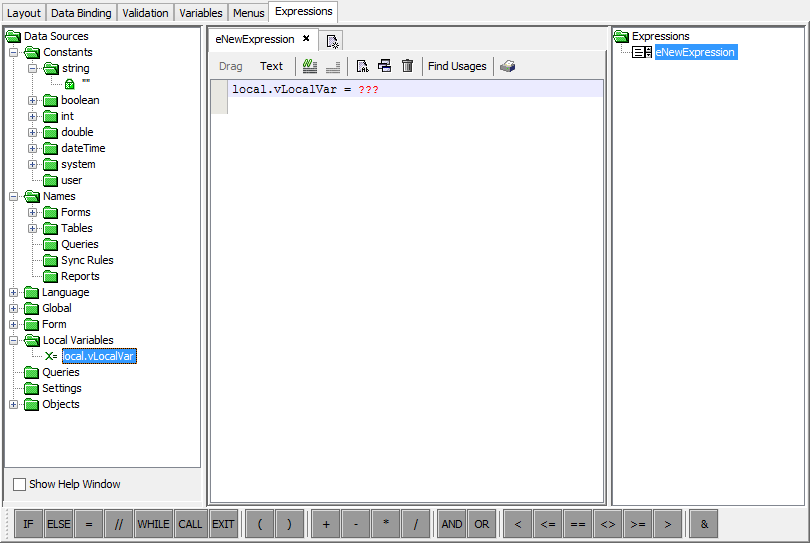
Managing Local Variables
Local variables are variables whose lifetime only exists within the current expression.
Local variables may be created by right clicking the "Local Variables" node in the DST, and selecting "Create New ..."
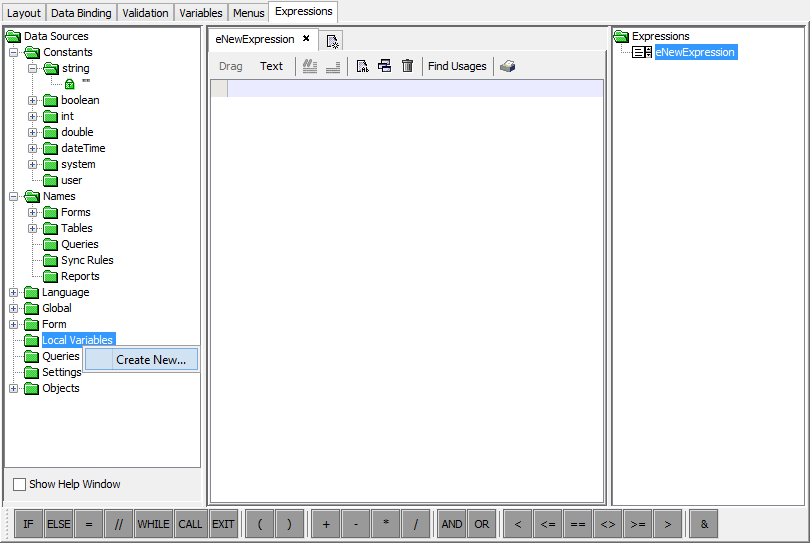
A dialog box will appear to specify the variable name.

Once created, variables may be dragged and dropped into expressions for use. They may also be renamed by right clicking the variable, and selecting 'Rename...', or by double clicking the variable in the DST. Renaming local variables will refactor all their occurrences in the expression.
Any unused variable may also be removed from the DST by right clicking and selecting 'Remove'. This option will be disabled for any variables being used in the expression.
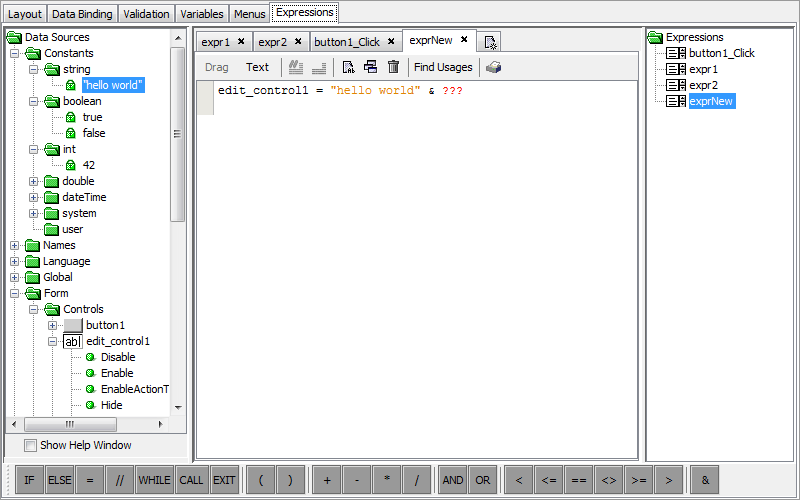
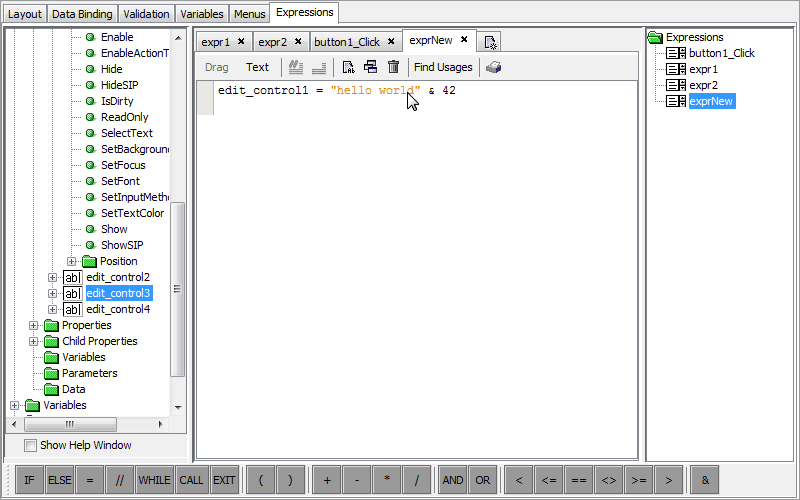
Appending Operators
Adding additional operators when calculating values may be achieved by dragging and dropping Grouping, Arithmetic, Logical, Relational or String operators in the space before or after a placeholder, where applicable. This will add the operator into the statement, and add a placeholder for the additional operand required in the operation.
- In this example, the '&' operator is dragged and dropped to edit_control1's assignment. Notice that the whole line isn't selected; only a portion of the line is.
- Releasing the mouse button will place the operator in the location, with a placeholder if applicable.
Locating Sources or References
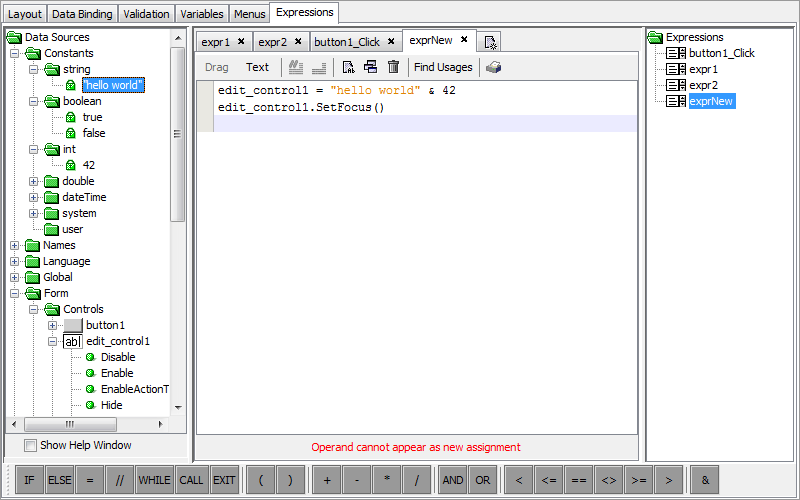
Clicking on a data source in the working area will result in the source being looked up in the Data Source tree.
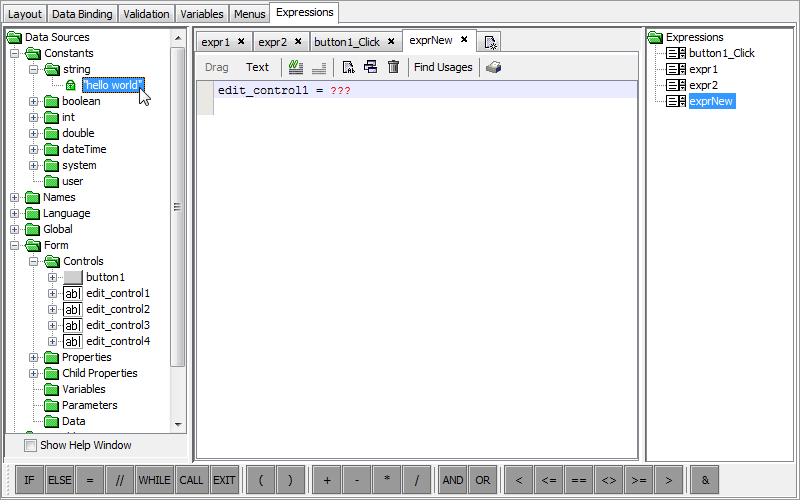
- In the example below, the constant string 'hello world' is to be clicked.
- Once clicked, the data source tree locates and highlights the data source.
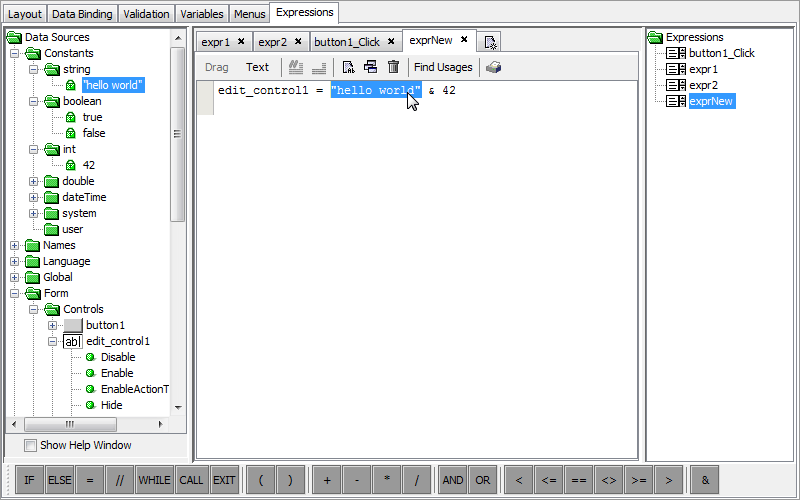
- Within expressions, data sources may be clicked, which will highlight each occurrence of the data source within the expression. In the example below, the number '42' is highlighted.

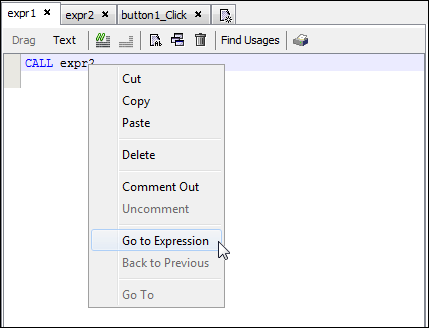
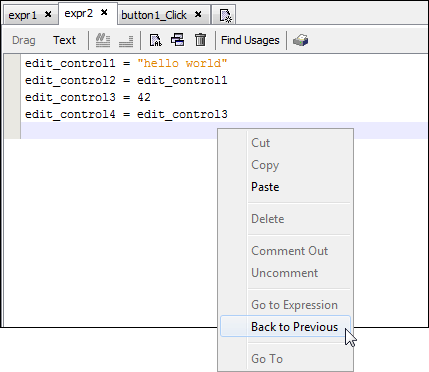
By Right Clicking on a CALL operand, selecting the Go To option will jump to the expression the CALL operand refers to. After this is done, the initial expression may be located using the "Back to Previous" in the editor's Right Click context menu.
- Here, the 'Go to Expression' option in the context menu is clicked.
-
- Once the expression has been entered through this operation, it may similarly be returned, via the 'Back to Previous' option in the opened expression's context menu.
Furthermore, the usage of a named Sync Rule, Table, Query or any other project element may be opened via the 'Go to' option in the editor's context menu.
Firstly, select the name of the element to look up on the line in the editor and then right click.
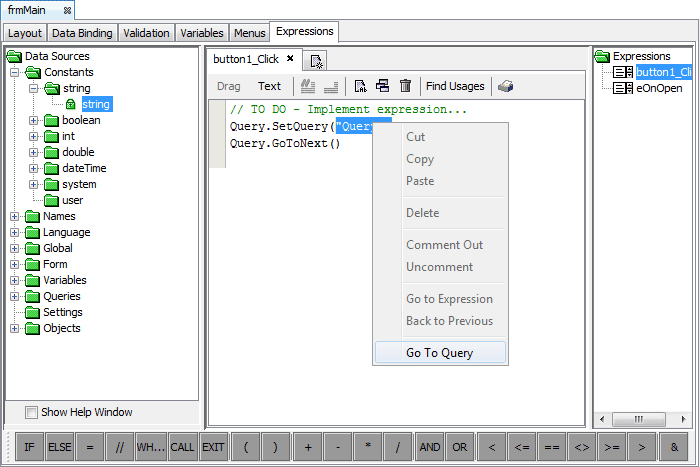
Selecting the 'Go to' option (in this case 'Go to Query') will open the selected element for editing.
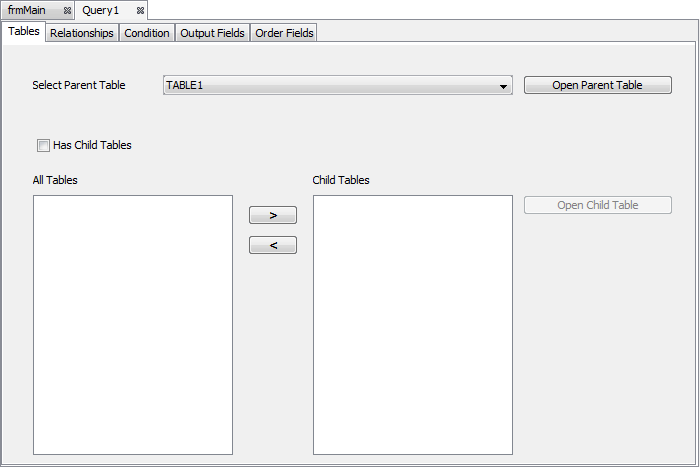
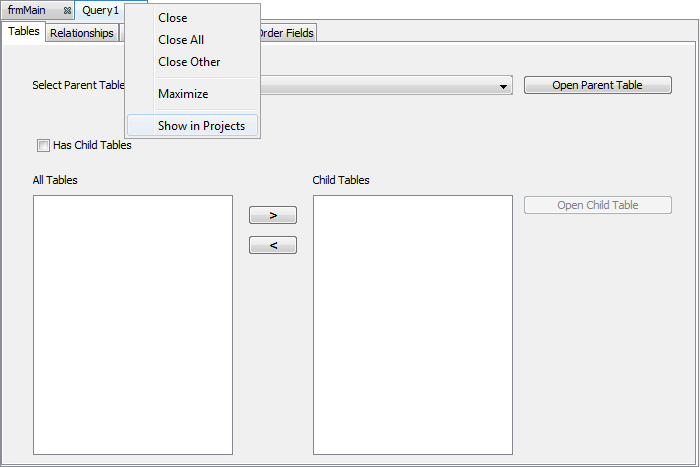
Once opened, the element in question may be located in the Projects panel by right clicking on it and selecting the 'Show in Projects' option.
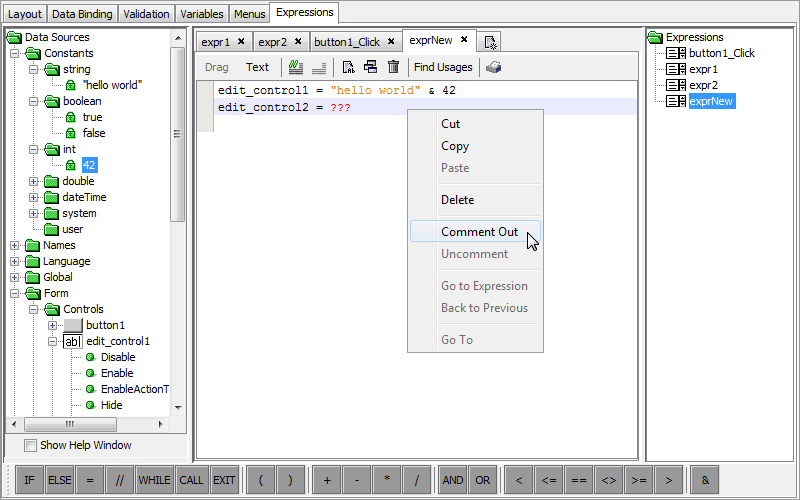
Commenting and Uncommenting
Commenting out lines may be achieved by right clicking and selecting
'comment out', or clicking on the [![]() ] icon in
the editor toolbar. This may also be reversed by the 'Uncomment'
option in the same menu, or the Uncomment button [
] icon in
the editor toolbar. This may also be reversed by the 'Uncomment'
option in the same menu, or the Uncomment button [![]() ].
Lines which are commented out will not be executed.
].
Lines which are commented out will not be executed.
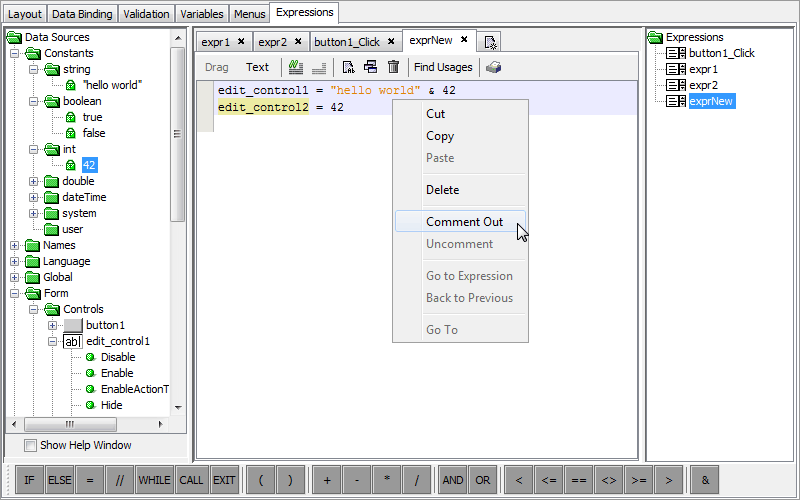
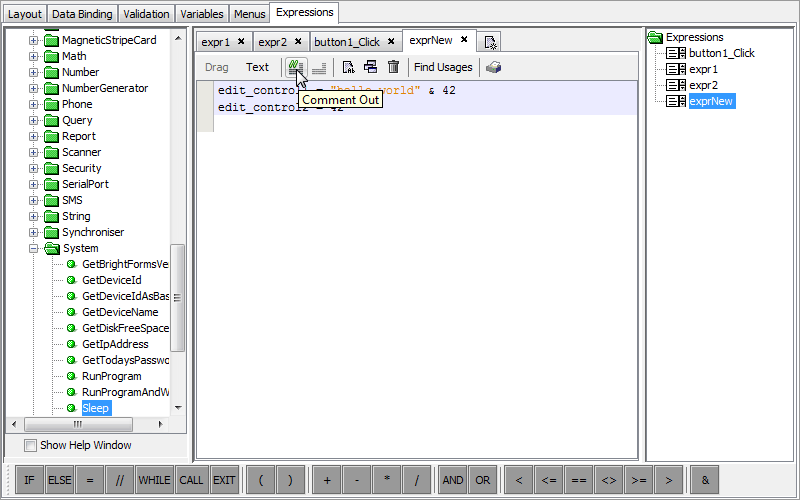
The steps below demonstrates the commenting and uncommenting out of code:
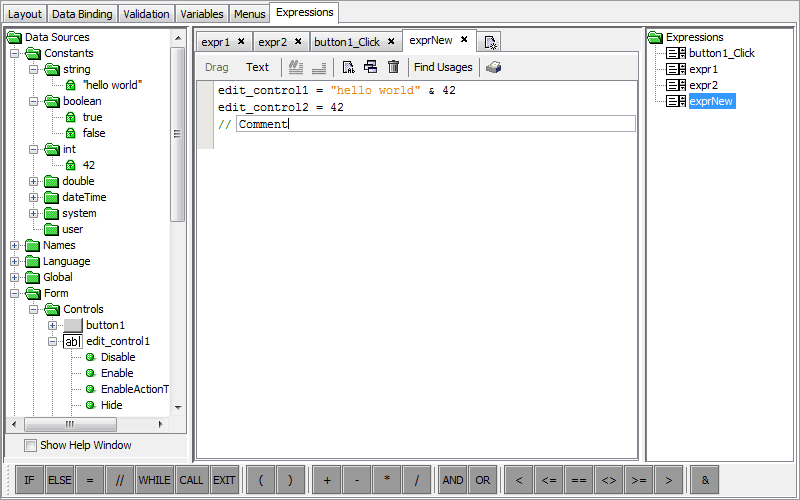
- Firstly, the two lines of exprNew are highlighted. The lines will be commented out in this example. As the two lines is not commented out, the Uncomment button is not accessible.
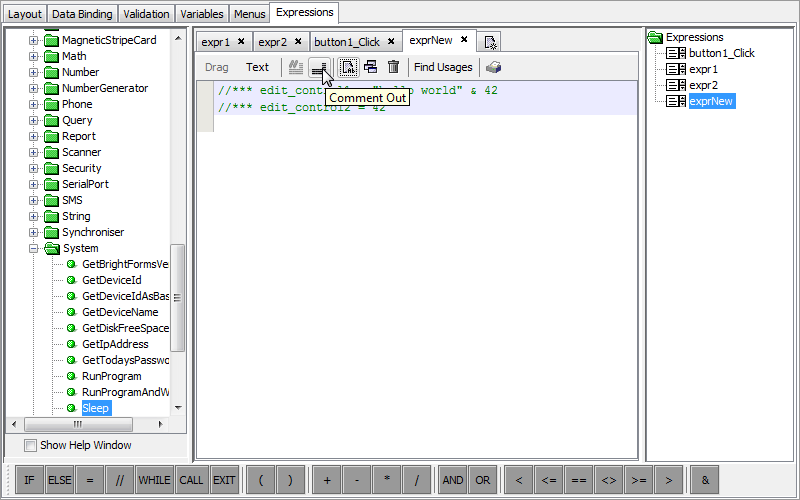
- When the button is pressed, the two lines are commented out via the "//***" prefix.

- The 'Uncomment' button is now also accessible, and the comment non-accessible, as the two lines are now lines which are commented out.
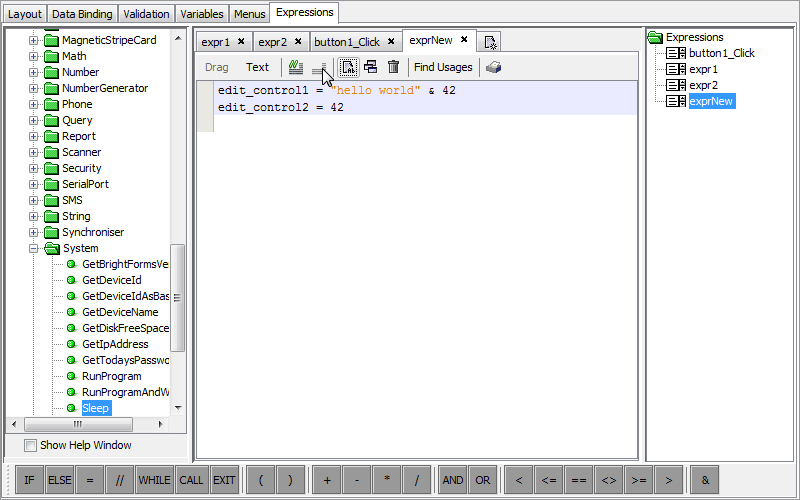
- Clicking on the 'uncomment' button will now revert the lines to their previous state.
Text Editing Mode
Text editing mode is a mode designed for developers who are
more familiar with the BrightXpress suite or who want to manually
bypass Drag and Drop conventions for whatever reason. This editor
may be accessed by clicking on the  button,
and exited by the
button,
and exited by the  button.
The editor for this mode is a simple text editor which displays a line and column reference for error tracking. It also supports Undo/Redo functionality through the context menu or the shortcuts Ctrl+Z and Ctrl+Y respectively. When in this mode, developer should note the differing conventions for statements compared to Drag and Drop mode. These are as follows:
Validation. Text expressions are validated when switching back to drag mode or when project validation occurs to check for syntactically correct expressions. If there are errors, validation will fail and you will not be able to switch to Drag mode or execute the application without locating and fixing the parsing errors listed by BrightBuilder. Furthermore, an expression in this state will not run in an application.
Expressions statements should be terminated by the semicolon (;) character, of course with the exception of IF, ELSE and WHILE statements.
For example:
Variable1 = string;
Form.Close();
Incomplete statements. Incomplete statements may still be parsed when switching over to drag mode. For instance, an Assignment statement may be missing its left hand side or right hand side or both, but will still parse successfully. Or an Object Method may be missing one or more of its parameters but will still parse successfully.
Form.MessageBox();
In Drag mode, will parse into:
Form.MessageBox(???,???,???)
Escape Character. The back-slash escape character may be used to indicate a quotation mark (") as well as itself (\) inside a string literal. This is essential if the quotation mark is meant to be part of a string.
For example:
In drag-and-drop mode an IF statement may appear like this:
edit_control1 = "quotation mark = ", backslash = \"
The same statement in the text editor would be:
edit_control1 = "quotation mark = \", backslash = \\";
Branching Conditions. IF and WHILE statement conditions must be contained within parentheses.
For example:
In drag-and-drop mode an IF statement may appear like this:
IF edit_control1 == "yes"
{
}
The same statement in the text editor would be:
IF (edit_control1 == "yes")
{
}
Implied brackets. IF, ELSE or WHILE statements must always have brackets that follow immediately after them. If they are left out, however, it is implied that the next statement is included under the IF, ELSE or WHILE statement.
For example:
IF (booleanVariable)
edit_control1 = "Hello";
edit_control1 = "World";
Would be the same as:
IF (booleanVariable)
{
edit_control1 = "Hello";
}
edit_control1 = "World";
The exception to this behaviour are comments. Any comments are also included inside the brackets. For example:
IF (booleanVariable)
// if this condition is met
// edit the form component
edit_control1 = "Hello";
edit_control1 = "World";
Would be the same as:
IF (booleanVariable)
{
// if this condition is met
// edit the form component
edit_control1 = "Hello";
}
edit_control1 = "World";
Comments. Lines can be commented out using the prefix //. If a statement had been commented out while in drag-mode it would have been commented out with the prefix //***. This will preserve the statement so that it can be uncommented in drag-mode by right-clicking the statement. Alternatively a section of the text can be commented out by enclosing the section inside /* */ characters. This is useful when the entire line does not need to be commented out.
If an incomplete or invalid statement was commented out in text mode, this line cannot be uncommented in drag mode.
For example:
// This is a comment that extends to the end of line
// The following line is a commented out statement
//*** Variable1 = 123;
/* This comment spans multiple lines
There are no stars on this line
This is the end of the comment */
Shorthand operands. Some operands may be very long and require much typing. To alleviate some of this typing, shorthand operands may be used in the text editor. For instance, there may be a User Constant identified by the string: UserConstantGroup1.TerritoryID1. To type this out repeatedly would take a lot of time. However if the identifier TerritoryID1 were unique then the text editor will intelligently map TerritoryID1 to be the same as UserConstantGroup1.TerritoryID1. The identifier would be unique if there were no other Variables, User Constants, Query Parameters or possible operands that use the same name.
The following may have shorthand operands:
Query parameters and query output fields provided there is no Form Data within the form the expression is used.
Global variables
User Constants
Application Settings
Keywords must be upper case.
All keywords including, IF, ELSE, WHILE, CALL, EXIT, the operators
AND and OR, and all System Constants must be upper case.
Fully type qualifying. It may be possible for different
types of objects to have the same name. For instance there may
be an edit_control on a form named "Status" and also
a Variable with the same name. In this case the identifier Status
would be ambiguous. Hence in these cases fully type qualified
identifiers must be given that casts the identifier to a type
of object.
Use the type qualifier name together with the scope resolution operator (::) and the object name. The notation would be as follows:
<Type_Qualifier>::<Object_Name>
For example:
Control::Status
Variable::Status
When an ambiguous identifier is encountered during expression
parsing, an error will be shown and the user will be prompted
with possible fully type qualified identifiers.
Below is a table of possible type qualifiers.
| Type Qualifier | Object |
| Control | Form Component E.g. Control::edit_control1 |
| Setting | App Setting Setting::Setting1 |
| Variable | Form Variable Variable::Variable1 |
| FormData | Form Query Data FormData::FIELD1 |
NOTE: This cannot be used with Shorthand operands.