Data Binding
Contents Hide
Data binding in BrightBuilder is simply a mapping of form controls to the table columns. This is one of the powerful properties of the BrightBuilder form. Using this feature, cursor form functions can be added, which allows the user to navigate through the query record set.
The Data Binding tab has two distinct mapping functions, one for loading data to the controls and one for saving control values to the table columns.
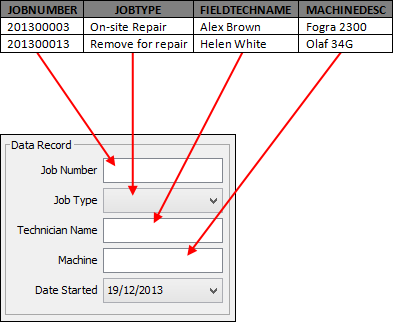
Load mapping populates the form controls with the data from a table record, allowing the user to view all the relevant fields of that record at once, refer to the following figure:
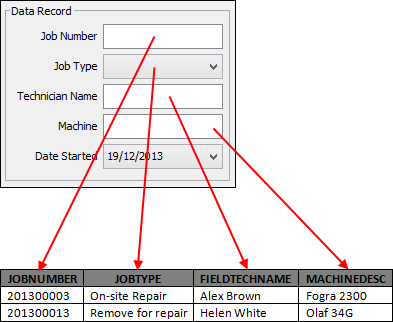
While the save mapping places the data contained in all included form controls into a record.
After selecting a form query, the data from the result set of that query becomes the Form Data . Form Data is the output fields from the query, whether it is from a parent table or child table or it has a function attached to it. All these fields will be available in the form for loading. Only the parent table columns of the query will be saved to the parent table.
Care must be taken when selecting the query Output fields especially if wanting to save data to the table columns, all non-nullable parent table columns must be included in the query output and filled out in the Save Data to Table Columns section. Another point to remember is that all form data appearing in the Load UI Elements section must also appear in the Save map to ensure data integrity when loading and saving.
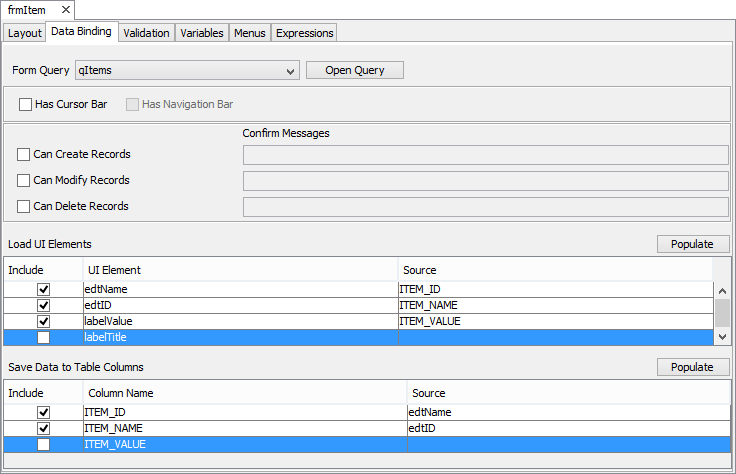
The previous image is the form Data Binding tab, use this tab to specify the form query, load and save maps for the application.
Attaching a query to a form
To be able to use the Data Binding facility of BrightBuilder, you must first attach a query to your form, assuming you already created a query in your project.
Go to the Data Binding tab of the form you want to attach a query to.
Select a query from the Form Query list.

Notice that the Has Cursor Bar checkbox is now enabled and that columns from the parent table of the query are loaded in the Save Data to Table Columns section. Also observe that in the Data Source tree, Form/Data now includes the Query Output Fields.
Using the Cursor Bars
Ticking the Has Cursor Bar checkbox allows the transformation of the form to a cursor form; it will also enable the following cursor form properties :
Has Navigation Bars allows the user to traverse the form query record set.
Can Create Records allows the user to add new records to the parent table of the form query.
Can Modify Records allows the user to modify any fields of the form query record set except the primary keys.
Can Delete Records permits the user to delete any of the form query record set.
Confirm Messages built-in user-defined dialog boxes that will be displayed once a user saves, modifies or deletes a record set.
If the cursor form is enabled and all properties were ticked, upon execution, the form Title will include a cursor index and will contain the following buttons:
New
Save
Delete
Navigation bars
Any of the cursor form properties can be included or excluded to correspond to the business application.
Loading Data to the UI elements
When creating the form layout, all the form controls that can accept user input, like edit controls and combo boxes, that have been added to the layout will automatically be included in the Load UI Elements section of the Data Binding tab.
Loading data to these form controls populates the form control fields with a specific data source, usually the query record set linked to the form.
Note that only the Output Fields in the form query can be loaded to the form controls and this information will be included in the Form/Data subtree of the Data Source.
The Form/Data subtree contains all the query output fields. Loading a table column that is not included in the query Output Fields will issue a validation error that the data to be loaded is not available.
To Load a query record set to the user interface elements, follow these simple steps:
Go to Data Binding tab of the Form and attach a query to that form.
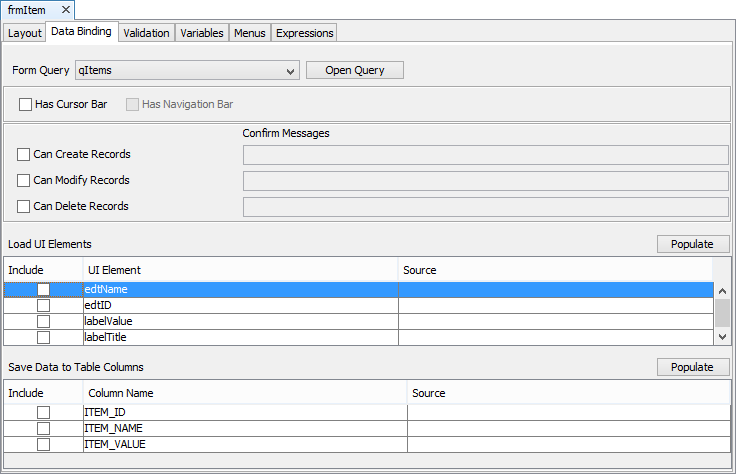
In the Load UI Elements section, tick the Include checkbox besides the form control name that the data is to be loaded to. The ellipse/cutomizer button will appear in the Source column for that control as shown below.

Click on the customiser button to display the Choose a Data Source dialog box, see Section 15.5.
From the Data Sources tree; expand the Form/Data to view all the form query output fields.
Select the output field that is to be loaded in to the user interface control and click OK.
An expression can also be used to load data to the UI elements; by using expressions, some changes or calculations can be made before displaying the data on the form layout. Alternatively a constant value could be loaded into the form controls. Then from the Choose a Data Source dialog box, do any of the following:
To load a constant data source, select the information from the Data Source tree by expanding the collection of sources available for the form and click OK.
To load an expression, tick on the Select an Expression radio button, select from the expression list, this list contains all the expressions available in the form and click OK.
Ticking the Include checkbox of a form control prepares BrightBuilder to accept some data from the form, forgetting to fill up the Source column of the UI element will issue a validation error upon Validate or Validate before Execute.
Unticking the Include checkbox will reset the Source column.
Removing the form query will not reset the Load UI Elements section and the form controls loading will have to be manually removed to reset the data loading function.
If the Save Data to Table Columns has already been filled-up, you can click the Populate button to automatically fill the Load table with the matching table columns based from the save table map. This feature is quite useful if your data binding is simple matching of table columns and form controls.
Saving Data to Table Columns
The Save Data to Table Columns feature allows data to be simultaneously stored in a single database record. Thus it is essential that a form query exist to make the table columns accessible. Saving to the database using BrightBuilder Data Binding feature is used in conjunction with the cursor form properties. While columns from child tables may be accessed via 'Loading Data to UI Elements', columns of the parent table may only be saved using this feature.
To save data to the query parent table columns:
1. Verify that there is a query attached to a form .
2. Tick the Has Cursor Bar checkbox and any or all of the other cursor form properties .
3. Tick the Include checkbox to enable the Source column customizer button of the table columns
4. Click on the customizer button to display the Choose a Data Source dialog box
5. To select the data source to save to the table column, do any of the following:
If using the UI element, expand the Form/Controls subtree and select the control name from the list.
If using constant values, select the information from the collection of data source available in the Data Source tree i.e. Constants/string.
If using simple functions, expand Objects/Controls subtree and select from the different method objects available. The Methods can be used to get information from a specific control element like the combo box or listview. (More Info on methods and controls)
If using expressions, tick the Select an Expression radio button and select an expression from the drop down list.
Overlooking any of the above steps in the data binding process will issue validation errors once executed and might affect the execution of the project.
Please also note the following features of this screen:
Unticking the Include checkbox for any table column will reset the Source column.
Removing the form query will reset the Save Data to Table Columns section.
Expressions can also be used to create, modify or delete records in the database. Assigning an expression as a data source in the 'Save Data' columns will run the expression each time a record is saved.
As with the load map, the Populate button may also be used to automatically fill the Save table with the matching form control elements, based from the Load table.
Choose a Data Source dialog
The Choose a Data Source dialog allows you to select the data source for the data binding elements. There are two options to choose from, select a value from the Data Source tree or select an expression to bind to the form control or the table column fields.
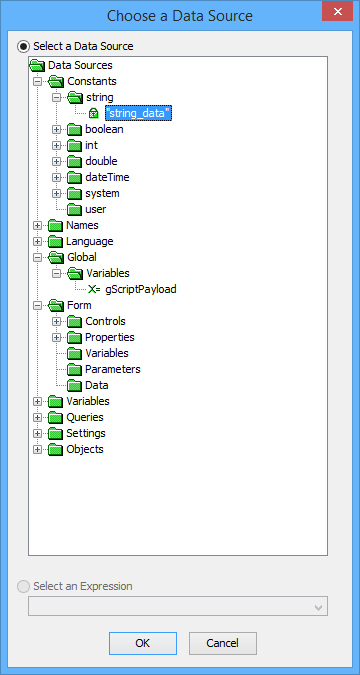
The Data Source tree in this dialog will only display all possible sources for the data binding. Queries with parameters will not be included in the data source tree.
Data Binding in Expressions
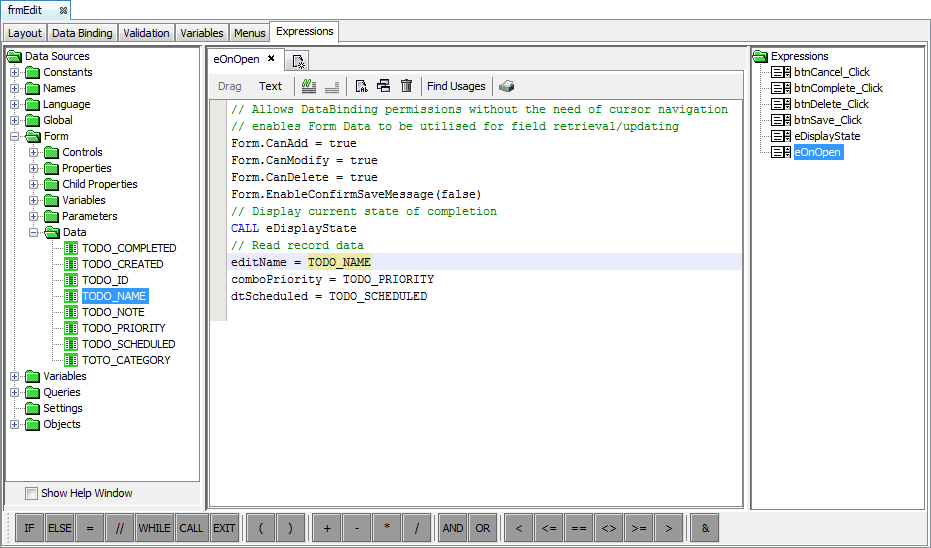
A form is considered to have been data bound if there is an associated query under the 'Data Binding' tab of the form.
Once this occurs, the query's outputs may be accessed as a data source under the form's data source tree. These data fields may be read from and written to, similar to form variables, however, they may only be successfully stored to the database with Form.Save() if the form's properties enable creation and modification of records.
Futhermore, if the query has any parameters, they will need to be set as the form loads, and will also be located in the DST under the 'Form > Parameters' node. This parameter may be read and set at any time, but the Data values resulting from the parameter will only be reloaded if the Form.Refresh() method is called.

Similarly, data binding enables the Jump column to be used, which will also determine what data will be loaded in the 'Form > Data' node of the DST. These jump columns may be set using the Form.SetJumpColumn() method, and similar to parameters, must also have the Form.Refresh() method called in order to reload the form's data.
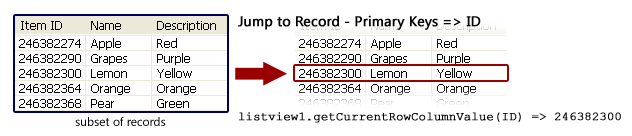
The current value of the jump column may also be navigated through within expressions using the Form.MoveFirst/Last/Previous/Next() methods, without necessarily having the cursor bar navigation displayed. This is useful when designing a means to iterate through records which does not necessarily conform to the cursor bar model.
Finally, the behaviour of the form as a cursor form may be set via Form > Properties variables in the DST. Here, the form's ability to Create, Save and/or Delete records can all be changed in real time by assigning 'true' and 'false' to the CanCreate, CanModify and CanDelete values accordingly.