Application Localisation
Contents Hide
BrightBuilder supports the functionality to provide the ability to change text values based on the language or locale the application is running in. This locale will vary on the system, but may also change real time in an application, allowing forms to be dynamically language friendly.
The language text values can be classified into two categories : Design time literals and runtime literals. The design time literals refer to the text values that are displayed by the controls such as buttons, check boxes etc. Runtime literals refer to the text values that are displayed and managed by the expressions, such as a message box displaying a user message. BrightBuilder allows the definition and east manipulation of these two types of text values.
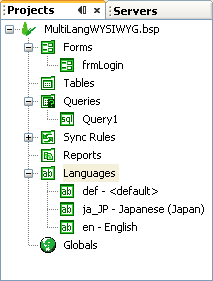
Locales of a project may be managed by “Languages” node in the projects panel. Here, strings or text may be viewed and edited easily and efficiently across a number of different languages or locales, while still maintaining all the application’s core functionality.
This framework allows third parties to come in and easily translate the application with context, yet not knowing the full inner workings of BrightBuilder, allowing developers’ work to extend to international markets.
This chapter will look at the steps to localisation in BrightBuilder.
Defining a language or locale
All projects have a “def - <default>” locale, the default generic locale created by BrightBuilder containing the existing set of strings used. If a language is referenced to one that hasn’t been defined, or referenced incorrectly, this default locale will always be used.
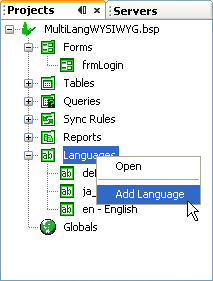
When a locale is defined, it is defined for the whole project. A new locale or a language is added to a project using the Languages component in a project.
To create a new locale or language, do the following,
- Right Click on the Languages node and select
Add Language
- The Add Language Dialog will appear. Specify
a language and country (optional)
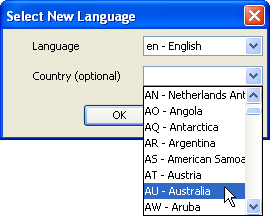
- Based on the language and the country, a locale
or language will be created for the project. The identifier of
a locale will be created as <language>_<country> (such
as en_AU) and a language will be just <language> (eg. en).
- The new locale will have the values of the “def - <default>” locale initially.
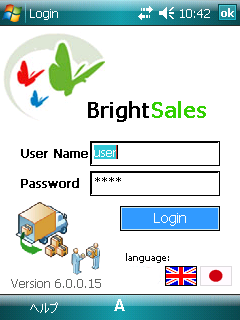
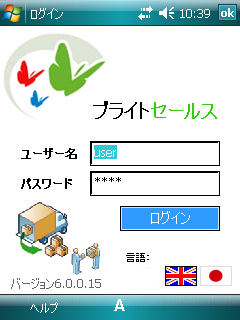
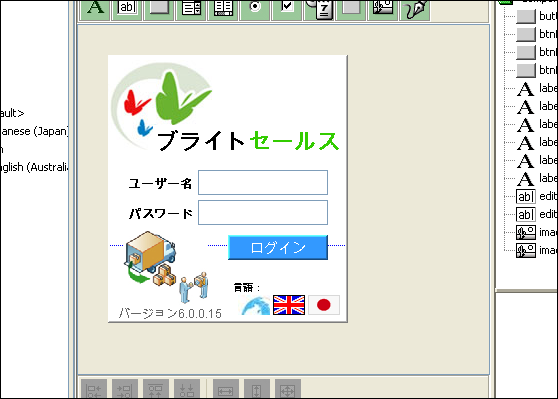
Switching design locale
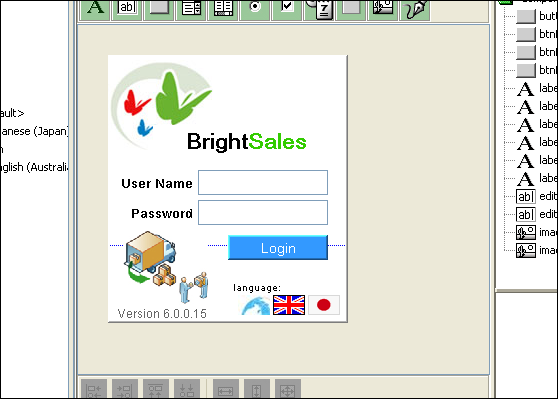
The WYSIWYG editor is set to the “def - <default>” locale by default, and any changes to controls’ captions will affect this locale. To switch and modify values within a different locale visually in this editor, do the following:
Right click the project and access the context menu
Select “Switch display language” dialog which will be populated with all the locales specified under the languages node.
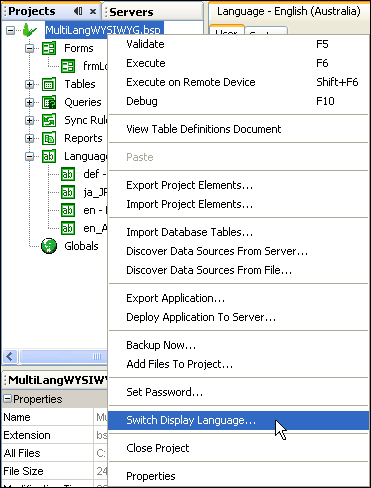
Select a locale and then click OK.

The display in the editor will refresh to reflect the captions in this locale, and any changes to caption values will also now be recorded for this locale.
String values and locales
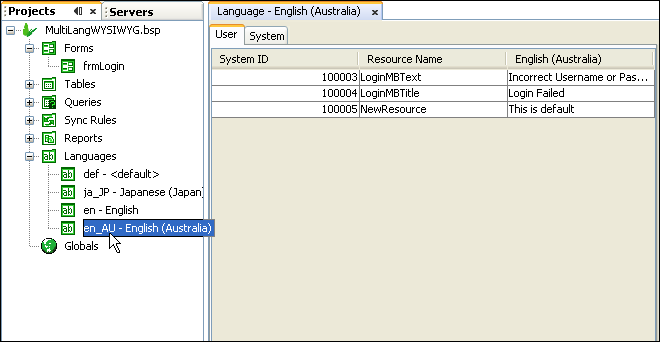
The languages tab may be opened by double clicking the locale’s node which will display all strings for a given language.
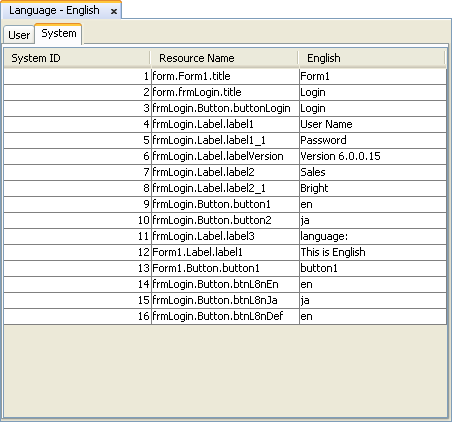
The parent “Languages” node will display all strings in the project for all locales.
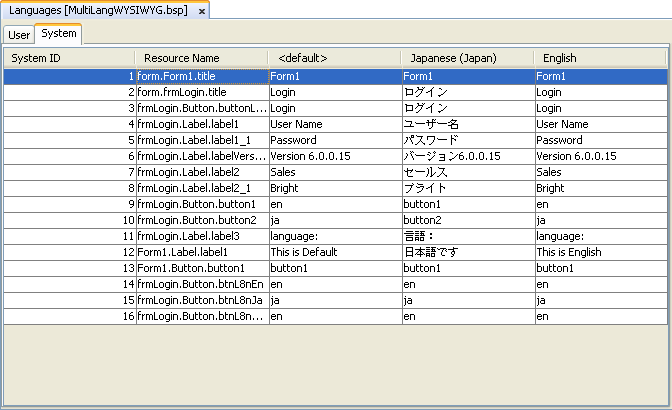
Within these tables, strings in a project are referenced via two means.
System IDs - an automatically generated identifier for the string within the whole project
Resource Names - an identifier which acts as a description to where the resource is located or how it is used in a project.
Using these references, string values may be edited.
Strings within a project may be classified as either User or System strings.
User – used for messages and text that will be used in expressions and will change depending on the locale.
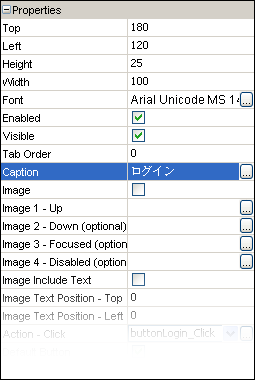
System – anything with a caption. When controls are made, they will be recorded automatically as a resource under this tab, and have their resource names and values populated automatically with their location and caption properties respectively.
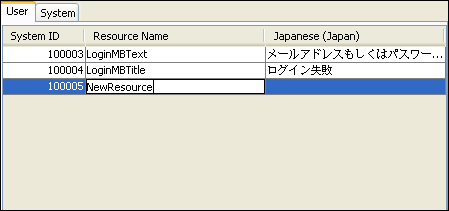
Creating user resources
To create a new User Resource Right Click in the table and select Add Resource via the context menu. This context menu may also be used when deleting user resources.
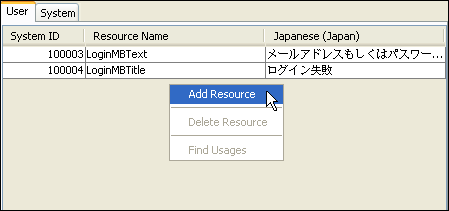
Specify a Resource name (default is IDR_#), then the string associated with it (default is NULL). Both these values may be changed by double clicking on their respective fields.
 Note: Making a resource in one locale will create them in all
locales under the same Resource name, but the value will only
be recorded for the current locale.
Note: Making a resource in one locale will create them in all
locales under the same Resource name, but the value will only
be recorded for the current locale.
These user locales, once added, can be found in the Data Source Tree under the folder Language > Strings

Editing project strings
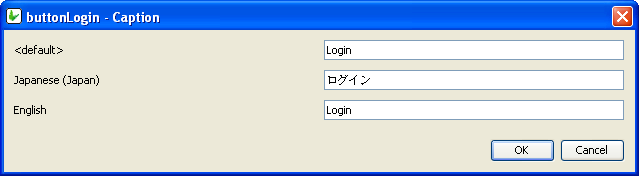
When editing captions, the string in the control’s properties will be for the currently displayed language of the project. Furthermore, if editing needs to be done on more than one language at once, you may click the ellipsis […] to view and modify the caption over all added locales.
New controls also get added as is to all locales with their default caption value. This value may be changed at a later stage.
Strings may also be edited using the languages tabs. Editing via this method is done via a double click of the field in the final column, or the column with the locale heading. It can be done in either the single or all languages tabs, and is useful for quick localisation and referencing between existing languages in projects.
Setting the locale
Locales are matched to region first and then language. If a language matches a locale exactly, that locale will load, but if a specific region does not exist, a common language will load. If there is no language matching, the default locale will be used.
When an application starts, the current locale will determine what the locale currently is.
The locale can also be manually specified using the System object methods to retrieve the current locale or invoke a locale change within your application for subsequently opened forms in a session. To do this, you should use the GetLanguage(), SetLanguage() and GetAllLanguages(), passing them the locale or language identifiers as defined under the languages node.
The following code may be used to set the locale to "ja_JP - Japanese (Japan)":
local.result = System.SetLanguage("ja_JP");
if (local.result <> 0)
{
local.locale = System.GetLanguage();
local.mb = "language is now " & local.locale;
} else {
local.mb = "could not set locale";
}
Form.MessageBox("notice", local.mb, 0);