Adding Validation Rules
Contents Hide
Another feature of BrightBuilder is to create user-defined validation rules, which prevents data being saved when the condition evaluated is false and pops up a validation error message to alert the user of the error in the data entered. Validation rules are evaluated just before data is saved, in this way, data integrity is protected from an invalid data entry.
Just with any form data saving in BrightBuilder, Validation Rules also adhere to the data saving process, where a query is used to access the database and forms are used for the user interface. Thus, to use the Validation Rule built-in functions correctly, it is necessary to use the form data saving mechanisms in BrightBuilder.
An example of a Validation Rule
A typical example of a validation rule is shown below. The form frmCursor has one validation rule for edtFIELD1.
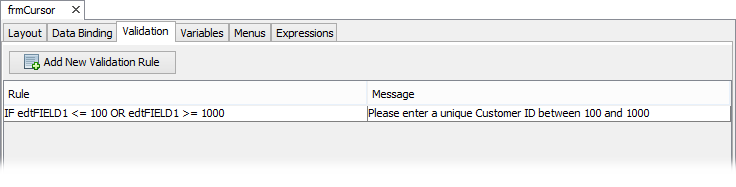
The Validation Rule simply states that saving should be aborted if the user entered a number outside of 100-1000 in edID and the following message will appear in BrightForms once the user clicks on the save button.
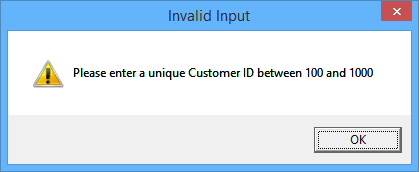
Saving will not commence until all validation rules are evaluated true.
Adding a new Validation Rule
In order to add a validation rule, the form must first contain the data controls to base the validation on.
Open the form to add a validation to and go to the Validation Rule tab of that form.
Right click on the Validation Rule grid to view the popup menu.
Select Add New Validation Rule, a new validation rule row will appear on the grid with a question mark (???) as its condition.
Set the validation properties i.e. condition and message.
Editing the Condition
Select the Validation tab of the form to be edited.
Select the Validation Rule to be changed, the customiser button will appear.
Click on the customiser button and the Edit the Condition dialog box will appear.
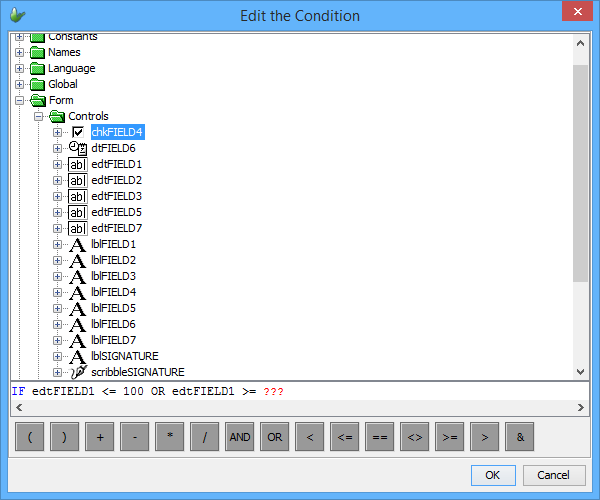
Use the Data Source tree and the operators to create an IF condition by dragging and dropping them into the Condition box
Click OK when finished.
Deleting a Validation Rule
Open the form in the Source Editor view and select the Validation tab.
Right click on the Validation Rule and select Delete Validation Rule from the popup menu. The Validation Rule selected will be deleted immediately.
Entering the Validation Message
Once the validation rule is formed, an appropriate message to display to the users of your application project is also required in the Validation Rule. To do this, simply follow these steps.
Click on the Validation Rule Message field until it has a blue border to indicate that it is modifiable
Type the message the user will to see when the validation rule is broken and press ENTER.