Quick Tutorial - Cursor Forms
Description
Describes the concepts behind a powerful and effective navigational feature of BrightBuilder; cursor forms.
Resources
What are Cursor Forms?
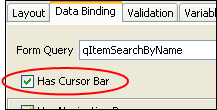
Cursor forms are a feature of BrightBuilder which enables developers to create applications which access, create, modify and delete data within a particular subset of records with ease. A form may be defined as a cursor form by selecting the ‘Has Cursor Bar’ checkbox in the ‘Data Binding’ tab. This may be set after assigning a query to the form (which defines the subset of data the form will access).
Once activated, the cursor bar will be present in an application on execution, but will not be present when designing the layout of the form. The Cursor Form actions (i.e. New, Modify, Delete, Move) can be invoked using methods within form expressions. These methods are found in the Objects > Form > Cursor Form folder in the data source tree.
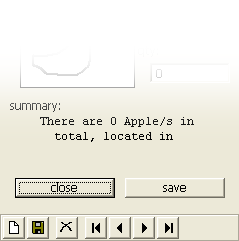
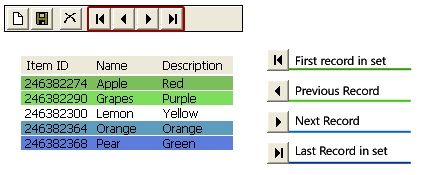
The buttons visible and accessible on a cursor bar is determined by its functionality, set under the Data Binding tab. The cursor bar below on the right for example, allows the user to create, modify, delete and navigate records.
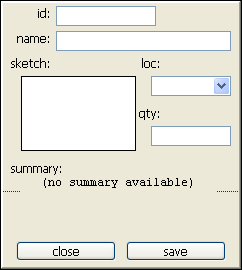
Data within a query result set is mapped to the form’s UI controls. Data may be loaded into the form’s controls via the ‘Load UI Elements’ table. In this way, at any given time, a single record is represented by the data loaded into the form controls. The mappings in the load table are adhered to when using cursor forms’ navigation functions.
By default, the record data which is loaded when the form opens is the first record in the query’s set, but this can be modified by ‘jumping’ to a particular record.
The ‘Save UI Elements’ table is used in conjunction with cursor forms’ data manipulation in a similar fashion. Both of these concepts will be explored in later stages of this tutorial.
For more information on data binding concepts in general, please refer to the BrightBuilder > Data Binding section of the User manual, or the Data Binding tutorial.
Jumping to a Record
As demonstrated in previous tutorials, we can isolate single records using a parameterised query, by assigning a primary key (for example, a unique ID) to its parameter. Parameterised queries, however, may also return a number or records depending on the parameter values, and in this case, it is cumbersome to isolate, navigate within and change these results through expressions.

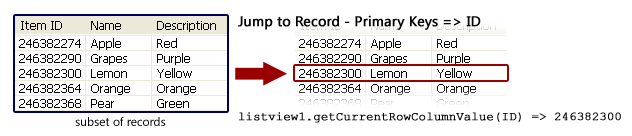
When opening a cursor form, the ‘Jump To Record – Primary Keys’ feature may be used. It is set by the parent form of an application, using the ‘Open Form’ dialog, and is available when the form is a cursor form. A common use could be when a record has been selected in a listview and the cursor form is used to display the full record details.
By assigning a data source to this, it will point to a specific record in the set returned by a query, which effectively isolates it, similar to a parameterised query. In the example below, by setting the value of ID as ‘246382300’, the record for ‘Lemon’ will be pointed to for access.
Please note however, that while one record is being displayed, all the results of the query are being loaded by the query behind the scenes. If you need to only edit one specific record, it is advised to utilise parameterised queries which will only return the single record instead.
On the cursor form, the record’s column data may then be accessed via the ‘Form > Data’ folder in the data source tree. These data values may then be loaded into controls, defined via the ‘Load UI elements’ table. For this reason, the concepts of data binding and cursor forms are closely linked together in BrightBuilder. Note that you can also run expressions when form controls load, which function similar to a form’s ‘Action – Open’ function, but are useful when dealing with navigation in cursor forms.
Navigation
Once cursor forms are activated, the ‘Has Navigation Bar’ option may be selected.
Enabling this option, the records of the query may be traversed as follows:
Each click of the navigation button loads values into to controls in accordance with the ‘Load UI elements’. As mentioned previously, if you need to calculate or generate more complex output or behaviour when displaying different records, link an expression to the loading of a form control.
Data Manipulation

If any of these options are activated, you may use the ‘Save Data to Table Columns’ table to record the values. Each option is as follows:
Creating records - Allows the form to create records, which can then be saved by clicking the ‘Save’ button. If an existing record is modified in the same manner, an error will appear unless the ‘Can Modify Records’ option is checked.
Modifying records - This allows existing records to be modified. As such, the data sources found in the ‘Form > Data’ folder can now also be written to by using assignment values (for example, NAME = “Lemon”). Furthermore, if this option is checked, if any controls are changed and the form is closed, a confirmation message will be displayed querying the user if they wish to save or discard these changes.
Deleting records - This allows the deletion of records using the cursor form. Pressing the delete button on the cursor bar will delete the current record from the database.
Messages can also be set, which are displayed to prompt the user to confirm that they want to execute these operations. Furthermore, expressions can be linked to these operations under a form’s properties as follows:
Creating records – ‘Action – New’
Modifying records – ‘Action – Pre Save’, ‘Action – Post Save’
Deleting records - ‘Action – Pre Delete’, ‘Action – Post Delete’
Finally, it should be noted that when using Create, Modify and Delete Cursor Form operations on a set of records, it is not advised to modify the same set of data with the Database Object in the same form.
Exercise
The ‘Detail’ form in CursorStart.bsp uses a parameterised query – qItemSearchByName. The UI elements are already being loaded from the Form Data, however the record being loaded when it opens will always be the first returned by the query. Complete this project using cursor forms via the following steps:
Enable cursor forms and use the ‘Jump to ID’ to load the selected item of the listview in the ‘Main’ form.
Enable navigation. As the summary_txt control is generated via the eOnOpen expression, have this expression run when the summary_txt control is loaded on the form.
Enable the creation, modification and deletion of records. Populate the ‘Save Data to Table Columns’ table to support this. Also ensure that a new ID is created when a new record is created by linking the eNewID function to a new record being created. Add messages confirming data creation/modification and deletion.
As saving a form using the Database Object will not be recognised by the cursor form operations on the same records, it is not advised. Therefore, change the save_btn_Clicked expression to save via the Cursor Form’s save method, rather than the Database Object’s.
A possible solution can be found in CursorFinished.bsp.