Synchronising Scribble Data
Contents Hide
Scribble Data within BrightForms
Scribbles can be written to the database as is, provided that the output field of the specified query is defined as a base64Binary under the Tables of a project and the table definitions in the database server match. For example:
Database.Reset();
Database.SetQueryParam("pItemID", id_field);
Database.AddColumn("SIGNATURE", sig_field);
Database.UpdateRecords("qSignFilter");
Like most form controls, the binary image data can be accessed and assigned through the Forms > Controls folder in the data source tree. For example, a binary image from a scribble can be assigned to a binary variable as shown below.
Variable1 = sig_field
The scribble can also be loaded with existing data through the assignment operator and using data bindings.
sig_field = SIGNATURE
In the above example the SIGNATURE operand is a data source located under Form > Data of a form which uses Data Binding via a Form Query. Similarly, scribbles can be loaded or saved to through the Data Binding tab in the Forms tab.
When scribble data is saved in BrightForms, it is saved compressed in order to save memory usage within the application. This compressed data, as well as decompressed data may be assigned as-is to controls within BrightForms.
To be able to use the data outside the application, the compressed data from the control must be decompressed when it is synchronised to BrightServer. This process is detailed below.
Sending Decompressed Scribble Data to BrightServer
You would want to send decompressed data to your database server when you require using the scribble outside the BrightForms application, for example storing and viewing the scribble as an image file. There are multiple ways to decompress data from a scribble.
Decompress by expression
One way is to decompress it in an expression, for example:
local.vData = Zip.UnzipBinary(sig_field)
The above assigns a local variable 'vData' with the result of calling the 'UnzipBinary' function with the scribble control. This will assign the decompressed version of the scribble. You can easily add this to an expression to ensure the data is decompressed when synchronising the scribble to a data source.
local.vData = Zip.UnzipBinary(sig_field); //Decompresses scribble data
Database.Reset();
Database.SetQueryParam("pItemID", id_field);
Database.AddColumn("SIGNATURE", local.vData);
Database.UpdateRecords("qSignFilter");
Decompress by mapping
Another way to decompress the data is to perform the decompression before saving it in a database using mappings.
To do this, define a new mapping in your BEP project under the Mappings subtree. The type of the mapping should be 'Query Mapping'. Open the advanced mapping options by click the button. Using these options, tick 'Need To Decompress' for all the fields that need to be decompressed before saving in the database.

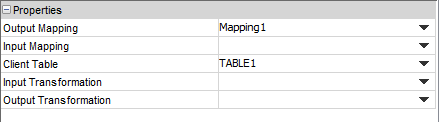
Once you have defined your mapping, you need to specify the mapping in the sync panel where you defined the data flow for your table containing the scribble. For sending the data to the database, you will want to set the 'Output Mapping' field.
Now when synchronising data from the client to the server, it will store the data from a scribble as uncompressed.
For further information about mappings follow the link here.
It is recommended to decompress the data using the above methods before saving it to your data sources if you are to use this data outside of the BrightXpress Mobility Suite. Once decompressed, the binary data for the image may be accessed and queried via standard SQL conventions.
For example, the following JDBC code may be used in a BrightServer script to access scribble data after it has been decompressed via mapping:
sqlQuery = "SELECT ID, NAME, DESCRIPTION, SIGNATURE " +
"FROM TABLE1 " +
"WHERE EXPORT_STATUS <> 1";
var ps = connection.prepareStatement(sqlQuery);
rsQueryData = ps.executeQuery();
while (rsQueryData.next())
{
var data = rsQueryData.getBytes("SIGNATURE");
...
this data may then be used as standard binary data in the script, such as to use the scribble data embedded in an HTML document:
var code = "<img src=\"data:image/jpeg;base64,"
+ Util.encodeBase64(data) + "\" />\n";
...
}
Sending Scribbles to File/s on BrightServer
If you are using a file as your data source, you will either want to store the raw data from the scribble within the file you are syncing to or have the scribble sync to a new file to be stored and viewed (e.g. as an image file).
Sync Raw Scribble data to a file
To sync the raw data into a file, you simply set up your sync point to have the data mapped as is into the file. Your mapping should point to a .csv or .txt data source file and look similar to the below screenshot.
If you are going to use the scribble data outside of the BrightForms application, you will need to decompress the scribble data. You can do this by looking at the steps outlined under 'Sending Decompressed Scribble Data to BrightServer'.
Sync Scribble data to separate files
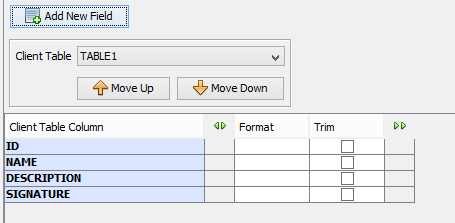
If you would like every scribble to be synchronised into separate file while all other fields are sent to your data source file, you will need to edit your existing mapping to handle this. In your mapping, you will need to specify the file path and file name the scribble should be store in on your server.
First open the advanced mapping
options by click the  button.
For every field with scribble data to be exported, you will need
to change the 'Data Type'
to 'rawBinary' and tick
the 'External File' column
to indicate you would like the field to be stored in a new file
for every record when synchronised.
button.
For every field with scribble data to be exported, you will need
to change the 'Data Type'
to 'rawBinary' and tick
the 'External File' column
to indicate you would like the field to be stored in a new file
for every record when synchronised.
In addition to this, specify the 'External File Path' on the server to state where the file should be saved, and the 'External File Name' for the name of the file. The Value Place Holders feature of BrightServer may be used to give each file a unique name, such as one which will match the ID of the record it belongs to. To find out more about value place holders click here.

In the above screenshot, the 'Need to Decompress' column is ticked. If you perform the decompression in an expression then you do not have to tick this column. However you need to ensure that the scribble data is decompressed before saving it to the file.
When syncing the scribble to different files for each record, your mapping should look similar to the above screenshot. For the file name we added the 'img_' and '.jpeg' to the value place holder to specify the file type of the image. Now when we synchronise, the scribble field for each record will be saved as a new image file on the server while all other fields will be sent to the specified data source file.
Save Scribble to the device's filesystem
To be able to save the scribble into an image locally on a device, you can easily use provided functions that BrightBuilder has.
//Allow user to input location and filename
local.strFilename = Form.ShowFileSaveDialog();
//Saves the scribble as a JPEG image
sig_field.SaveJPEGFile(local.strFilename);
The above expression, will allow a user to specify where they would like to save the image and the name of the image file on their device. For it to be saved as an image successfully, we must decompress the data from the scribble.