This demo is simple application which can write, edit and delete records, centred around ‘to do’ tasks. These records may be kept on the device or synchronised with the server, such that items in the list may be downloaded onto other devices.
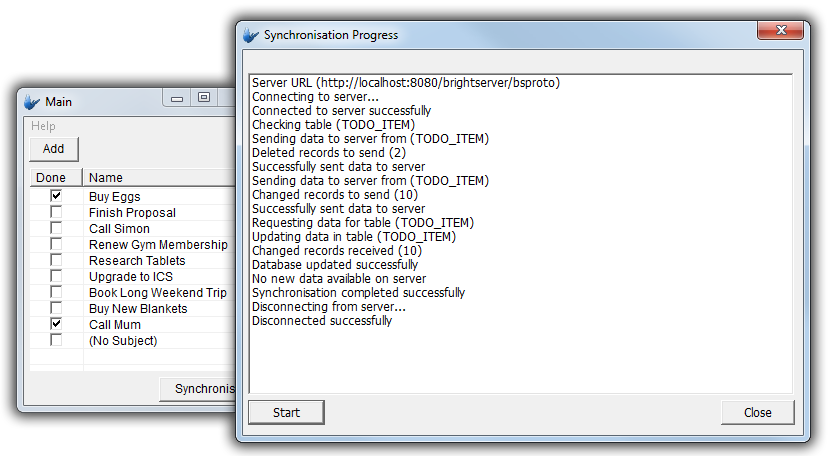
The application consists of two forms for this task; the main form is a simple form displaying a listview with a list of tasks. It has an add button to create new tasks, and existing entries may be double tapped for editing. Both of these cases will open the edit screen. At the bottom of the form, there is also a synchronise button, which will first send the current list of records to the server, then retrieve any records on the server.

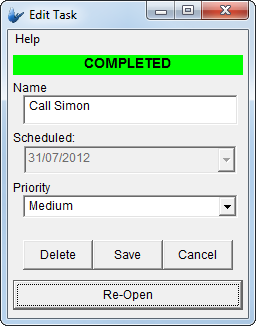
To do items may be added, modified and deleted within the application via the edit screen, where the title, priority and scheduled date may be changed. The edit screen also allows users to complete open tasks, and re-open complete tasks, which results in a viewable UI change for the user. The state of the record is saved when the ‘Save’ button is tapped.
Create a new BrightXpress project for BrightForms named DemoToDo.bsp.
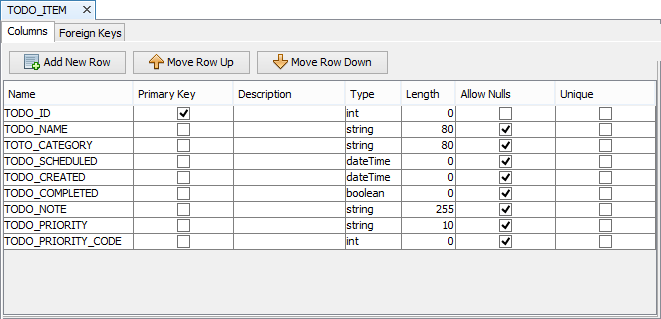
Once created, firstly create the data tables which the application will operate on. To do this, expand the new project’s node and right click on ‘Tables’. Create a new table named TODO_ITEM, and define it as follows:
To create new project elements, right click the specific node to open a context menu, and then select the ‘New’ option. This will create a new element which may be edited and/or renamed accordingly.
To add rows to a table, right click the empty area in the dialog and then tap the ‘Add New Row’ option in the context menu which appears. A new row will appear in the table for editing, and clicking out will commit any changes made.
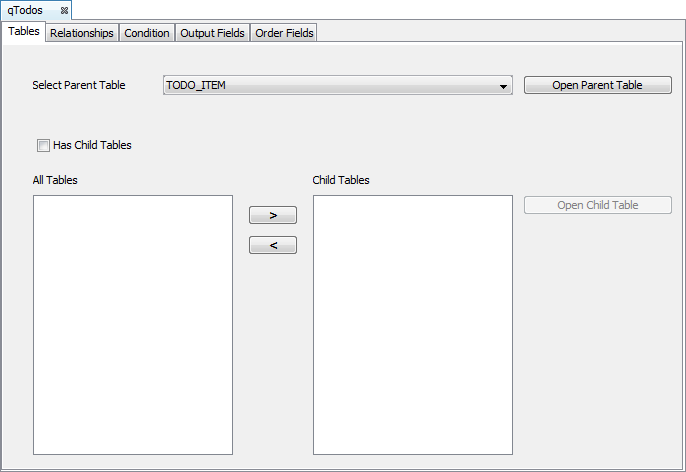
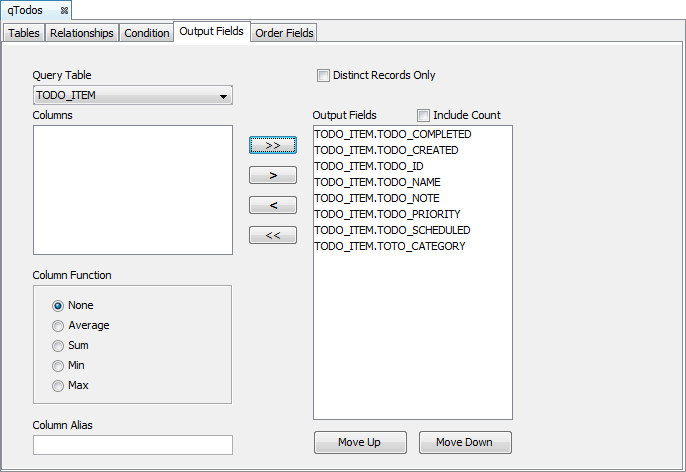
The main form has a listview which displays records on the device. To specify what records are to be displayed from the device’s database, a query is used by the application, and therefore needs to be defined. Create a standard query on the TODO_ITEM table with no joins or conditions. As there are no conditions, the query will return all the records in the table when used. All fields may then be specified as the output.
qToDo
Tables: TODO_ITEM
Condition: None
Output Fields: All (use the >> key)
Order Fields: TODO_COMPLETED (asc), TODO_PRIORITY_CODE (desc)
Create a new form named frmLogin. Through dragging and dropping controls from the toolbar, produce the following layout:

Use the ‘Caption’ property of button controls to change the displayed text.
Continue to define the listview query, and configure the columns by following the steps below.
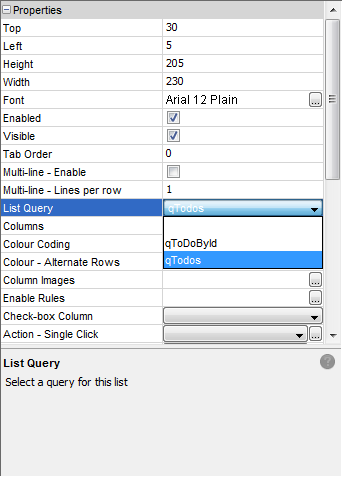
The listview control allows a form to display the set of records returned by a database query. Set the listview query to display all the records in the TODO_ITEM table, by assigning the query ‘qToDo’ to the ‘List Query’ property.
Set the displayed columns as follows, using the ‘Columns’ property of the control:
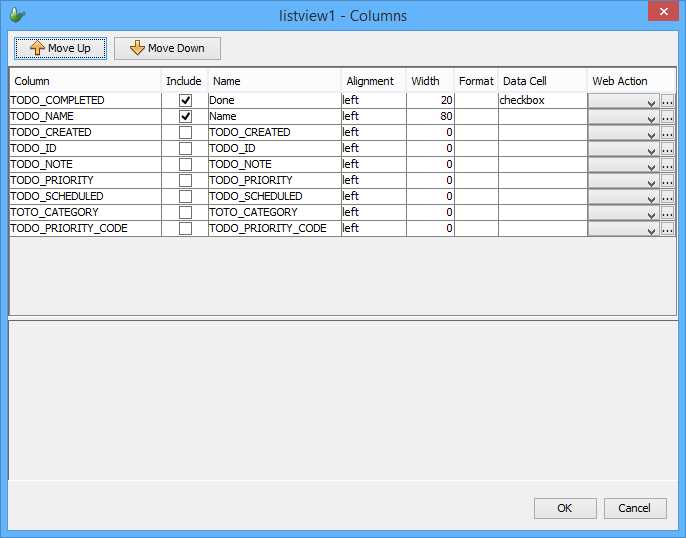
Rows returned from the query will be present in the listview columns dialog when the query is assigned. Through this dialog, columns may have their display name, order, width and alignment changed, as well as set able to be hidden from the control.
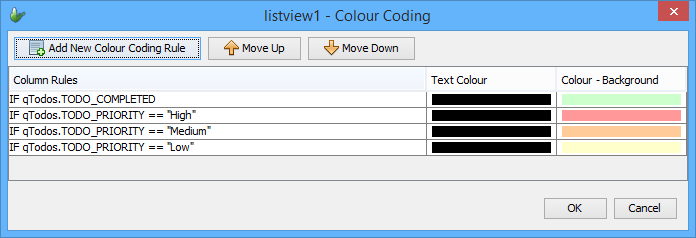
Set the Colour Coding of the listview to via the properties panel. Based on the column rules, the text and background of rows will be highlighted as defined, with the top-most rules having priority.
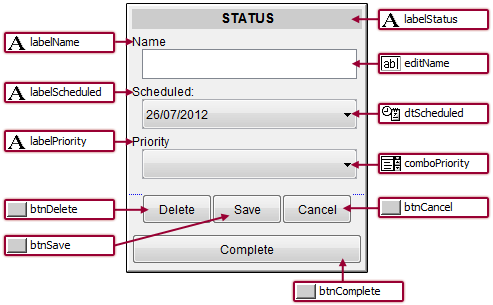
Create a new form called frmEdit. Design it as follows:
As this form is designed to view a specific record, create a second query which will retrieve this specific record based on an item’s ID. The ID may be specified at run time by using a parameter in the conditions tab of the query.
qToDoById
Tables: TODO_ITEM
Condition: pId = TODO_ITEM.TODO_ID (parameterised)
Output Fields: All (Use the >> button)
Once this is created, link the query to the form by locating the ‘Data Binding’ tab of frmEdit. Assign the new query as shown below.
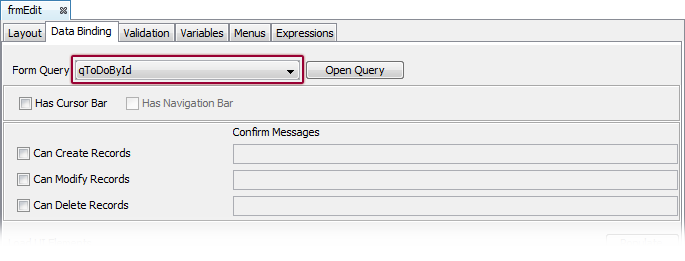
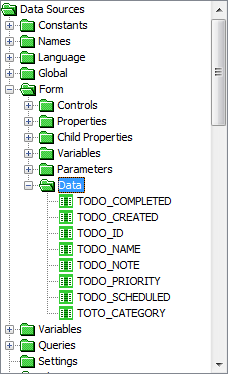
In assigning this query under the Data Binding tab, output fields of the query may be accessed via the Form > Data node of the Data Source tree. The data sources under this node may be referenced and/or assigned through the lifetime of the form, and saved when the Form.SaveRecord() method is called.
Use the accessible data from the query to populate the form’s controls on open. To do this, create the expression, eOnOpen, to query the local database and then display the result as the form’s edit controls. Once created, set the expression to the form’s ‘Action – Open’ property. As displayed below, an additional expression ‘eDisplayState’ must be defined. Create this expression to fill in the next step.
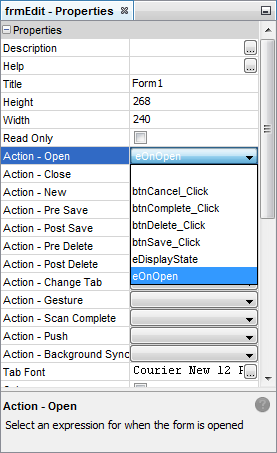

Specifying an ‘Action – Open’ expression will run it immediately as the form opens. As shown above, within a project’s properties, there exists a number of additional action events which may run expressions if triggered.
The CALL operand used within an expression to call other expressions of the form or globally. It is located in the operand toolbar at the bottom of the expression editor.
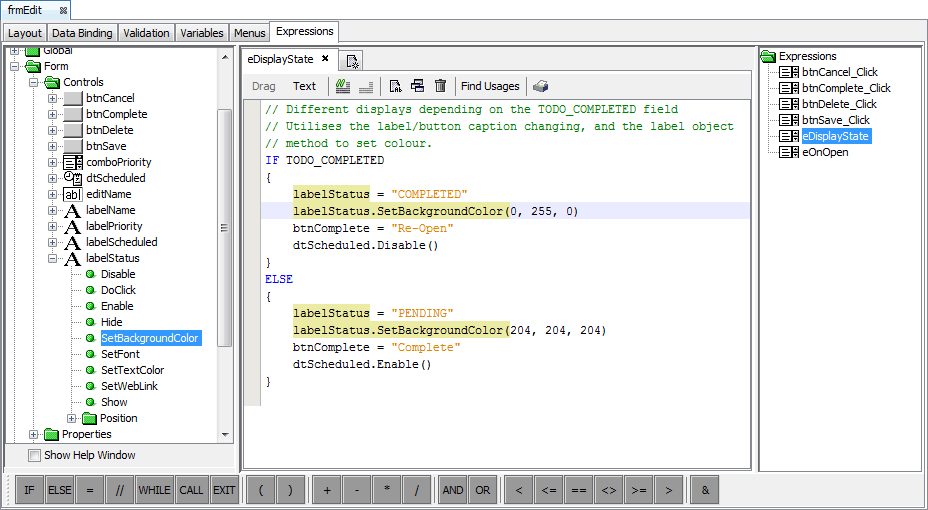
Captions and other properties of controls may be changed in real time on the form. This allows the application to render different states, clearly reflecting the application or record state to the user. To do this, locate the control under the Controls node of the DST, and make necessary changes. The control’s reference itself under the ‘Form > Controls’ node is also used to change the controls’ captions.
The following code for ‘eDisplayState’ will change the controls on the form, depending on the state of the record’s data. If the record is marked as ‘completed’, the status label’s background will change to green, and the ‘Complete’ button will change to ‘Re-Open’. The ‘Scheduled’ control will also be disabled, to prevent user changes.
Continue to assign the following expressions associated with the save, delete and cancel buttons on the form. These may be created by double clicking on their respective controls, and completing the expression.
btnSave_click
//Save any changes made to the priority, name or schedule date, then close
TODO_PRIORITY = comboPriority;
TODO_NAME = editName;
TODO_SCHEDULED = dtScheduled;
TODO_PRIORITY_CODE = comboPriority.GetSelection();
Form.SaveRecord();
Form.Close();
btnCancel_Click
//Close the form, with no changes
Form.Close();
btnComplete_Click
//Toggle the TODO_COMPLETED value. Will be saved.
TODO_COMPLETED = TODO_COMPLETED == false;
//Call an expression change
CALL eDisplayState;
With the above expressions completed, the two forms may be linked together. Proceed to the first form in order to achieve this.
Double click on the ‘Add’ button to assign or specify a new expression to the control via the ‘Assign Action’ dialog.
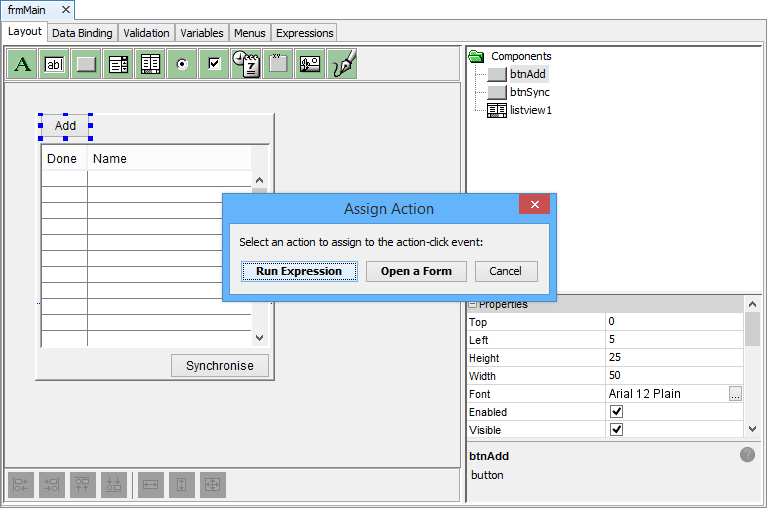
The option using a form open definition is also offered in this dialog, however, in this example, we will use expressions to achieve the same result.
A new expression will be created and linked to once the ‘Run Expression’ button is tapped. Proceed to complete these new expressions with the provided code.
//Create a new record
Database.Reset();
local.vId = NumberGenerator.GetUniqueNumber();
local.vNow = DateTime.Now();
Database.AddColumn("TODO_ID", local.vId);
Database.AddColumn("TODO_NAME", "(No Subject)");
Database.AddColumn("TOTO_CATEGORY", "Uncategorised");
Database.AddColumn("TODO_CREATED", local.vNow);
Database.AddColumn("TODO_SCHEDULED", local.vNow);
Database.AddColumn("TODO_COMPLETED", 0);
Database.AddColumn("TODO_PRIORITY", "Medium");
Database.AddRecord("TODO_ITEM");
//Set the parameter of the new form to the created ID
Form.SetChildFormQueryParameter("pId", local.vId);
Form.OpenChildForm("frmEdit");
The form ‘frmEdit’ contains a parameterised query used to populate form data, and therefore the parameter of this query must be set before the form opens. Hence, the Form.SetChildFormQueryParameter() method is used before Form.OpenChildForm() to achieve this.
Double click on the listview. This will open a similar action assigning dialog, which will be called when the control is double clicked.
//Only opens editing the form if a row is selected
IF(listview1.GetSelection() -1)
{
local.vId = listview1.GetCurrentRowColumnValue("TODO_ID");
//Sets the currently selected row for editing
Form.SetChildFormQueryParameter("pId", local.vId);
Form.OpenChildForm("frmEdit");
//Refreshes the list once the editing form closes
listview1.Refresh();
}
The expression above utilises the listview.GetSelection() control method to ensure that there is a valid, listed ID selected to edit. If no row is double clicked, this method will return -1 and nothing will happen.
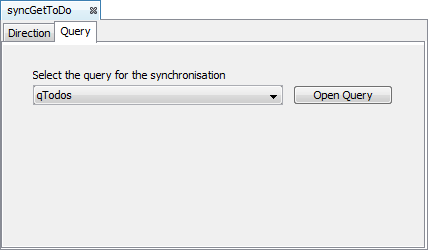
Finally, implement the Sync Rule by specifying an expression when the ‘Synchronise’ button is tapped. With the previously created query ‘qToDo’, create a sync rule – ‘qGetToDo’ with the direction of synchronisation from the server to the client.
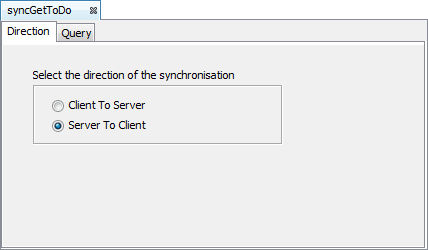
When a query is specified as a ‘Server to Client’ sync rule, it will be sent to the server and run on its tables. The returned records are then loaded into the local database.
Create another sync rule – ‘syncSendToDo’ with the same query, only have the direction from client to server.
Once both rules are defined, double click the ‘Synchronise’ button and define the following expression to send then get records in this order. Use the Form.SyncDialog() method to display the sync process to the user with a message box as follows:
listview1.Refresh();//Synchronise records
Synchroniser.DisableAll();
//Send any created or modified records first
Synchroniser.EnableSyncRule("syncSendToDo", true);
Synchroniser.SetExecutionOrder("syncSendToDo", 1);
//Retrieve any new or updated records second
Synchroniser.EnableSyncRule("syncGetToDo", true);
Synchroniser.SetExecutionOrder("syncGetToDo", 2);
//Synchronise via standard, verbose sync dialog
Form.ShowSyncDialog(false);
//refresh the listview control on the form to display any new records
listview1.Refresh();
While the application will work on its own, to test the synchronisation of records to the server, create a simple server with the steps below.
Create a new BrightServer project called DemoToDo.bep
Copy and paste the TODO_ITEM table definition from the application into this new project.
Create a new Sync Point by right clicking the Sync Points node and selecting ‘New Sync Point’. Drag and drop a database Data Source in this newly created sync point.
Set the table as a data source in the Sync Points of the project, and specify it to download data by dragging and dropping a connection point from the database to the table.
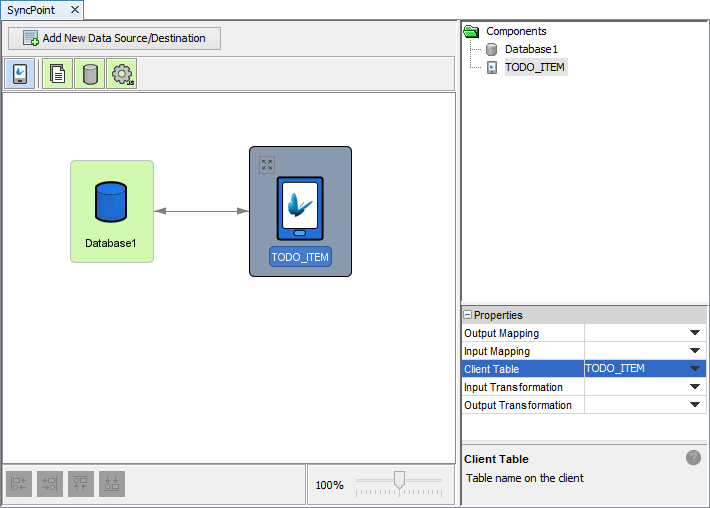
The client table must be set up to send and receive records via this sync panel via Sync connectors.
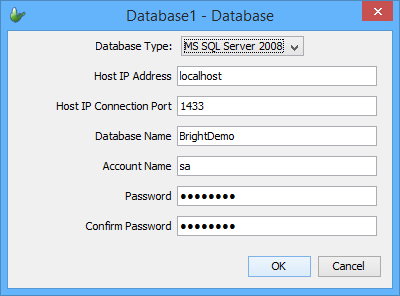
Double click the Database data source and define the database BrightServer will communicate with.
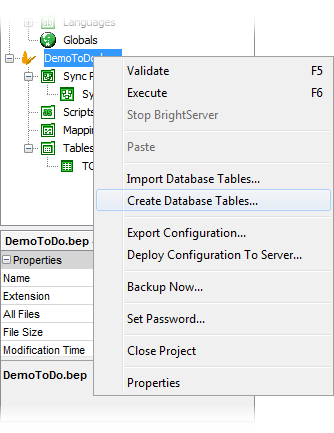
Use the Projects > Create Tables feature to create the table to the database specified. Populate test data on the database server where necessary.
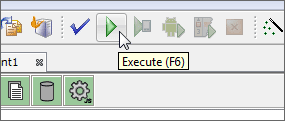
Execute the server by selecting its node in the Projects panel, and then pressing F6 or by clicking the ‘Execute’ button in the toolbar. The server will start on localhost, with its output displayed in the output window of BrightBuilder. Once the server has started, the application will be ready for testing via synchronisation.
The configuration may also be deployed to an existing running BrightServer instance, using the ‘Deploy Configuration To Server…’ option in the bep element context menu.
During development, the application may be executed on Windows Mobile/Android devices or Desktop via the execute option(s) in the taskbar. They are as follows:
![]() Execute on BrightBuilder
machine (Windows)
Execute on BrightBuilder
machine (Windows)
![]() Execute
on Windows Mobile Device
Execute
on Windows Mobile Device
![]() Execute
on Android Device
Execute
on Android Device
BrightForms may be configured using the Settings dialog, accessed by the ‘Help > Settings’ option on Windows devices, or by tapping the Menu button and selecting ‘Settings’ option on Android devices.
Providing a valid login and server address, BrightForms will be able to synchronise with the server based on the server’s configuration. In the case of this demo application, the development machine’s IP address would need to be used, as the server was executed in BrightBuilder.
Users may be configured using the Servers panel of BrightBuilder, where users may be added, deleted and have applications released to them. In development, it is recommended to configure BrightForms’ settings to a user without an application assigned to them, as otherwise the application will download each time the application synchronises with the server.
After BrightForms’ users and settings are configured, test the application by creating a new ToDo item with the ‘Add’ button, then tapping the ‘Synchronise’ button. The records will be sent to the server, with any server records sent to the device. Observe these records sent to the server tables, and create records on the server which will be retrieved by the device on synchronisation.