This application demonstrates an example of user authorisation within an application, through the use of a login screen and queries. It also provides an example how to incorporate synchronisation in an application, as well as showing how to utilise message boxes for the user’s workflow. It then proceeds to demonstrate multiple synchronisations and varied query utilisation, once the user has logged in.
This application’s login screen is simple with few controls. The user is able to type in their login credentials into the login form, and then tap the ‘login’ button. If the user/password combination matches those on the local database, the system will allow the user to proceed to the ‘Main’ form. If not, the application will give the option to synchronise to the server, in order to retrieve the latest user data, and try again.


Once logged in, the login form persists data on the device from the user login data, such that they may use the post-login screens. The application will also load this persisted information when the application loads. The application will then continue to the main form.
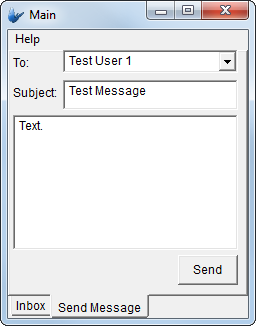
The main form consists of two tabs, the first a form which displays a list of messages which may be retrieved and read from the server, and the second, a form which enables the user to create and send messages to other users through the server.

Create a new BrightXpress project for BrightForms named DemoMessage.bsp.
Before designing the forms of the project, we will define the data tables it will operate on. To do this, locate the ‘Tables’ node of the project and create a new table. Right click this node to create a new table, and rename it USER_AUTH. This table will contain user identifiers which will be used as their login, as well as matching passwords, user string display (i.e. full name) and their user type. Double click and define it as follows:
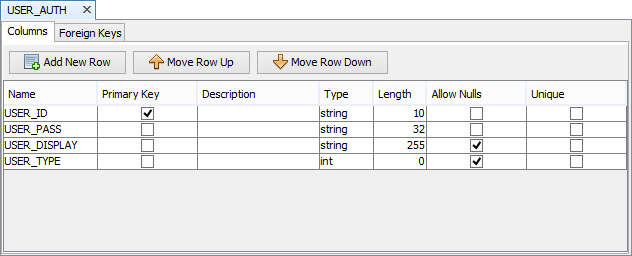
Typically, a system would have these passwords encrypted such that BrightForms may decrypt them with security libraries, but to aid test data creation, this encryption will be omitted in this demo.
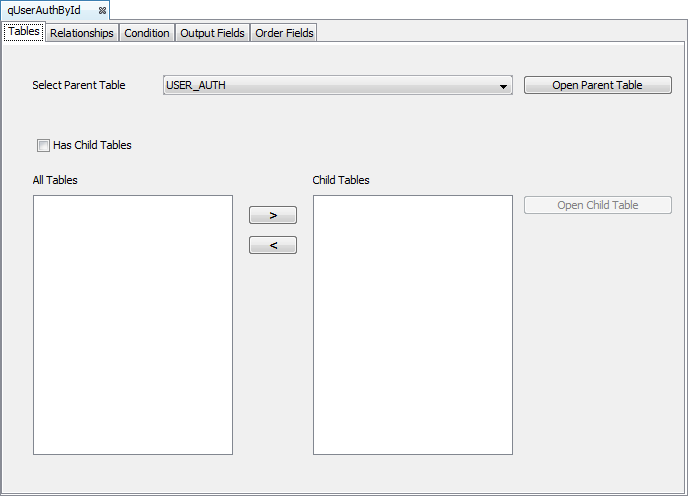
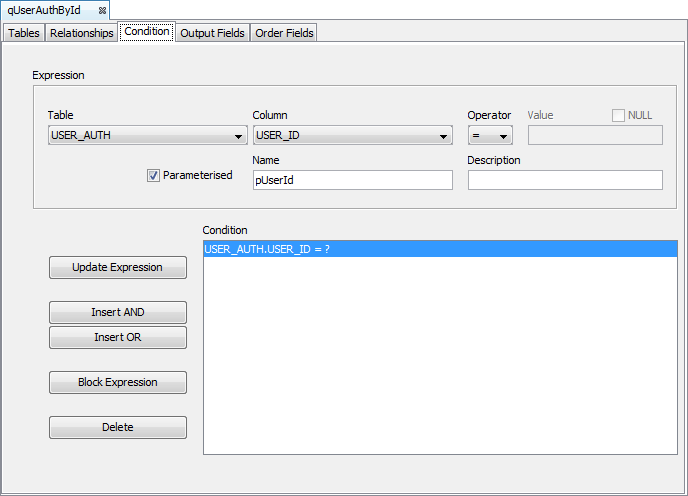
Queries are used at runtime to retrieve records under the table definitions in a project. With the login screen, we need to retrieve the USER_PASS field of a corresponding USER_ID. This can be achieved via a parameterised query in BrightBuilder to ‘filter’ the total set of records. Create the following standard parameterised query for this purpose. As the USER_ID is a primary key, this query will return a single record.
qUserAuthById
Tables: USER_AUTH
Condition: pUserId = USER.AUTH.USER_ID (parameterised)
Output Fields: All (use the >> button)
Records being sent and retrieved from the server also use the query object. Create a query ‘qSyncUserAuth’ whose parent table is USER_AUTH. Have all the table’s fields in the outputs. This query is designed to run with a Sync Rule.
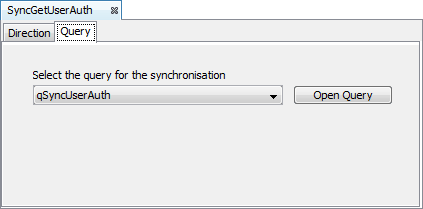
Proceed to create a new Sync Rule ‘SyncGetUserAuth’ which when run, will run the query created above on the server, and place the returned records onto the device. To do this, specify the sync rule as ‘Server to Client’ in the ‘Direction’ tab, and with the ‘qSyncUserAuth’ query in the ‘Query’ tab.
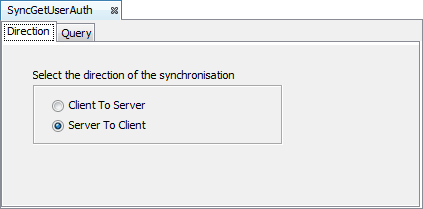
When a query is specified as a ‘Server to Client’ sync rule, it will be sent to the server and run on its tables. The returned records are then loaded into the local database.
Once the data model is complete, create a new Form named frmLogin with the following layout:
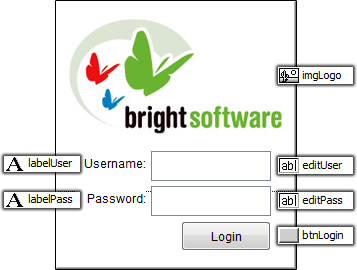
Use the ‘Caption’ property of button and label controls to change the displayed text.
Ensure the editPass control has its ‘Password’ property set to ‘true’. This will mask characters which are entered into the password field.
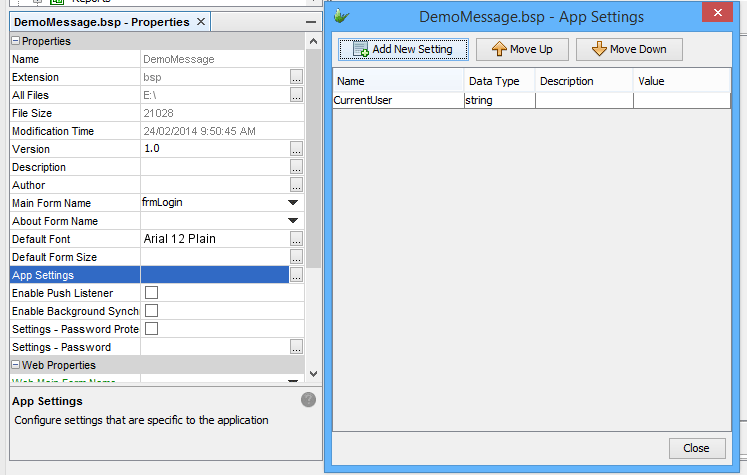
Persistence of variables across BrightForms restarts are handled by a project’s App Settings. Create a new App Setting called ‘CurrentUser’. This will be used to store the current user on the device, but also to persist it such that after the application closes, the last user may be retrieved.
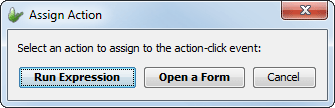
Once all the data and controls are set up in the project, proceed to define the behaviour when the ‘Login’ button is tapped by using an Expression. To create an expression linked to the button’s action, double click the button to open the Assign Action dialog. Selecting ‘Run Expression’ will create and open a new expression – ‘btnLogin_Click’ which will be linked to the button’s ‘Action – Click’ property. Proceed to define this expression in the next step.
Expressions may be created in BrightBuilder via Drag mode, where items may be selected from the Data Source Tree, which provides access and reference to all available methods, controls and variables for a project.
The expression will check if the username and password is present in the local database via the Query Data Source. If it is, it will log in accordingly, however, if incorrect, it will prompt the user and give them the option to synchronise with the server for the latest records. If they feel they have entered in the combination incorrectly, they may decline this option and simply try again. This is achieved via messageboxes and their return type(s), such as IDYES.
Drag and drop within the expression editor to construct the following code. Alternatively, these lines may be copied and pasted via the sample DemoMessage.bsp file.
//Typically, the user entered password would be checked against server records
//which may be encrypted. For the simplicity of this tutorial, it is assumed
//that this field is not encrypted, for easier population.
//*** local.vMd5pass = Security.MD5Digest(editPass);
local.vMd5pass = editPass;
qUserAuthById.pUserId = editUser;
IF(qUserAuthById.USER_PASS == local.vMd5pass)
{
//Establish session and device variables for the user and open main form
global.gUserType = qUserAuthById.USER_TYPE;
// Store user id for reference as an App Setting
Settings.CurrentUser = editUser;
// Open the main form
Form.OpenChildForm("frmMain");
//Reset fields on success
editUser = "";
editPass = "";
}
ELSE
{
//Display prompt to user on incorrect password, giving option to sync
local.vMsg = "User/Password not found! Synchronise from server?";
local.vMsgBox = Form.MessageBox("Login", local.vMsg, MB_YESNO);
IF(local.vMsgBox == IDYES)
{
Synchroniser.DisableAll();
Synchroniser.EnableSyncRule("SyncGetUserAuth", true);
Form.ShowSyncDialog(false);
}
}
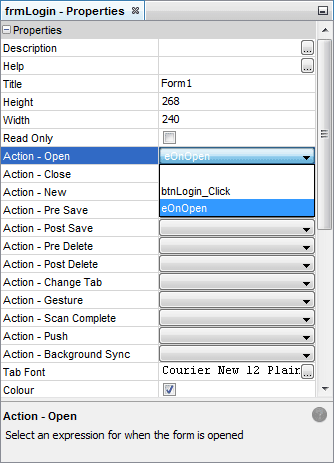
To have the user last sign in be populated in the login field, create another expression ‘eOnOpen’ and have it linked to the form’s ‘Action – On Open’ property. Doing so will call this expression when the form first opens. Proceed to define the expression as follows:
editUser = Settings.CurrentUser;
The following steps in the tutorial define the main messaging functionality of the application.
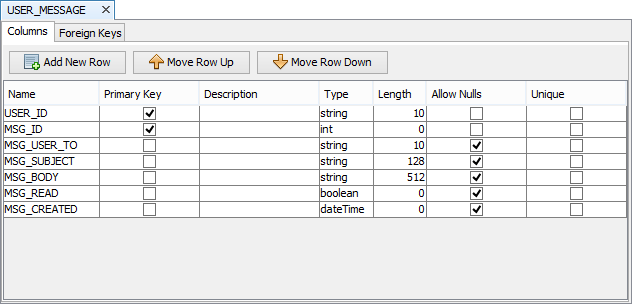
In order to include messages in the application, define the following table to accommodate the messaging functionality in the application:
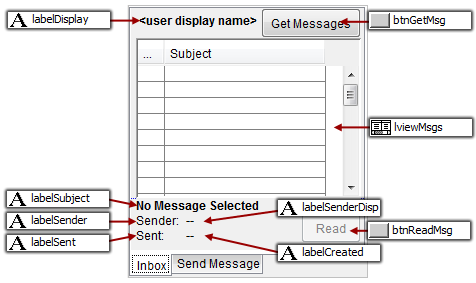
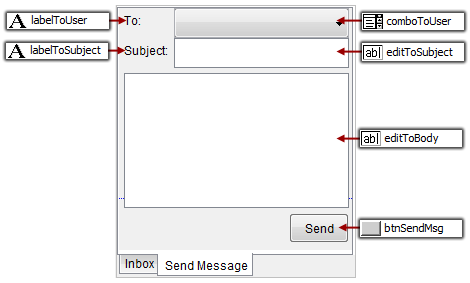
Create another form called frmMain, which consists of two tabs as follows:
The button control ‘Read’ is set to disabled via setting the ‘Enabled’ property as ‘false’. This control will be enabled or disabled in expressions at a later stage.
Right Click the area outside of the form and select ‘Add Tab’. Rename the first tab ‘Inbox’ and the second ‘Send Message’ respectively via the same context menu. Continue to define the form’s second tab as follows:
There are two controls in this new form which require queries; the listview in the first tab and the combo box in the second. The listview in the first tab displays the list of messages addressed to the logged in user. In order to achieve this, define a parameterised query which will return a set of records which are assigned to the user, using the ‘MSG_USER_TO’ field. The UI also displays the User Display, which is not a field in this table. Therefore, the query must also contain a child table join with the USER_AUTH table and have this relationship defined.
qMsgByUserTo
Tables: USER_MESSAGE (Primary), USER_AUTH (Child Table)
Relationships: USER_MESSAGE.USER_ID = USER_AUTH.USER_ID
Condition: pUserId = USER.AUTH.USER_ID (parameterised)
Output Fields: USER_MESSAGE.* (Select USER_MESSAGE and use the >> button), USER_AUTH.USER_DISPLAY
Order Fields: USER_MESSAGE.MSG_CREATED (asc)
Assign the created query to the listview, and set the columns as follows:
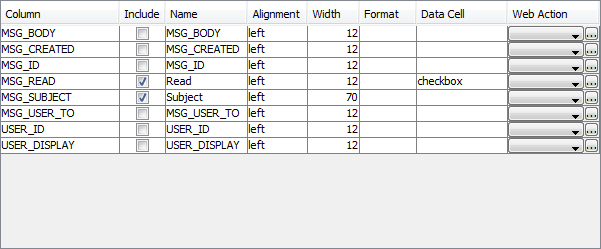
Set the ‘Read Only’ property of the listview as ‘true’, such that the checkbox data cell for MSG_READ may be used for display purposes.
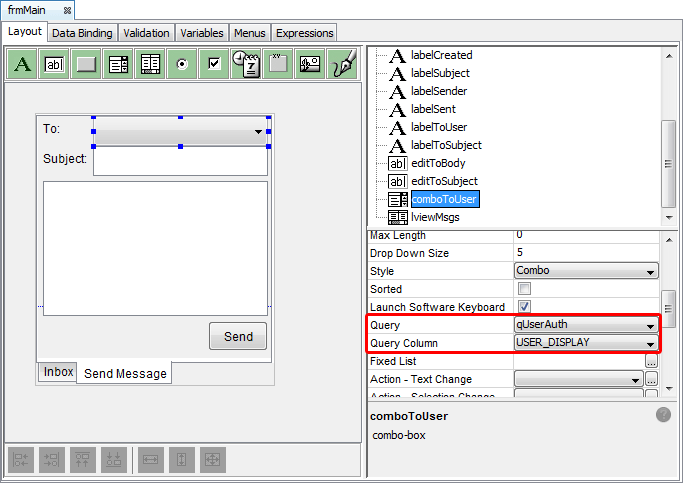
Continue to define the Combo box’s query, which will display USER_DISPLAY for all users on the device. As the password or user type is not needed for this control, they will not be included as an output field. However, as the selected ID will be used in the message created, the ID must be included as an output. Specify the order to be the display alphabetically.
qUserAuth
Tables: USER_AUTH
Output Fields: USER.AUTH.USER_ID, USER_AUTH.USER_DISPLAY
Order Fields: USER_AUTH.USER_DISPLAY (asc)
Once defined, assign the query to the comboToUser control. USER_DISPLAY is configured to be displayed via the ‘Query Column’ property of the combo box.
There exists two sync rules for the application; the first will send all message records from the device to the server (used for checking the unread/read states of messages, and for sending new messages). Therefore, define the following query and sync rule respectively:
qMsgs
Tables: USER_MESSAGE
Output Fields: All (use the >> button)
syncSendMsgs
Direction: Client to Server
Query: qMsgs
The second query of the application will retrieve all messages on the server belonging to the current user. This is achieved via a parameterised query associated with a sync rule.
qSyncMsgByUserTo
Tables: USER_MESSAGE
Conditions: pUserId = USER_MESSAGE.USER_ID (parameterised)
Output Fields: All (use the >> button)
syncGetMessages
Direction: Client to Server
Query: qSyncMsgByUserTo
Parameters: pUserId = Settings.UserId(appears as qSyncMsgByUserTo is set)
As a parameterised query is used, it will run based on the value of its Parameter at the time the sync rule is called.
Once the form and query controls are complete, proceed to create the following expressions, linked to their respective button controls:
btnGetMsg_Click
//Run the synchroniser, sending new or updated messages first,
//Then retrieve any new messages from the server if any.
Synchroniser.DisableAll();
Synchroniser.EnableSyncRule("SyncSendMessages", true);
Synchroniser.SetExecutionOrder("SyncSendMessages", 1);
Synchroniser.EnableSyncRule("SyncGetMessages", true);
Synchroniser.SetExecutionOrder("SyncGetMessages", 2);
Form.ShowSyncDialog(false);
//Refresh the listview, displaying the changes
lviewMsgs.qMsgByUserTo.pUserId = Settings.CurrentUser;
lviewMsgs.Refresh();
btnSendMsg_Click
//Only allow the user to proceed if there is a valid recepient
IF(comboToUser.GetSelection() == -1)
{
Form.MessageBox("Error", "No user selected!", MB_OK);
EXIT;
}
//Create a new record based on the controls in the form
//UserId is based off the application setting, set on log in
local.vNow = DateTime.Now();
local.vID = NumberGenerator.GetUniqueNumber();
local.vToUser = comboToUser.GetCurrentRowColumnValue("USER_ID");
Database.Reset();
Database.AddColumn("USER_ID", Settings.CurrentUser);
Database.AddColumn("MSG_ID", local.vID);
Database.AddColumn("MSG_USER_TO", local.vToUser);
Database.AddColumn("MSG_CREATED", local.vNow);
Database.AddColumn("MSG_SUBJECT", editToSubject);
Database.AddColumn("MSG_BODY", editToBody);
Database.AddColumn("MSG_READ", false);
Database.AddRecord("USER_MESSAGE");
Synchroniser.DisableAll();
Synchroniser.EnableSyncRule("SyncSendMessages", true);
Form.ShowSyncDialog(false);
btnReadMsg_Click
//Change the labels to reflect the Message record data
local.vTitle = lviewMsgs.GetCurrentRowColumnValue("MSG_SUBJECT");
local.vBody = lviewMsgs.GetCurrentRowColumnValue("MSG_BODY");
//Display subject and body of message in MessageBox
Form.MessageBox(local.vTitle, local.vBody, MB_OK);
//Update the MSG_READ field to denote read state, then save the listview
//As the listview is read only, this is the only way msgs can be marked as
//being read.
local.vRow = lviewMsgs.GetSelection();
lviewMsgs.SetColumnValue(local.vRow, "MSG_READ", true);
lviewMsgs.Save();
In order to have the listview display message data in the label controls correctly when clicked, define the following expression ‘lviewMsgs_SingleClick’:
//Populate the fields and enable the 'Read' button only if the selection
//is valid. Else display the alternate state to user.
IF(lviewMsgs.GetSelection() <> -1)
{
labelSubject = lviewMsgs.GetCurrentRowColumnValue("MSG_SUBJECT");
labelSenderDisp = lviewMsgs.GetCurrentRowColumnValue("USER_DISPLAY");
labelCreated = lviewMsgs.GetCurrentRowColumnValue("MSG_CREATED");
btnReadMsg.Enable();
}
ELSE
{
labelSubject = "No Message Selected";
labelSenderDisp = "--";
labelCreated = "--";
btnReadMsg.Disable();
}
Assign this expression to the listview’s ‘Action – Single Click’ property.
Finally, create an expression, eOnOpen, to query the local database for the current user, and then display the result on the form’s label. As the form will have opened via expression with no context, initialise the listview parameter to the logged in user, then call a refresh for the change to take effect.
//Display current user in form
qUserAuthById.pUserId = Settings.CurrentUser;
labelDisplay = qUserAuthById.USER_DISPLAY;
//As this form is opened from an expression, set the parameter
//explicitly, then refresh the listview
lviewMsgs.qMsgByUserTo.pUserId = Settings.CurrentUser;
lviewMsgs.Refresh();
When a listview, combo or form’s query parameter is changed, the control or form must be refreshed with the object method Refresh() in order to display the changes.
Create a new BrightServer project called DemoMessage.bep
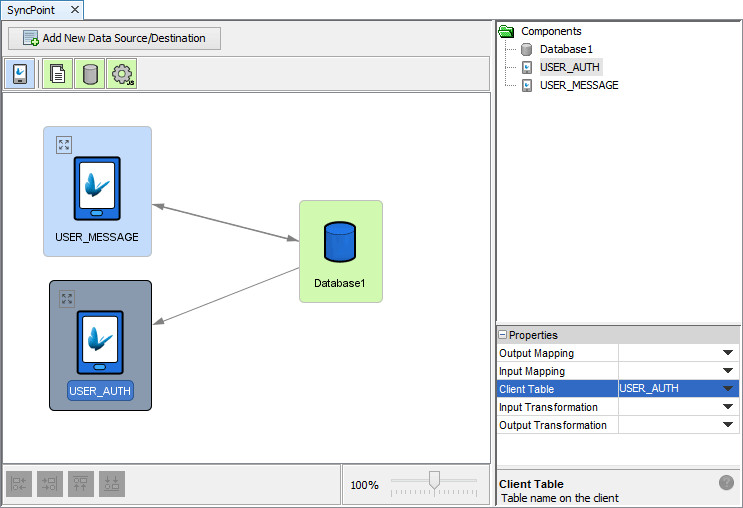
Create a new sync point, and copy/paste the USER_AUTH definition from the application into this new project.
Set the table as a data source in the Sync Points of the project, and specify it to download data by dragging and dropping a connection point from the database to the table.
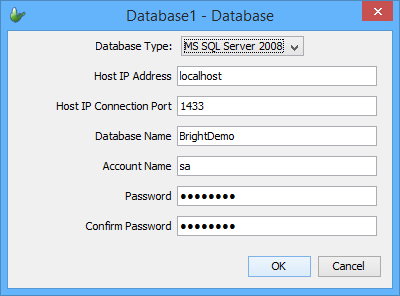
Double click the database data source and define the database BrightServer will communicate with.
Use the Projects > Create Tables feature to create the table to the database specified. Populate test data on the database server where necessary.
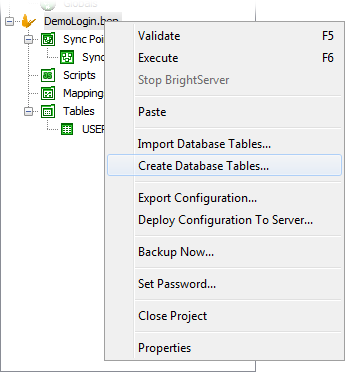
Execute the server by selecting its node in the Projects panel, and then pressing F6 or by clicking the ‘Execute’ button in the toolbar. The server will start on localhost, with its output displayed in the output window of BrightBuilder. Once the server has started, the application will be ready for testing via synchronisation.
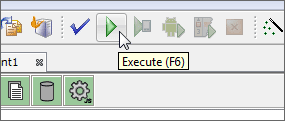
During development, the application may be executed on Windows Mobile/Android devices or Desktop via the execute option(s) in the taskbar.
They are as follows:
![]() Execute on BrightBuilder
machine (Windows)
Execute on BrightBuilder
machine (Windows)
![]() Execute
on Windows Mobile Device
Execute
on Windows Mobile Device
![]() Execute
on Android Device
Execute
on Android Device
BrightForms may be configured using the Settings dialog, accessed by the ‘Help > Settings’ option on Windows devices, or by tapping the Menu button and selecting ‘Settings’ option on Android devices.
Providing a valid login and server address, BrightForms will be able to synchronise with the server based on the server’s configuration. In the case of this demo application, the development machine’s IP address would need to be used, as the server was executed in BrightBuilder.
Users may be configured using the Servers panel of BrightBuilder, where users may be added, deleted and have applications released to them. In development, it is recommended to configure BrightForms’ settings to a user without an application assigned to them, as otherwise the application will download each time the application synchronises with the server.
After BrightForms’ users and settings are configured, test the application by having records on the server database’s USER_AUTH table, and ‘logging in’ to the demo application’s frmMain screen.

Once confirmed, test the messaging functionality of the application, creating messages with the ‘Send Message’ tab of the main form, and synchronising from the server using the ‘Get Messages’ button for different users.