This demo consists of two projects, one of which demonstrates projects run under BrightWeb, and the other which demonstrates how to synchronise record sets from the server to devices. The combination of the two procjects creates a simple end to end system which sends jobs to a client device from a back-end system also developed in BrightBuilder.
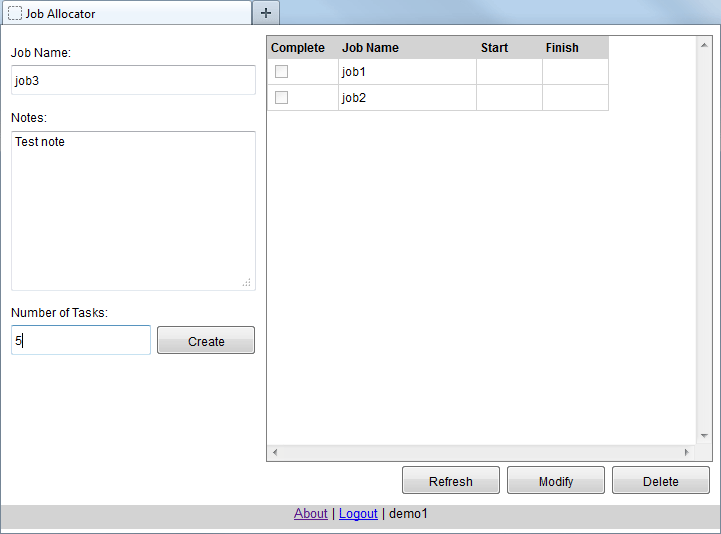
The first project is a Job Allocator and consists of a single form which is designed to run on BrightWeb that writes job headers and dummy tasks directly to the server’s database.
The second project is designed to run on BrightForms for Windows Mobile or Android, and downloads the jobs and generated job detail records created by the Job Allocator via the synchronisation engine. Here, the job headers’ outstanding and total task records are listed on one form, and the individual tasks may be opened and completed in a child form. The changed records’ state may then be synchronised to the server.

The design of these forms mainly centre around listview controls, and the various methods to used display, access and modify entries of these objects. The forms in this demo also demonstrate setting form parameters, and modifying server or local records via database operations.
Finally, it also describes the process of deploying applications to the server, releasing them to users, and accessing them via always connected web, or occasionally connected BrightForms means.
Create a new BrightXpress project for BrightForms named DemoJobAllocator.bsp.
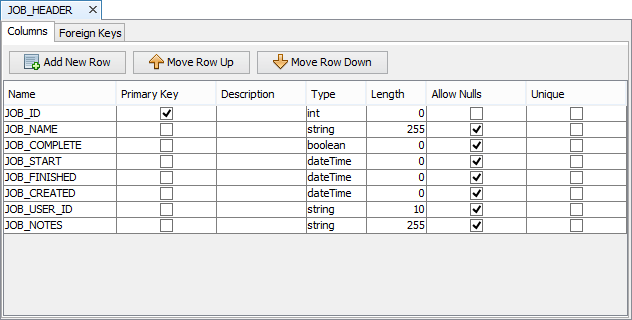
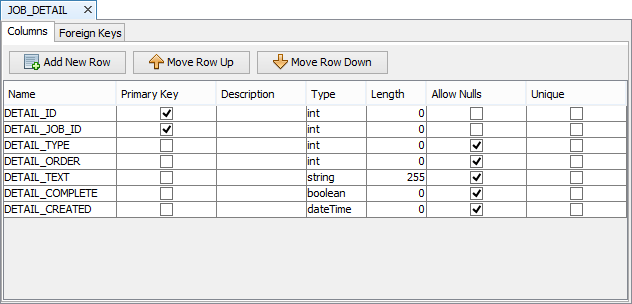
Data record definitions are defined in BrightBuilder through Tables. These tables form the basis of data operations within the project. Create the following two tables in the project, by right clicking the Tables node and selecting New Table. From here, define the following tables - JOB_HEADER and JOB_DETAIL, with the following definitions:
If tables are already defined on the server database, a project may import these table them via the ‘Import Database Tables …’ feature located in its context menu.
Create the following queries via the Query node to specify records from the tables above. These may be used to retrieve data, but also may be used to identify records for database operations.
qJobHeaders – this will be used in the listview to display all records in the Jobs table.
Tables: JOB_HEADER
Output Fields: All Fields (use the >> button)
qJobHeaderById – this will be used to delete a job with the database object.
• Tables: JOB_HEADER
• Condition: Parameterised condition JOB_HEADER. JOB_ID = pJobId
• Output Fields: All Fields (use the >> button)
qJobDetailByJobId – this will be used to delete detail records linked to a job.
Tables: JOB_DETAIL
Condition: Parameterised condition JOB_DETAIL.DETAIL_JOB_ID = pJobId
Output Fields: All Fields (use the >> button)
Create a new form – ‘frmMain’, and design it as follows:
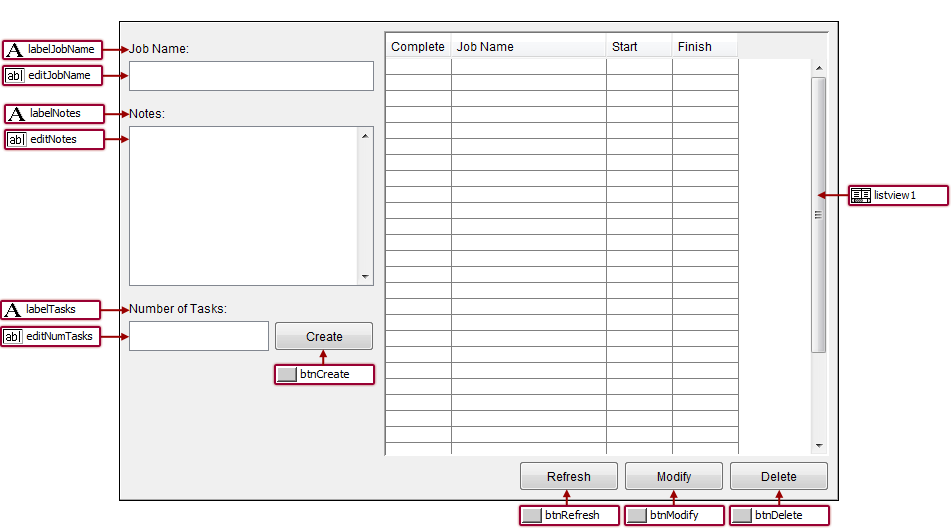
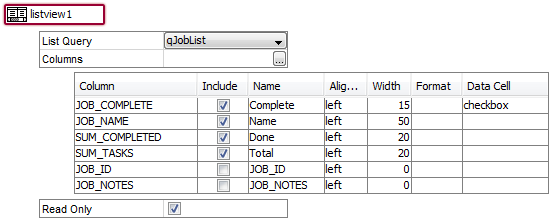
Set the listview’s Query Property as ‘qJobHeaders’, and define the columns as follows:
New Job Header and Detail records may be created via Expressions utilising the Database Object.
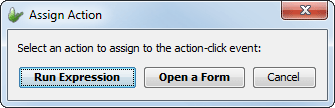
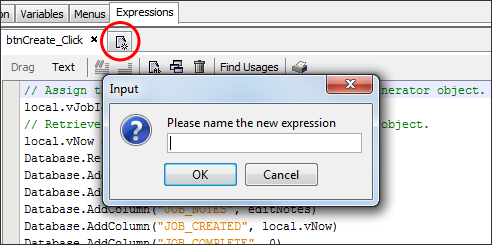
To create a new expression, double click the frmCreate control to open the ‘Assign Action’ dialog. From here, create an expression via the ‘Run Expression’ button, which will open the Expressions pane.
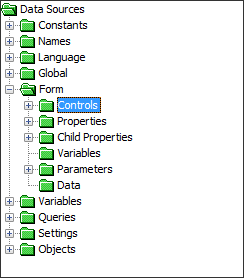
Define the expression, using the Data Source Tree (Drag Mode). Alternatively, open up the sample project and copy/paste the code for btnCreate_Click.
//Assign the record a unique ID using the NumberGenerator object.
local.vJobId = NumberGenerator.GetUniqueNumber();
//Retrieve the current date/time via the DateTime object.
local.vNow = DateTime.Now();
Database.Reset();
Database.AddColumn("JOB_ID", local.vJobId);
Database.AddColumn("JOB_NAME", editJobName);
Database.AddColumn("JOB_NOTES", editNotes);
Database.AddColumn("JOB_CREATED", local.vNow);
Database.AddColumn("JOB_COMPLETE", 0);
local.vResult = Database.AddRecord("JOB_HEADER");
//If the Add is successful, proceed to populate the number of tasks as specified
//by the edit control editNumTasks
IF(local.vResult == 0)
{
local.vInt = 0;
WHILE(local.vInt < editNumTasks)
{
Database.Reset();
Database.AddColumn("DETAIL_ID", local.vInt);
Database.AddColumn("DETAIL_JOB_ID", local.vJobId);
Database.AddColumn("DETAIL_ORDER", local.vInt);
local.vStr = "Job task#" & String.FormatNumber(local.vInt, 2, 0, true);
Database.AddColumn("DETAIL_TEXT", local.vStr);
Database.AddColumn("DETAIL_COMPLETE", 0);
Database.AddColumn("DETAIL_CREATED", local.vNow);
Database.AddRecord("JOB_DETAIL");
local.vInt = local.vInt + 1;
}
}
//Refresh the listview at the end of the expression to reflect any changes made
listview1.Refresh();
Use the expression editor to create another expression to retrieve the selected row’s details for modification.
Call this ‘eOnSglClick’ and have it assigned to the listview’s ‘Action – Single Click’ property. Define it as follows:
//Populate user input fields with data of the selected record.
editNotes = listview1.GetCurrentRowColumnValue("JOB_NOTES");
editJobName = listview1.GetCurrentRowColumnValue("JOB_NAME");
This is achieved via the listview control and the GetCurrentRowColumnValue() object method, which can retrieve any column which is returned by the listview’s query for the selected row. This is one of many listview object methods which may be used to retrieve or manipulate data for any application.
Double click the btnModify control to create an expression to modify a selected record when clicked. Use the drag and drop editor, or text mode to define the following code:
//Retrieve the currently selected record's ID
local.vJobId = listview1.GetCurrentRowColumnValue("JOB_ID");
//Set the query parameter
Database.Reset();
Database.SetQueryParam("pJobId", local.vJobId);
Database.AddColumn("JOB_NOTES", editNotes);
Database.AddColumn("JOB_NAME", editJobName);
Database.UpdateRecords("qJobHeaderById");
listview1.Refresh();
This retrieves the ID of the currently selected record, similar to the previous step. It then proceeds to use this ID in conjunction with the Database Object to modify the records returned by query used for UpdateRecords() for the parameter set by SetQueryParam().
These methods affect all records returned by the assigned query. However, as qJobHeaderById’s parameter is the primary key, only one record will be affected.
Finally, double click the btnDelete control to create a new expression to remove the currently selected record in the listview. This will delete the Job Header record, and all the associated Job Detail records using the qJobHeaderById and qJobDetailByJobId queries.
//Retrieve the currently selected record's ID
local.vJobId = listview1.GetCurrentRowColumnValue("JOB_ID");
//Delete any header records whose ID matches the selected value
Database.Reset();
Database.SetQueryParam("pJobId", local.vJobId);
Database.DeleteRecords("qJobHeaderById");
//Delete any detail records whose JOB_ID field matches the selected value
Database.Reset();
Database.SetQueryParam("pJobId", local.vJobId);
Database.DeleteRecords("qJobDetailByJobId");
//initialise input controls
editJobName = "";
editNotes = "";
editNumTasks = ""; //Refresh listview, reflecting the change
listview1.Refresh();
Similar to the UpdateRecords() method, the DeleteRecords() will delete all records of the query specified for the parameter set by SetQueryParam().
On occasionally connected devices with a local database, these deleted records will be removed from the server on synchronisation. If this is not desired, the DeleteRecordsLocally() method will only delete the records on the local database.
Please note that as the project is running in BrightWeb, both methods will remove the records on the server, as the server’s database is the web applications local database.
Create a new BrightXpress project for BrightForms named DemoJobReader.bsp.
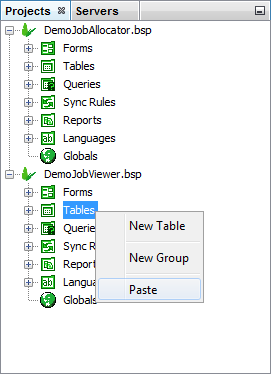
The reader is designed to read the same data types as DemoJobAllocator.bsp. Therefore, copy the JOB_HEADER and JOB_DETAIL tables from the project DemoJobAllocator.bsp by selecting both elements in the project tree, then selecting ‘Copy’ from their context menu.
These tables may then be pasted by right clicking the Table node and selecting ‘Paste’.

The queries used in the previous project were both standard queries, which are able to process most, if not all application requirements. However, BrightBuilder also offers alternate means to specify the record set, such as Advanced SQL queries. These may be defined by changing the ‘Type’ property of an SQL query to ‘Advanced SQL’. This will change the Query editor to an SQL Editor.
For this project, create an Advanced SQL query called qJobList, for use on the main form which displays tallies using multiple column functions combined with a join:
SELECT T1.JOB_COMPLETE, T1.JOB_ID, T1.JOB_NAME,
SUM(T2.DETAIL_COMPLETE) AS SUM_COMPLETED,
COUNT(T2.DETAIL_ID) AS SUM_TASKS, T1.JOB_NOTES
FROM JOB_HEADER T1, JOB_DETAIL T2
WHERE T1.JOB_ID = T2.DETAIL_JOB_ID
GROUP BY T1.JOB_ID, T1.JOB_NAME
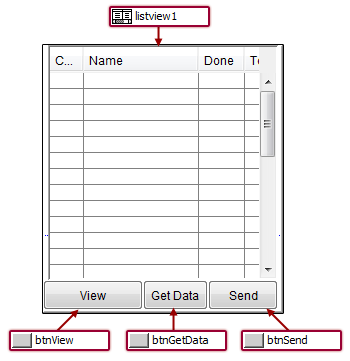
Create the first form – ‘frmJobList’. This will display Job headers for the users, with the Advanced SQL defined in the above step in a listview. It will also contain three buttons which will be used to display and synchronise job records from the device to the server.
Use the diagram below to position and configure the controls of the form, particularly the listview, with a few properties such as Query and Columns, which need to be tweaked.
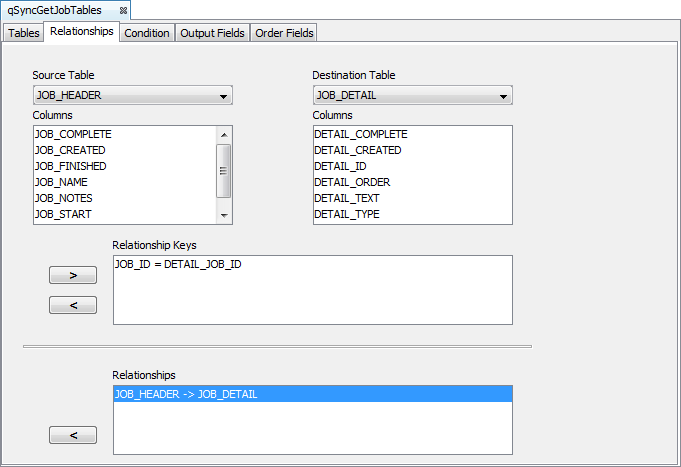
Create a new Query called ‘qSyncGetJobTables’. This will be used to retrieve all JOB_HEADER records on the server, and any matching JOB_DETAIL records when used with a sync rule. This may be defined via a standard query as follows:
qSyncGetJobTables
Tables: JOB_HEADER (parent), JOB_DETAIL (child)
Relationships: JOB_ID = DETAIL_JOB_ID

When a query is specified as a ‘Server to Client’ sync rule, it will be sent to the server and run on its tables. The returned records are then loaded into the local database, and may then be queried, added to, modified or deleted accordingly.
Link this created query to a new Sync Rule called ‘syncGetJobs’. Specify the sync rule direction to be server to client.
As the linked query contains Parent and Child table(s), the synchronisation will result in records from both tables being synchronised to the device, based on the query’s Relationship.
Proceed to define the query for sending records from the device to the server. Repeat the previous two steps, only calling the query ‘qSyncSendJobTables’, and having the rule linked with a sync rule ‘syncSendJobs’, directed from client to server.
Sync rules are enabled and/or executed via Expressions utilising Synchroniser object methods. To have the frmGetData button perform a synchronisation, double clicking the button, and select to create a new expression. The expression ‘btnGetData_Click’ will be created, and link to the ‘Action – Click’ property. Define the expression as follows:
Synchroniser.DisableAll();
Synchroniser.EnableSyncRule("syncGetJobs", true);
Form.ShowSyncDialog(false);
listview1.Refresh();
This will disable any outstanding sync rules with the DisableAll() method, activate the syncGetJobs rule to run on the next sync, and perform the sync via the ShowSyncDialog() method, giving feedback to the user via a Sync Dialog. The listview.Refresh() method will then be called, re-querying the database to display the record state post-synchronisation.
Any enabled sync rules will run when the Form.ShowSyncDialog() method is called. In this case, only one – ‘syncGetJobs’ will be executed.
Continue creating a similar Expression the btnSend button control, creating ‘btnSend_Click’. Define it as the expression above, however, have the EnableSyncRule() method enable ‘syncSendJobs’ instead.
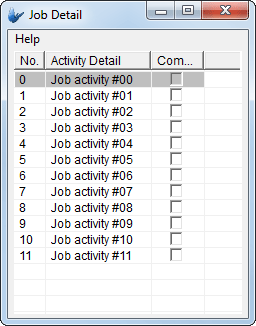
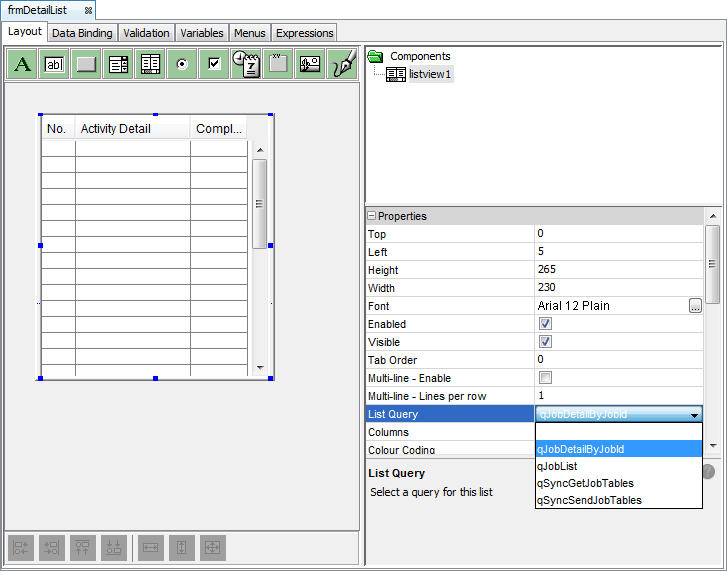
Create a new Form named ‘frmDetailList’. Drag and drop a new listview control to this form which will be used to display the job detail records.
As with previous listviews, the ‘List Query’ defines what records are displayed in the listview at run time. Create a new query – ‘qJobDetailByJobId’, which will return a set of detail records based on a JOB_ID and assign it to this listview.
qJobDetailByJobId
Tables: JOB_DETAIL
Condition: Parameterised condition JOB_DETAIL.DETAIL_JOB_ID = pJobId
Output Fields: Fields DETAIL_ID, DETAIL_JOB_ID, DETAIL_ORDER, DETAIL_TEXT and DETAIL_COMPLETE
Order Fields: DETAIL_ORDER (asc)
Configure the columns through the listview’s properties as below, and set the ‘Data Grid –Auto Save’ property to ‘true’.
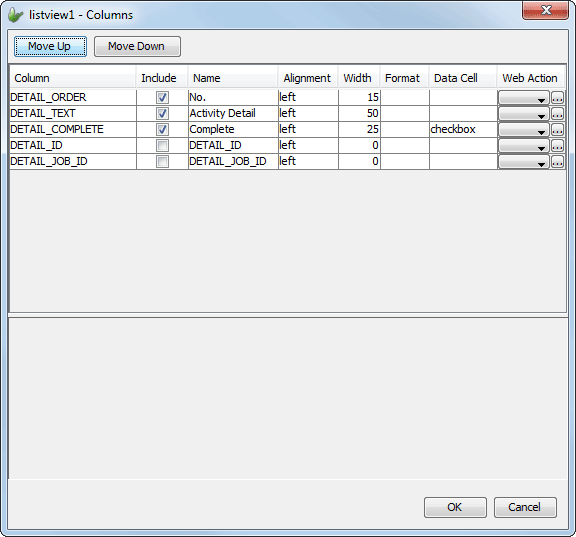

Having the ‘checkbox’ property for the data cell will allow the user to modify the columns where necessary. The ‘Data Grid –Auto Save’ property being set to true will also save this change locally as soon as it is made. If this property is not utilised, data grid records may be manually saved via the listview.Save() method in expressions.
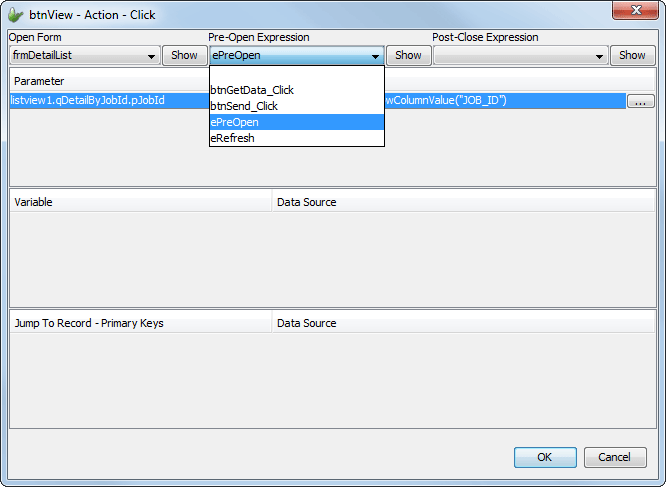
Return to the ‘frmJobList’ form. From here, assign the btnView button control by double clicking and selecting the ‘Open a Form’ from ‘Assign Action’ dialog.
This will open the Form Open dialog, which allows the opening of forms with Parameters set on initialisation. Configure this dialog to have the button open the ‘frmDetailList’ form.
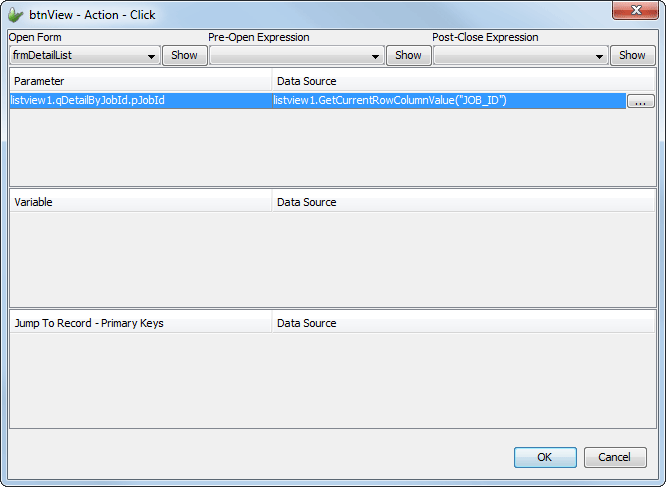
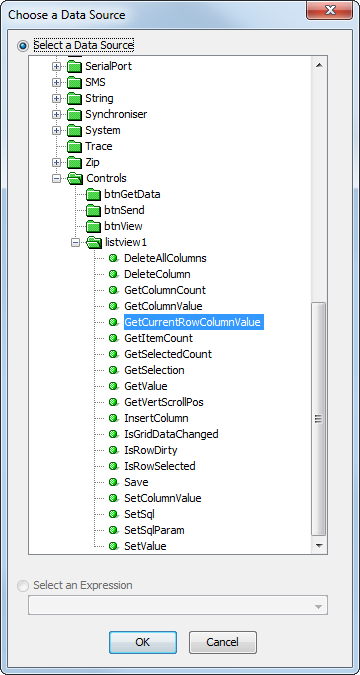
Specify the open expression populate the frmDetailList’s listview
parameter as listview.GetCurrentRowColumnValue(“JOB_ID”)’ by tapping
on the ellipsis button ( ![]() ) and
selecting this method using the Data Source Tree.
) and
selecting this method using the Data Source Tree.
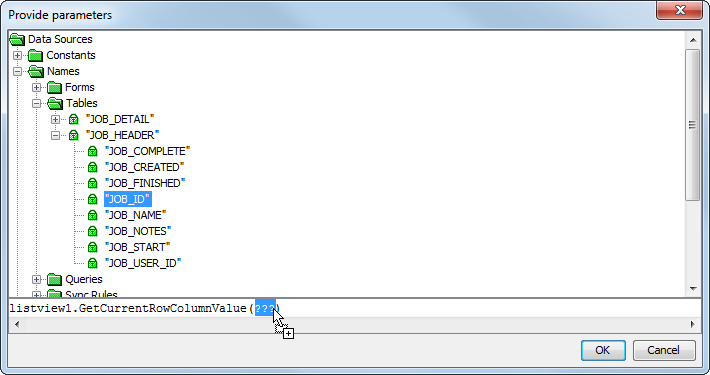
In setting this value, the child form’s listview parameter will be initialised as the form opens.
If the form is opened via an expression using the Form.OpenChildForm() object method, the child form will open with no parameter assigned in this instance. In this instance, the child form would need to contain an ‘Action – On Open’ expression, setting this parameter and refreshing the listview.
As the currently selected row is being used, the end user should be prevented from opening the child form without having a row selected. Proceed to implement this via the expressions tab, creating a new expression called ‘ePreOpen’. This will alter the Form.CancelOpen form property, and cancel the opening if the condition is met.
Additional prompts may be defined at this point too, in the expression below, a message box will pop up and display the record’s notes, retrieved from the listview.
//Check if there is a row selected
IF(listview1.GetSelection() == -1)
{
//If not, prompt the user for a selection, and cancel open
Form.MessageBox("View", "Please select a row", MB_OK);
Form.CancelOpen = true;
}
ELSE
{
//If so, display the notes associated with the record
local.vNotes = listview1.GetCurrentRowColumnValue("JOB_NOTES");
IF(local.vNotes <> NULL AND local.vNotes <> "")
{
Form.MessageBox("Job note", local.vNotes, MB_OK);
}
}
Continue to link this new expression to the ‘Pre-Open Expression’ field to the form open dialog created in the previous step. This will have the expression run immediately when the ‘btnView’ control is tapped.
listview1.Refresh();
The server definition of the project is defined by the bep file, which may be used to map client tables to server side tables, or numerous other data sources. In this demo application, a simple server which sends and gets data to BrightForms and BrightWeb devices will be explored.
Firstly, create a new BrightServer project named DemoJob.bep.
Copy and paste the JOB_HEADER and JOB_DETAIL tables created in the previous step(s) into the bep’s project tree.
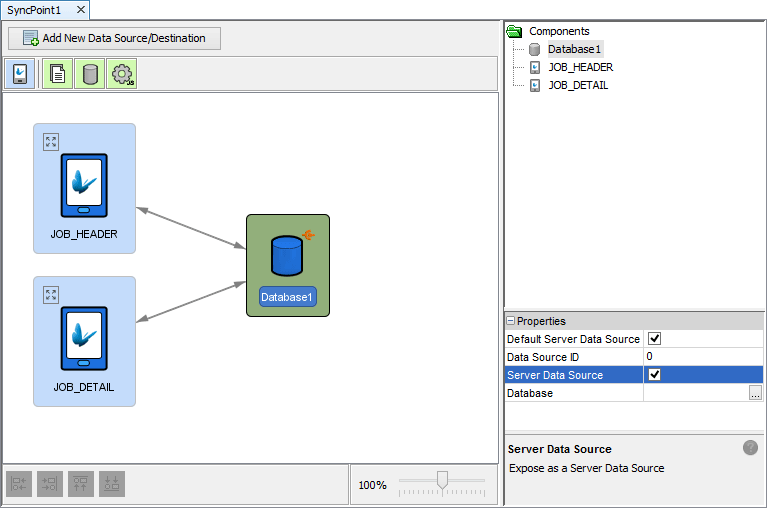
Create a new sync point, and drag and drop the database data source.
Drag and drop two ‘Client Table’ data sources, and assign them via their ‘Client Table’ properties to the JOB_HEADER and JOB_DETAIL tables.
Drag and drop an edge of the table sources to the edge of the database. This will create a line connecting the two together, allowing Client -> Server synchronisation to occur for the table. Proceed to connect both tables to the database data source in both directions.
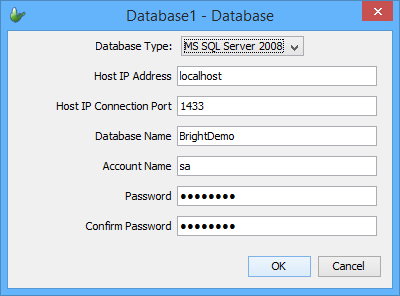
Double click the database data source and define the database which BrightServer will communicate with when sending data.
Set server as a ‘Server Data Source’ via its properties. This will allow web applications such as DemoAllocator.bsp to write and run data directly off the server without the synchronisation process being utilised.
The sync point panel should look similar to below:
Use the Projects > Create Tables property to create the table to the database specified. The project is now ready for testing on the server, via Web and Standard Devices.
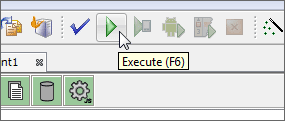
Execute the server by selecting its node in the Projects panel, and then pressing F6 or by clicking the ‘Execute’ button in the toolbar.
Server configurations may also be deployed to remote servers by the ‘Deploy Configuration to Server …’ option in the BEP project’s context menu. For this demo, we will run the server locally on the development machine.
The server will start on localhost, with its output displayed in the output window of BrightBuilder. Once the server has started, the applications will be ready for deployment onto the server.
Deploy both the DemoJobAllocator and the DemoJobReader applications to the server by right clicking on their nodes and selecting ‘Deploy Application to Server’.
Select and configure the connection to the local server if necessary, and follow the prompts to log in and deploy the application.

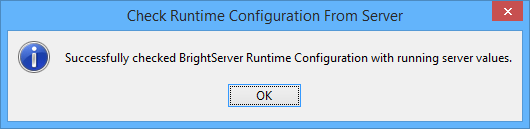
On success, BrightBuilder will verify the deployment and version as follows.

Once deployed, the application may then be released to users, which is done via the Configuration - Users panel.
Locate the Users node under the server configuration. Right click and open, or double click this node.

A message will display prompting a download from the server. Click the 'Download ...' option to proceed, entering server login details where necessary.
If successful, a dialog will appear confirming the download. Continue by clicking the OK button.
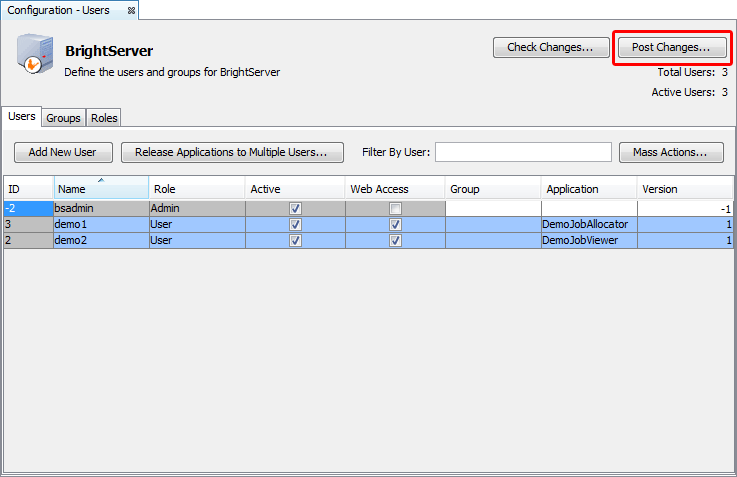
The Users panel will display to users of BrightServer. Right click within the table and select 'Add New User'.
In this screen, users may be also added, deleted or modified via the context menus. The changes take effect after the configuration is validated, initiated when the 'Upload Changes' button is clicked.
A new user will appear in the table. Locate the Web Access column in the table, and ensure it is selected to enable BrightWeb usage.
Double click the Application and Version fields in the table for the user, and enter in the values displayed after deployment confirmation for each project. The user panel will look similar to below:

Click the 'Post Changes ...' button to preview the configuration changes made.
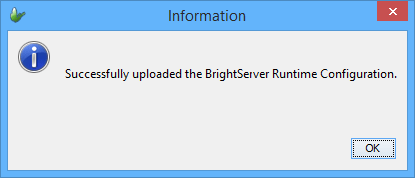
Click the Proceed button when prompted with the preview dialog. This will validate the configuration changes, and if successful, will proceed to upload the configuration to the server, and display a message indicating success.
Note: If new users are to be added for web access and there are insufficient licenses on the server, the previous users’ Web licenses must be retired. Similarly, if a different device is to use BrightForms, previous device licenses must be retired. This operation may be done via the Licensed Web Users and Licensed Devices nodes respectively. Please be aware of this as there is a single web and device license available in BrightServer’s Demo mode.
The server may now be accessed via the BrightServer URL, which is located at the URL of its address, followed by the path './brightserver/web'. For example, the BrightWeb portal of a server running on the IP address 127.0.0.1, on port 8080 would be: http://127.0.0.1:8080/brightserver/web/. If an external device is being used, the machine’s IP address must be used, with the device able to connect via the network.
After logging in with the user credentials for the DemoJobAllocator application, it will load via BrightWeb in browser. Proceed to populate the jobs table with tasks; checking the SQL server such as with SQL Server Management Studio, these changes may be observed in real time.
Startup BrightForms on the device. Configure the location of BrightServer with BrightForms’ Help > Settings dialog (Windows Desktop/Mobile) or by tapping the Menu button and selecting ‘Settings’ (Android). Configure the Users panel to include the user which the ‘DemoJobReader’ application was deployed to. In the servers tab, enter the IP address and the port the server is running on.
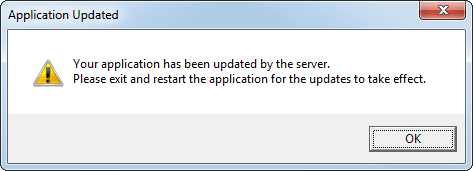
Once configured, tap Synchronise to download the application from the server. BrightForms will notify on successful application retrieval, prompting a restart.
On restart, the frmJobList form will open, as designed in BrightBuilder. Tapping ‘Get Data’ will download the records from the server onto the device.
You now have a simple, yet completely end to end system sending jobs from a back-end server to mobile devices.