The Demo Expense project is an expenses record system. With this application you can record new expenses and send them to a server database.
This tutorial will show you how to use data binding to save records, create synchronisation rules and create expressions in a fully functional application.
This document assumes that the user knows how to create tables, forms and queries. For further help regarding these BrigthBuilder concepts, please refer to their chapters in the User Manual, or Tutorials exploring these features.
Create a new project and name it DemoExpense.
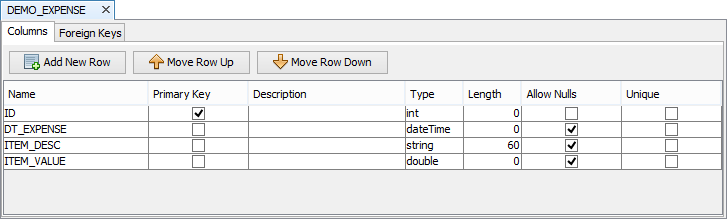
Create the following table with the specifications shown:
DEMO_EXPENSE – Table of expenses in the server database.
Create a query called qAllExpenses that will return all expense records, with the following specifications:
Parent Table: DEMO_EXPENSE
Output Fields: All
Order By: ID (ascending)
Create a query called qExpensesByDate that will return expense records which contains the pDate parameter, with the following specifications:
Parent Table: DEMO_EXPENSE
Condition: Parameter – pDate, (DEMO_EXPENSE.DT_EXPENSE = ?)
Output Fields: All
Order By: ID (ascending)
Create a query called qExpensesTotalByDate that will return the sum of all expenses on a date, with the following specifications:
Parent Table: DEMO_EXPENSE.
Condition: Parameter – pDate, (DEMO_EXPENSE.DT_EXPENSE = ?)
Output Fields: Sum of the ITEM_VALUE column, column alias - DAILY_TOTAL, (sum(DEMO_EXPENSE.ITEM_VALUE)(DAILY_TOTAL))
Note: To do this, go to Output Fields, select ITEM_VALUE and click on Sum, and press the > button with the ITEM_VALUE highlighted. You will be prompted to enter name for this summation, and enter DAILY_TOTAL then press enter.
Next we need to create a form to accept new expense entries. Create a form called Item with the following components:
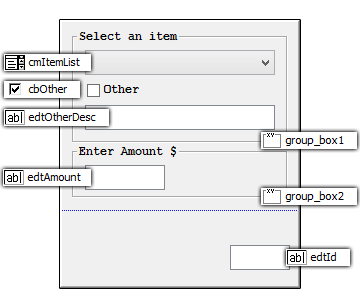
In the Item Form, change the tab order of comboItemList to 1, cbOther to 2, efOtherDesc to 3, efAmount to 4.
Create a validation rule in Item Form to match the following:
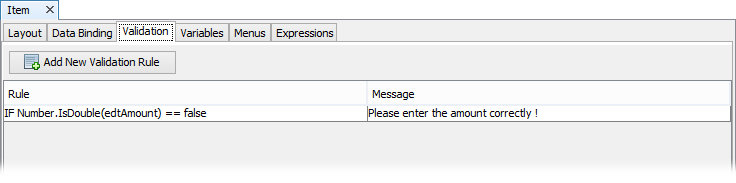
Note: Validation rules get checked right before saving a record.
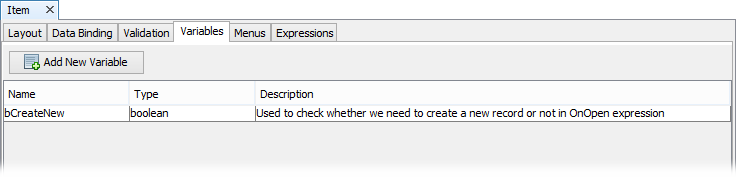
Create a new variable in Item Form to match the following:
Create another form called Main with the following components:
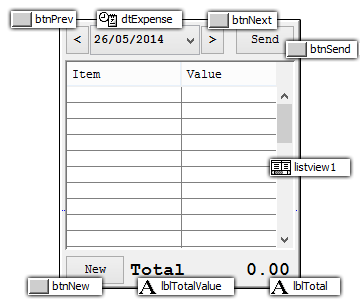
Note: the “Total” and “0.00” are two different labels. The “0.00” is called staticTotal.
Change the tab order of btnPrev to 1, dtExpense to 2, btnNext to 3, btnSend to 4, and btnNewbutton to 5.
Create a new Variable in the Main form called dtTemp of type Date/Time.
To display expenses that occur on a specific day, assign the qExpensesByDate query to the List query of the lvExpenses in the Main Form. In the columns property for lvExpenses, only include ITEM_DESC and ITEM_VALUE, renaming their column names to “Item” and “Value” respectively. Set both their columns widths to 50.
Expense records must be sent to the server. Create a new Sync Rule SyncSendExpenses with the following settings:
Direction - Client to Server
Query - qAllExpenses
In the Main form, create the following expressions:
Refresh
//Refresh List View
dtTemp = DateTime.ResetTime(dtExpense)
lvExpenses.qExpensesByDate.pDate = dtTemp
lvExpenses.Refresh()
// Refresh Total
qExpenseTotalByDate.pDate = DateTime.ResetTime(dtExpense)
// We may not have any expense given the day!
IF qExpenseTotalByDate.DAILY_TOTAL == NULL
{
staticTotal = "$0.00"
}
ELSE
{
staticTotal = "$" & qExpenseTotalByDate.DAILY_TOTAL
}
OnNext
// Subtract a day in seconds (24*60*60 = 86400)
dtExpense = dtExpense - 86400
CALL Refresh
OnPrev
// Subtract a day in seconds (24*60*60 = 86400)
dtExpense = dtExpense - 86400
CALL Refresh
Synchronise
Synchroniser.DisableAll()
Synchroniser.EnableSyncRule("SyncSendExpenses", true)
Form.ShowSyncDialog(false)
CALL Refresh
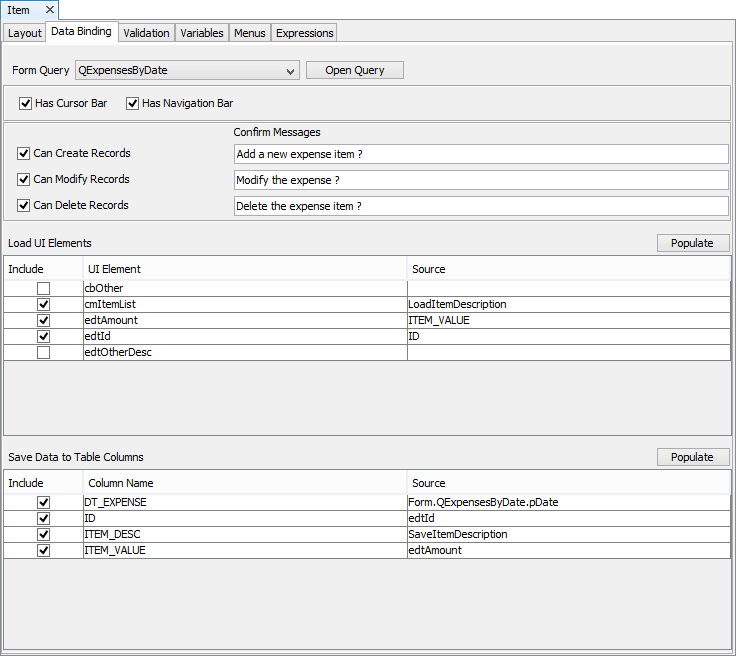
In the Data Binding tab of the Item form set the Form Query to qExpensesByDate.
In the Item form create a new variable bCreateNew of type Boolean.
In the Item Form create the following expressions:
LoadItemDescription
comboItemList = ITEM_DESC
IF comboItemList.GetSelection() < 0
{
cbOther = true
efOtherDesc = ITEM_DESC
comboItemList.Disable()
efOtherDesc.Enable()
efOtherDesc.SetFocus()
}
ELSE
{
cbOther = false
efOtherDesc.Disable()
comboItemList.Enable()
comboItemList.SetFocus()
}
OnNew
comboItemList.Enable()
comboItemList = ""
efAmount = 0.0
efOtherDesc = ""
cbOther = false
efOtherDesc.Disable()
efId = NumberGenerator.GetUniqueNumber()
OnOpen
IF bCreateNew == true
{
Form.New()
}
OnOther
IF cbOther == true
{
efOtherDesc.Enable()
comboItemList.Disable()
}
ELSE
{
efOtherDesc.Disable()
comboItemList.Enable()
}
SaveItemDescription
IF cbOther == true
{
ITEM_DESC = efOtherDesc
}
ELSE
{
ITEM_DESC = comboItemList
}
In the Data Binding tab of the Item form, set the following:
Go to the Item Form and do the following:
· Assign OnNew expression to Action-New property
· Assign OnOpen expression to Action-Open property
· Assign OnOther expression to Action-Click property of check box cbOther.
Go to the Main Form and assign the following expressions accordingly:
Assign OnPrev expression to Action-Click property of btnPrev
Assign OnNext expression to Action-Click property of btnNext
Assign Refresh expression to Action-Open property of Form and Action - DateTime Change of dtExpense
Assign Synchronize expression to Action-Click property of Send button
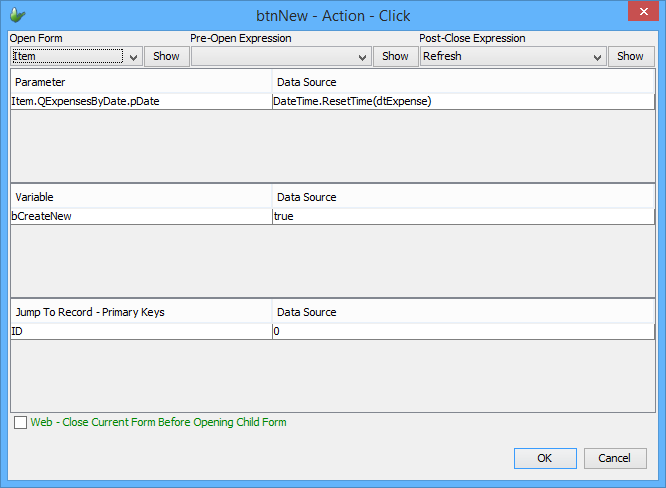
On Action-Click property of btNew, click the “…” button, and modify then properties to the following:
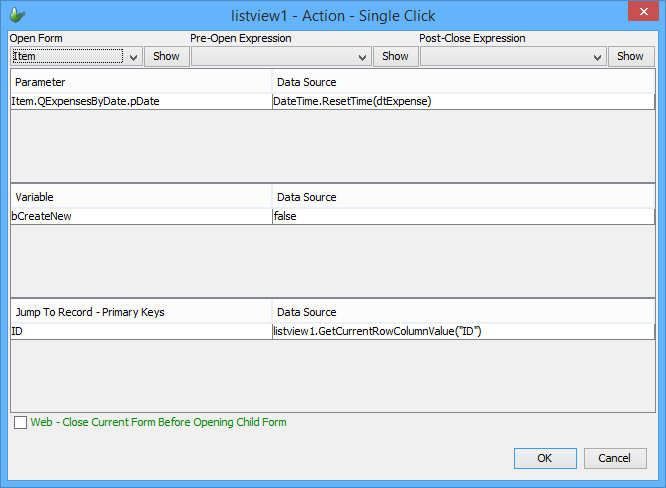
Similarly, assign the Single Click property of the listview1 to the following:
Set Main to be the main form of the DemoExpense project.
Execute the project form BrightBuilder.
In the Travel Expense Form, select a desired date and click New.
Select an item or check the “Other” check box to enter details of the expense. Enter the amount of the expense. Click on the save icon at the bottom. Exit the child form. The record will appear in the listview once the Item screen is closed.
To send the local table records to the server click Send while configured to a BrightServer instance.