The Customer Viewer demo is a simple application which may be used to retrieve customer details from a server database for viewing on mobile devices. There is also a search functionality that will allow you to filter the customer data by their names.
This tutorial will show you how to use data binding, create synchronisation rules and create expressions. It will also show you how to connect to BrightServer to download data from a file data source.
You know how to create tables, forms and queries.
BrightForms project for DemoCustomer has already been created.
A BrightServer instance has been installed and started.
BrightForms has already been installed.
Let’s start by running BrightBuilder.
Create a new project and name it DemoCustomer.
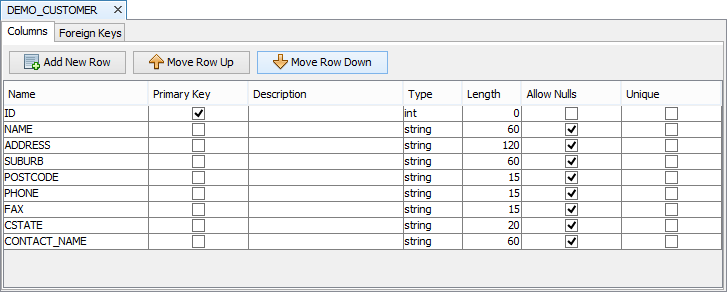
Create a new table and rename to DEMO_CUSTOMER.
Construct the table definition as follows:
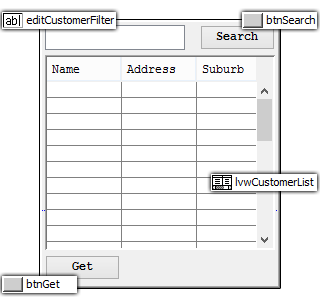
Create the first form and rename to FormCustomerList. This screen will display a list of all customers in the DEMO_CUSTOMER table. The form layout will look like the image below. Rename the form controls as shown.
The listview control requires a list query to display data. So create a new query and rename to qCustomerFilter with the following specifications:
Parent Table: DEMO_CUSTOMER
Condition: Parameter – pCustName, (DEMO_CUSTOMER.Name like ?)
Output Fields: All
Order By: NAME
Modify lvwCustomerList properties as follows:
List Query – Select qCustomerFilter from the drop down list.
Columns –
Include NAME, ADDRESS and SUBURB field.
Rename the Column Header as Name, Address and Suburb respectively.
Change the widths for each field to 33.
Modify editCustomerFilter properties as follows:
Tab Order = 1
Modify btnSearch properties as follows:
Caption = Search
Default Button = true or ticked.
Font = Courier New 12 Bold
Tab Order = 2
Modify btnGet properties as follows:
Caption = Get
Font = Courier New 12 Bold
Tab Order = 3
Create the Search expression. From the form layout, double-click on btnSearch. This will create an expression btnSearch_Click and link this expression to the Action – Click of btnSearch.
Create btnSearch_Click with the following expression statements:
// TO DO – Implement expression…
lvwCustomerList.qCustomerFilter.pCustName = “%” & editCustomerFilter & “%”
lvwCustomerList.Refresh()
Modify FormCustomerList properties:
Action – Open – Select btnSearch_Click. This will ensure that the listview will be refreshed when the form is opened.
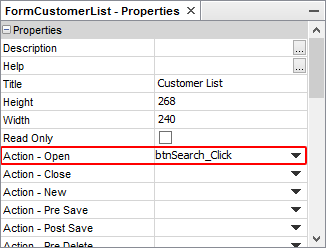
Title = Customer List
Create a new query and rename to qAllCustomers and simply select DEMO_CUSTOMER as the Parent Table. This query will be used for the sync-rule and only needs to define the synchronisable table.
Create a new sync-rule and rename to SyncGetCustomers with the following specifications:
Direction Tab > select Server to Client.
Query Tab > select qAllCustomers from the drop down list.
Go back to FormCustomerList Layout tab and double-click btnGet to automatically create the expression btnGet_Click and attach this to the Action-Click property.
Create the btnGet_Click expression with the following statements:
// TO DO – Implement expression…
Synchroniser.DisableAll()
Synchroniser.EnableSyncRule("SyncGetCustomers", true)
Form.ShowSyncDialog(false)
lvwCustomerList.Refresh()
Modify the DemoCustomer.bsp property:
Main Form – select FormCustomerList
At this point, you can test the application
by selecting the project name DemoCustomer.bsp and click on Execute
button ![]() or pressing F6.
or pressing F6.
Create a new form and rename to FormCustomerDetails. The form layout is shown below. Rename the form controls as shown.
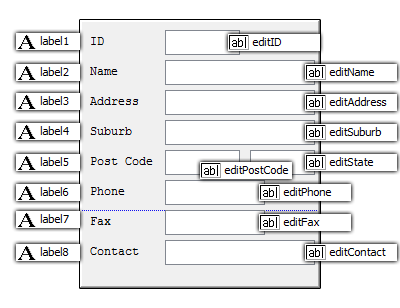
Modify the Caption property for the each label as follows:
label1 – ID
label2 – Name
label3 – Address
label4 – Suburb
label5 – Post Code
label6 – Phone
label7 – Fax
label7 – Contact
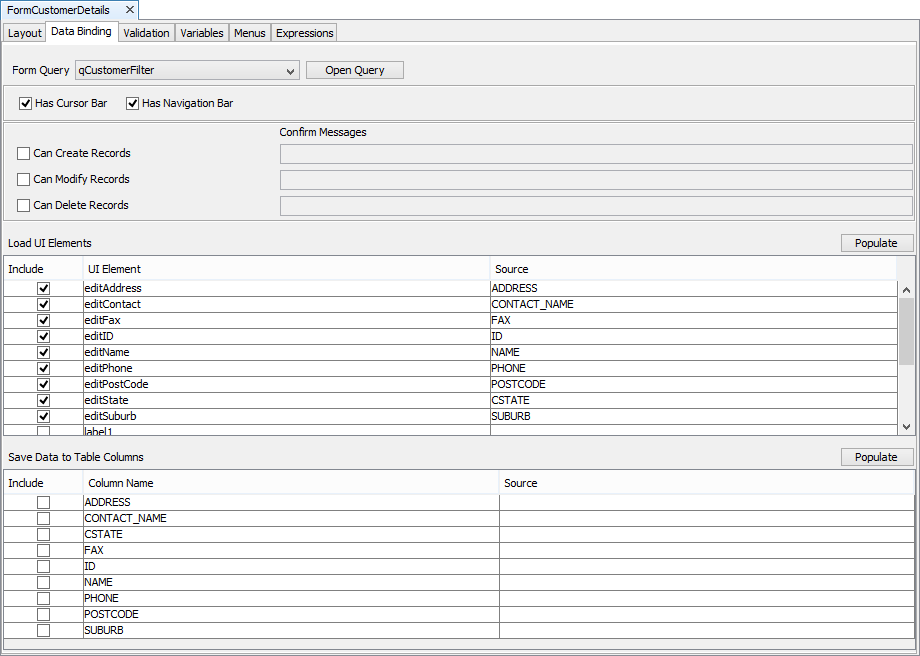
Go to the Data Binding tab of FormCustomerDetails,
Select qCustomerFilter from the Form Query drop down list
Tick Has Cursor Bar
Tick Has Navigation Bar
Load the UI Elements based on Data Sources>Form>Data as shown below:
Now let’s link two forms. Go to FormCustomerList Expression tab.
Create a new expression and rename to exprPO_CustomerDetails.
Create the expression exprPO_CustomerDetails with the following statements:
IF lvwCustomerList.GetSelection() < 0
{
Form.MessageBox("No selection", "Please select a customer !", MB_OK)
Form.CancelOpen = true
}
ELSE
{
Form.CancelOpen = false
}
Go to Layout tab and click custom editor button for Action-Double Click property of lvwCustomerList.

The Form-Open dialog will display, edit this dialog as shown below.

Now you have completed the application development, you can now test the screen flow and the synchronisation. Make sure that DemoCustomer.bep is running so that you can have records to download from the server.