How to Capture Barcodes
Contents Hide
Description
This tutorial details how barcodes are used the Business Application Designer application for both the Edit Dialog and List Dialog screens.
Edit Dialog 
The Edit Dialog is designed to show or capture user data on the device. This is achieved by using Fields in the Edit Dialog, which may be configured for display purposes, calculations and/or have their value saved to/loaded from the database. As with other dialogs, it is created by dragging and dropping the Edit Dialog icon onto the application canvas of the Applications node in the BXP project.
The 'Barcode' field is used to display, save or load signature data on devices within the Edit Dialog. Tapping the 'New Field' button, and specifying the 'Barcode' type in from the drop box in the opening dialog will add a new barcode capture field to the layout and component panels, where they may be further re-arranged and edited.

The field appearing in the layout will consist of a label, image control and button with barcode image. These controls may be resized, rearranged and/or set to be hidden to the user, if required.
When running on the device, tapping the barcode button will initiate a scan on the device. This will attempt to open the barcode scanner on the device, which may involve a new screen being opened utilising the camera for scanning. On other devices, the scan may trigger the hardware scanner to activate. Completing and confirming the scan will proceed to load the value in the edit control component.
List Dialog 
A list dialog displays a set of records which are on the device in a table. The table columns to be shown may be adjusted to hide/show only relevant columns to the user. Records may be selected from this list when the application is running to establish the form context for child forms.
The records in a listview may be searchable using the 'Include Search' checkbox in the editor. This will include a text entry field and a 'Search' button at the top of the form.
When the application runs, entering a value in this text field and tapping the 'Search' button will filter records based on matches to the text entry for the specified 'Search Column' of the list, allowing the user to narrow down search results via the search criteria.
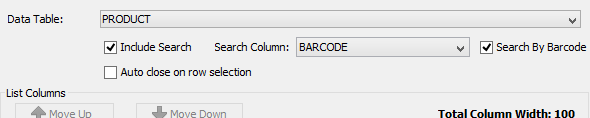
An additional 'Search By Barcode' option in the List Dialog editor may also be activated, which will replace the Search' button with a 'Scan' button on the form. When this is tapped in the application, it will initiate a barcode scan (either by camera or dedicated hardware) instead of string lookup on the search column. This will load the scanned value into the control, and filter only matching records for the barcode.
Exercise
Initially, the project has a PRODUCT table, along with a List Dialog and an Edit Dialog which are assigned to use this table definition. The edit dialog uses default types for its fields.
Modify the project to enable searching via barcode in the List Dialog form, based on the BARCODE column of the PRODUCT table. In the Edit Dialog form, change the BARCODE field's type to the 'Barcode'.
When completed, publish the application to a BrightServer Instance. After publishing, retrieve the application, then add records on the device using the List Dialog's add button, assigning barcodes using the new field type in the Edit Dialog screen. Returning back to the List Dialog, scan a barcode and observe the records being filtered accordingly.
A sample solution with completed List and Edit Dialogs is provided with the BxpBarcodeFinished.bxp file.